
HOW TO ACCESS THE PLESK PANEL
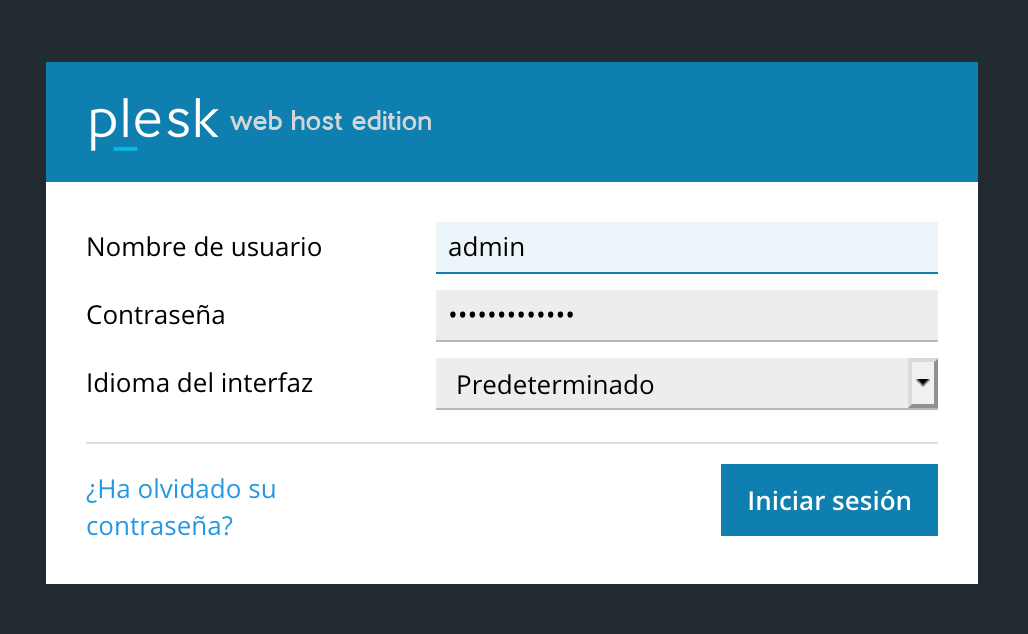
Accessing Plesk is very simple, we just have to go to our browser and write the name of the server followed by the port number 8443 which is that it sets the tool itself by default:
https://ejemplo.com:8443/
Next, we enter our username and password:
HOW TO CHANGE THE PLESK LANGUAGE
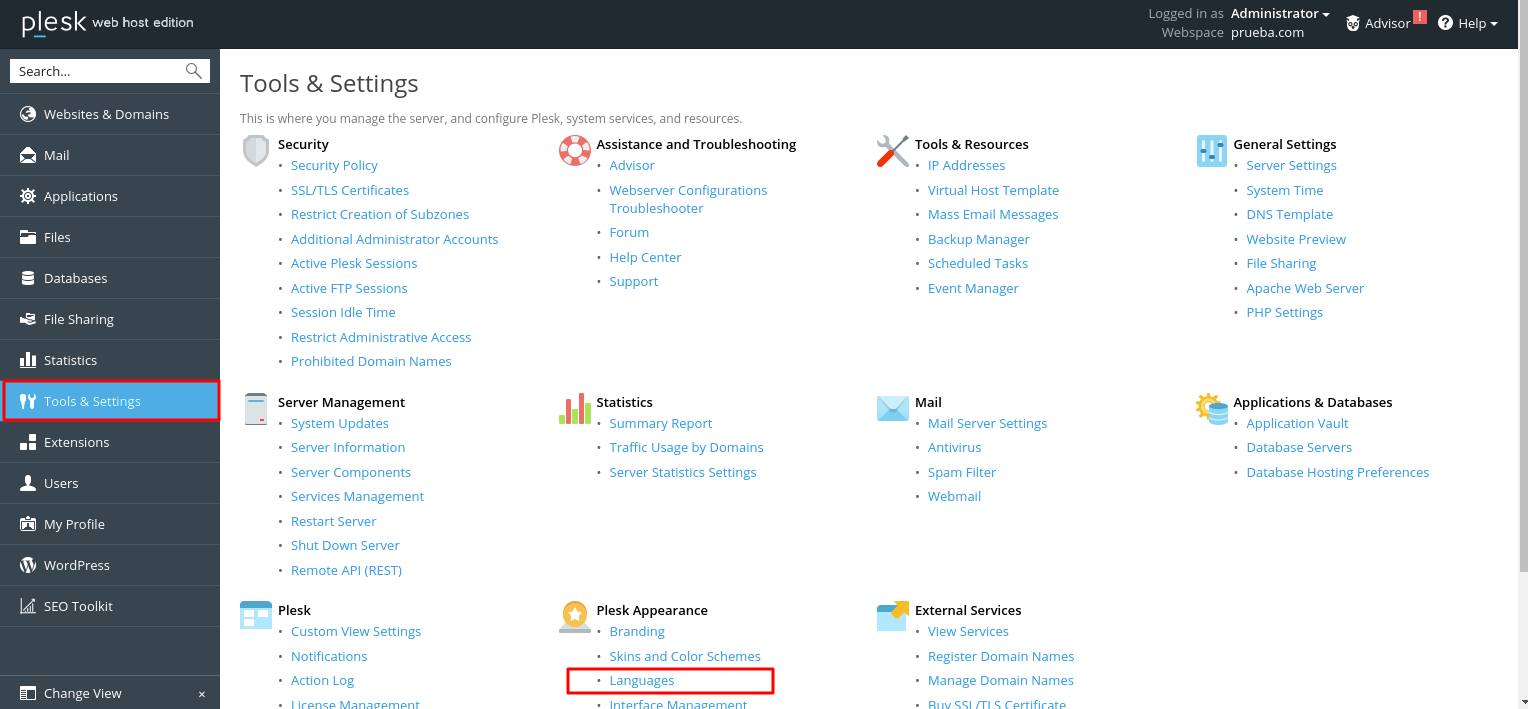
If we want to change the language of Plesk we must access "Tools and Settings" o «Tools and Settings» (in Spanish) in the left sidebar.

Later in the section "Plesk Apareance" select "Languaje".
In this example, we are going to set the Spanish language. We have to choose the line where it says: es-ES SPANISH and we click on "Make Default" to set the default language settings.
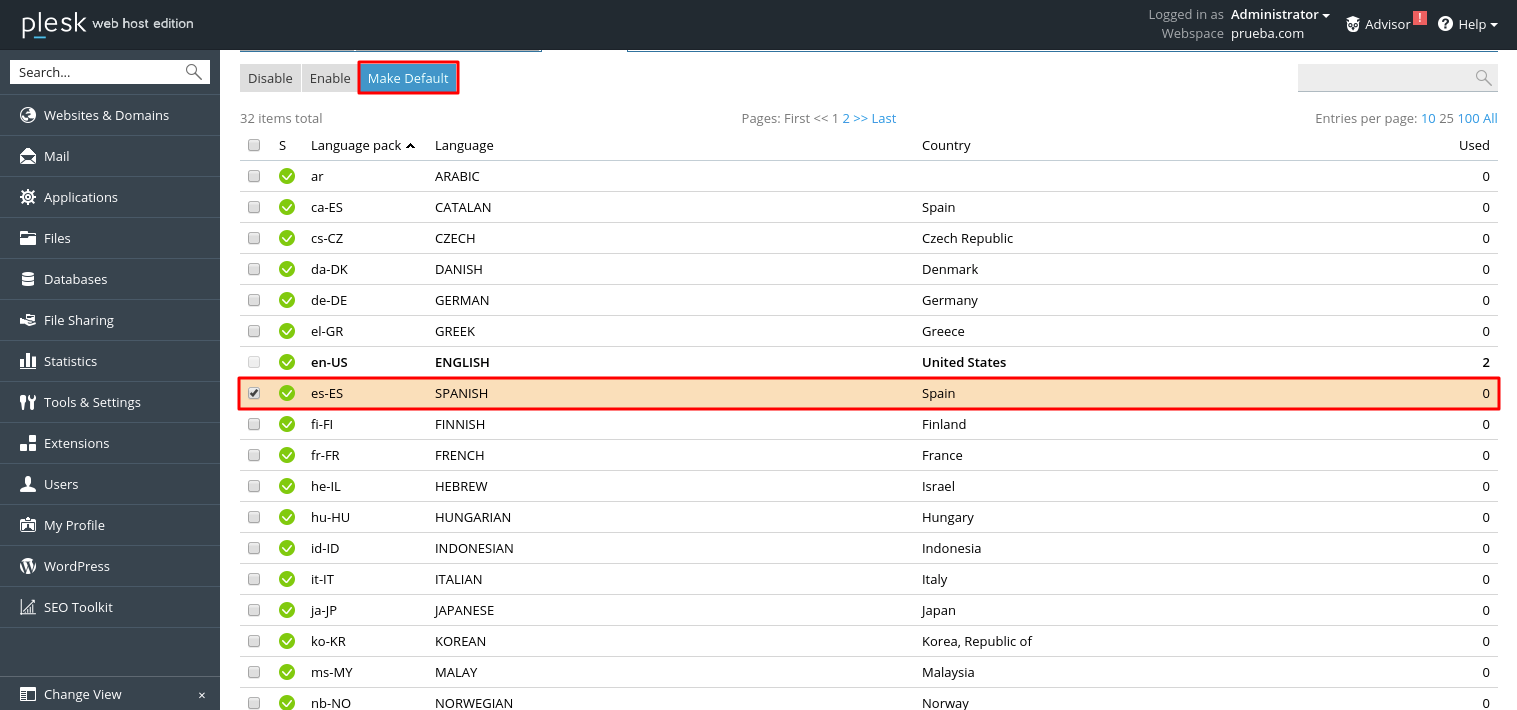
Now we only have to exit and re-enter Plesk for the changes to be applied in our control panel.
HOW TO MODIFY THE APPEARANCE OF OUR PLESK PANEL
If we want to modify the appearance of our panel, we have to select «Tools and Settings» (in Spanish) in the left sidebar.
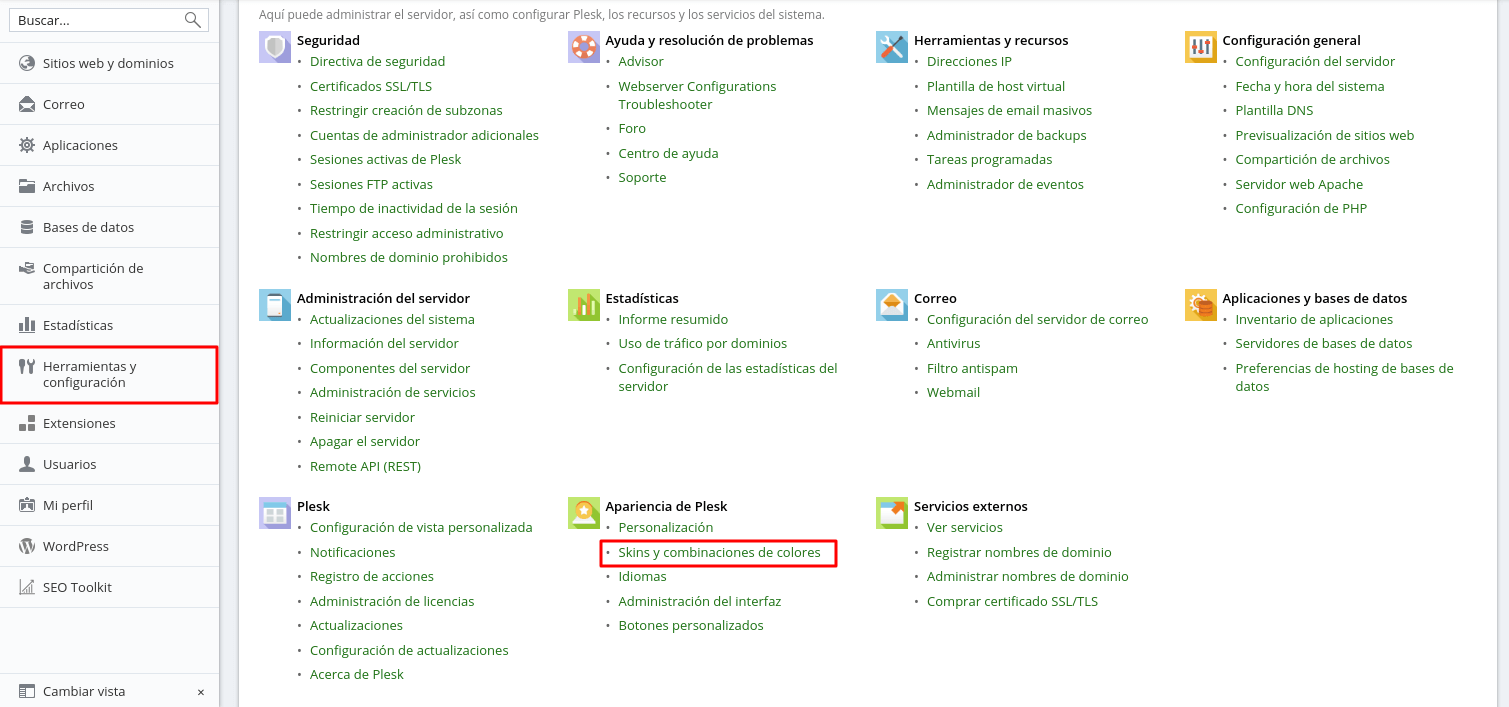
Once here, what we will do is click on «Skins and combinations» of colors found in "Plesk appearance"
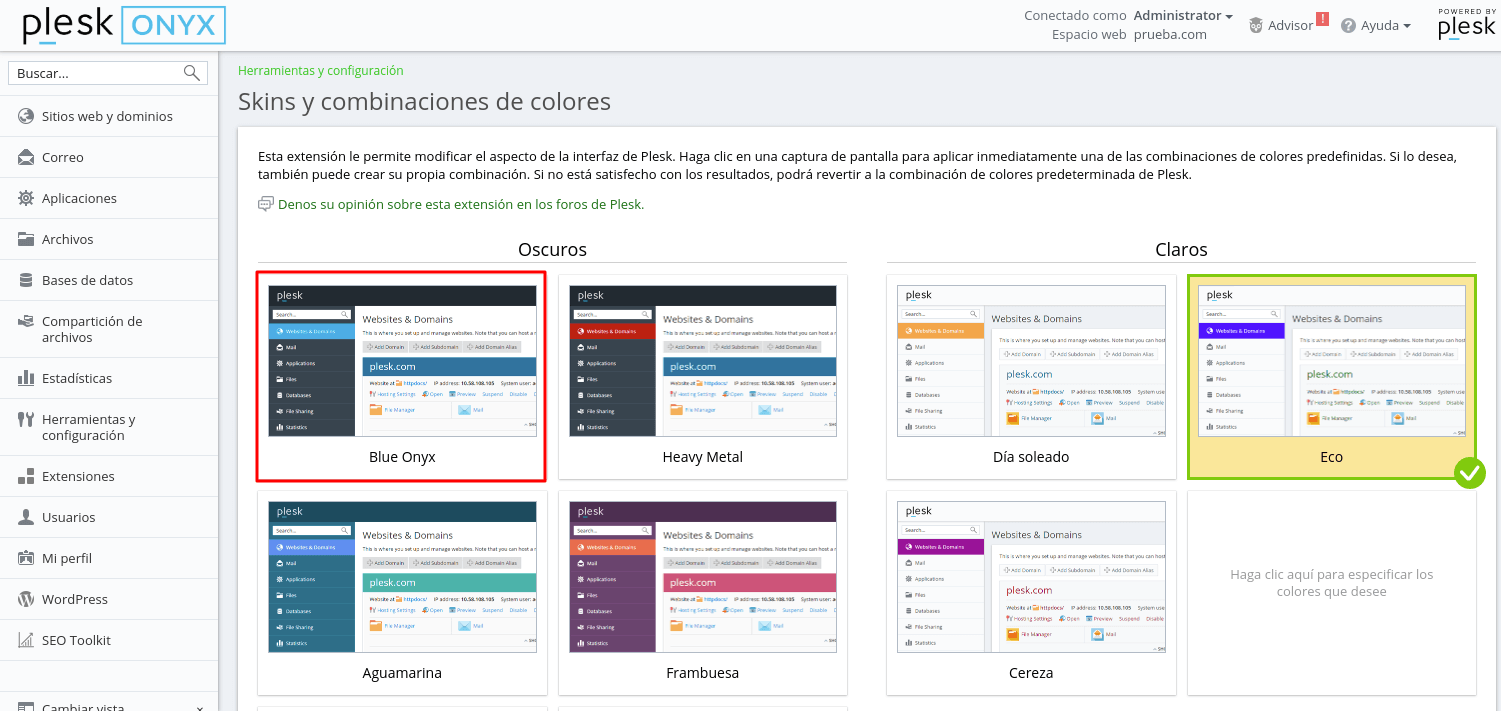
Once selected, click on the button Keep this color combination:

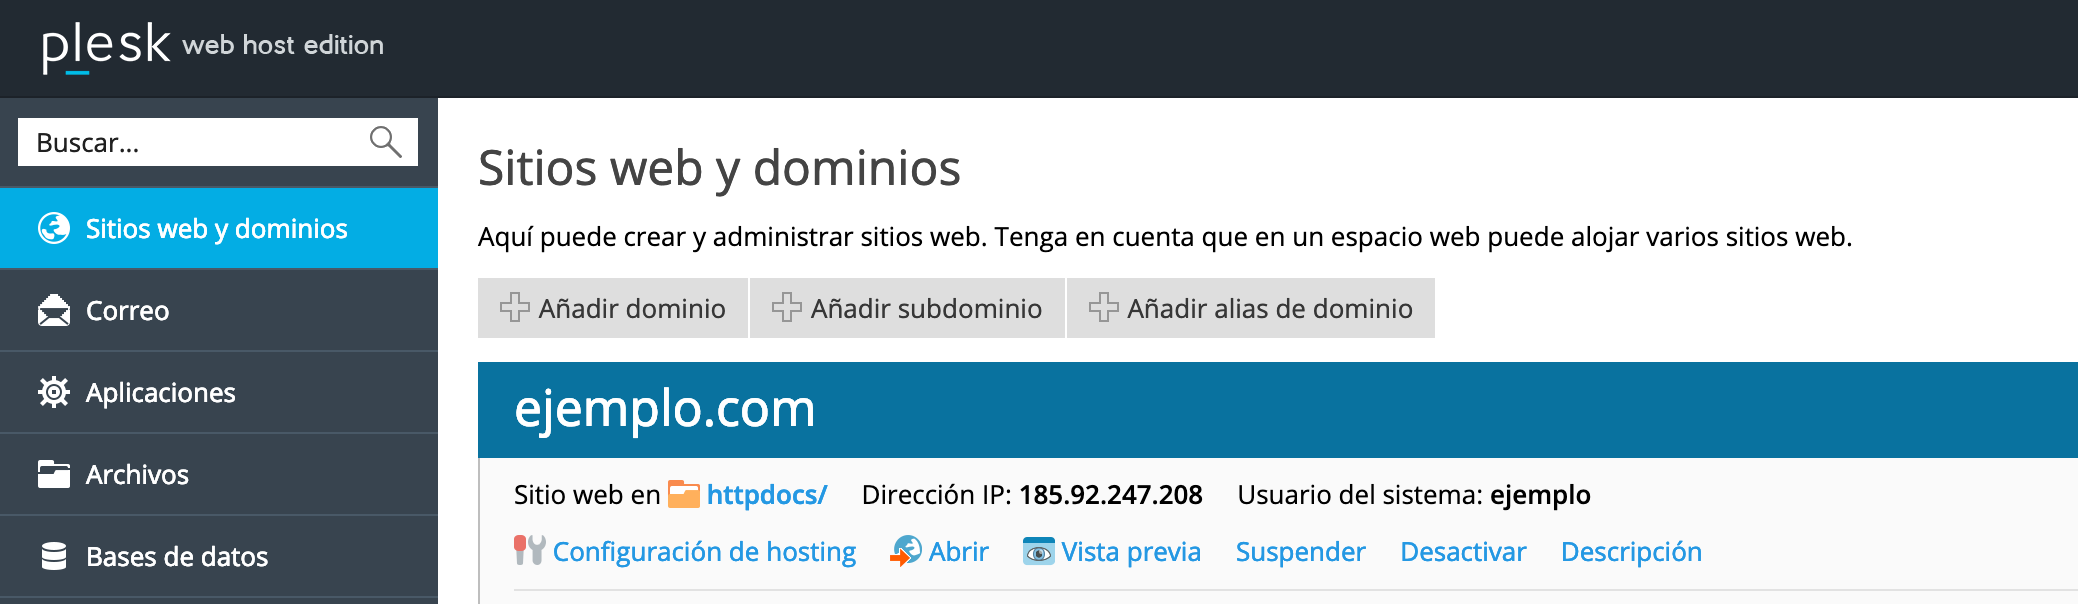
HOW TO ADD A NEW DOMAIN IN PLESK
If your web hosting plan includes more than one domain name (website), you can easily add new domains on the server.
BREAK TIME:Before doing this step, you need this domain to be registered. You can register a new domain here
To create a new domain we go to the main page of the Plesk administrative panel "Websites and domains" and click on «Add domain»:
Next we are going to fill in the following fields:
- Domain name: We will write the domain name that we want to add.
- Location of website files: We select the location in which we want to add our domain.
- DNS server configuration: Making a choice "Activate DNS service"
- Hosting type: We mark "Website Hosting".
- Root of the document: This will be the directory that will have all the files for our website.
- Preferred domain: We leave the option "None".
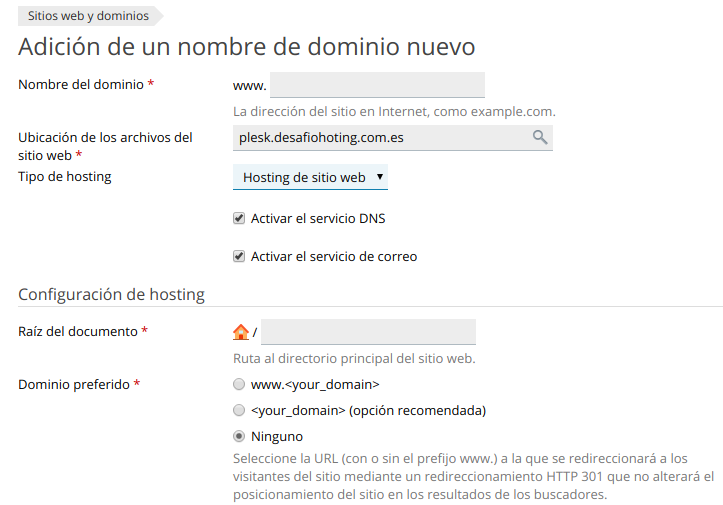
We click on "To accept" and we will verify that the domain has been created correctly.
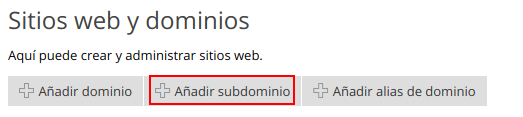
HOW TO ADD A SUBDOMAIN IN PLESK
First we go to the main page of our Plesk panel "Websites and Domains" and click on "Add new subdomain":
Next we are going to configure the following fields:
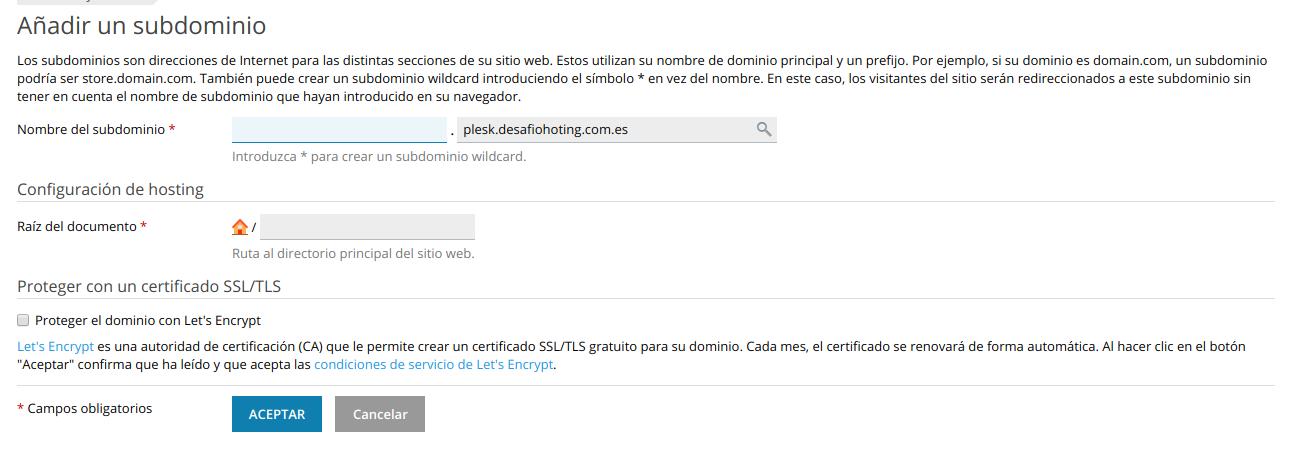
- Subdomain name: In the first field we are going to put the name we want for our subdomain. In the second field we select the domain in which we want to add the subdomain that we are creating.
- Root of the document: We write the path in which all the files of the subdomain will be hosted (If we leave it by default it will be the name of the subdomain).
Now we click on "To accept" and the new subdomain will have been created.
HOW TO CREATE A DOMAIN ALIAS IN PLESK
The Domain Alias is a domain name that works as a mirror of another domain. The same website will be shown as in the original domain.
Domain aliases allow you to target multiple domain names on the same website. This can be useful, for example, for identification purposes.
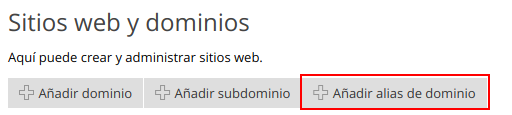
Steps to add a new domain alias:
From the main Plesk panel "Websites and domains" we click on "Add domain aliases":
Then we will fill in the following fields:
- Domain alias name: We write the name of the domain alias that we want to add.
- For the domain: We select to which domain the alias redirects.
- Synchronize the DNS zone with the main domain: We make sure that this box is checked.
- Mail service: This box must be checked.
- Web service: This box must be checked.
- Redirect with HTTP 301 code: This box must be checked.
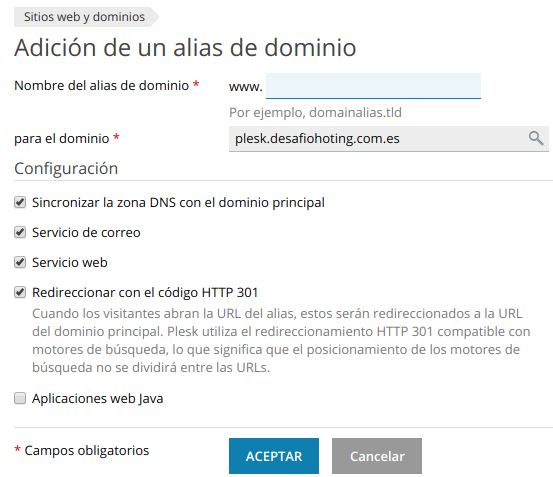
We click on "To accept" and the alias will be created.
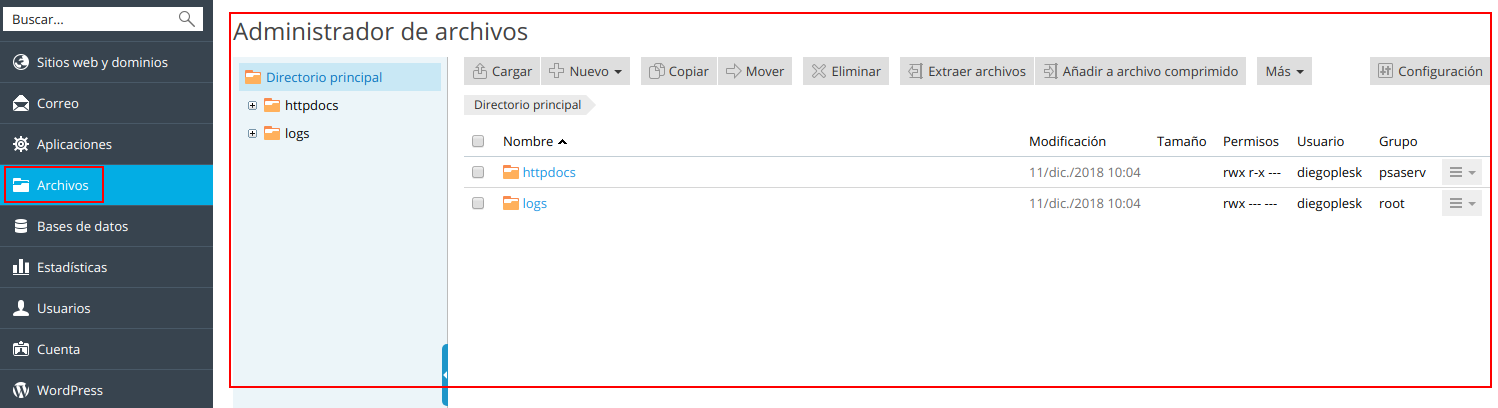
FILE MANAGER IN PLESK
To access the Plesk file manager it is as simple as going to the section on "files" in plesk and it will open the file explorer.
HOW TO CHANGE PHP VERSION OF A DOMAIN IN PLESK PANEL
If we want to change the PHP version of one or more domains through Plesk we have to select in the left sidebar: Websites and domains. We select the domain we want to change and then click on PHP configuration.
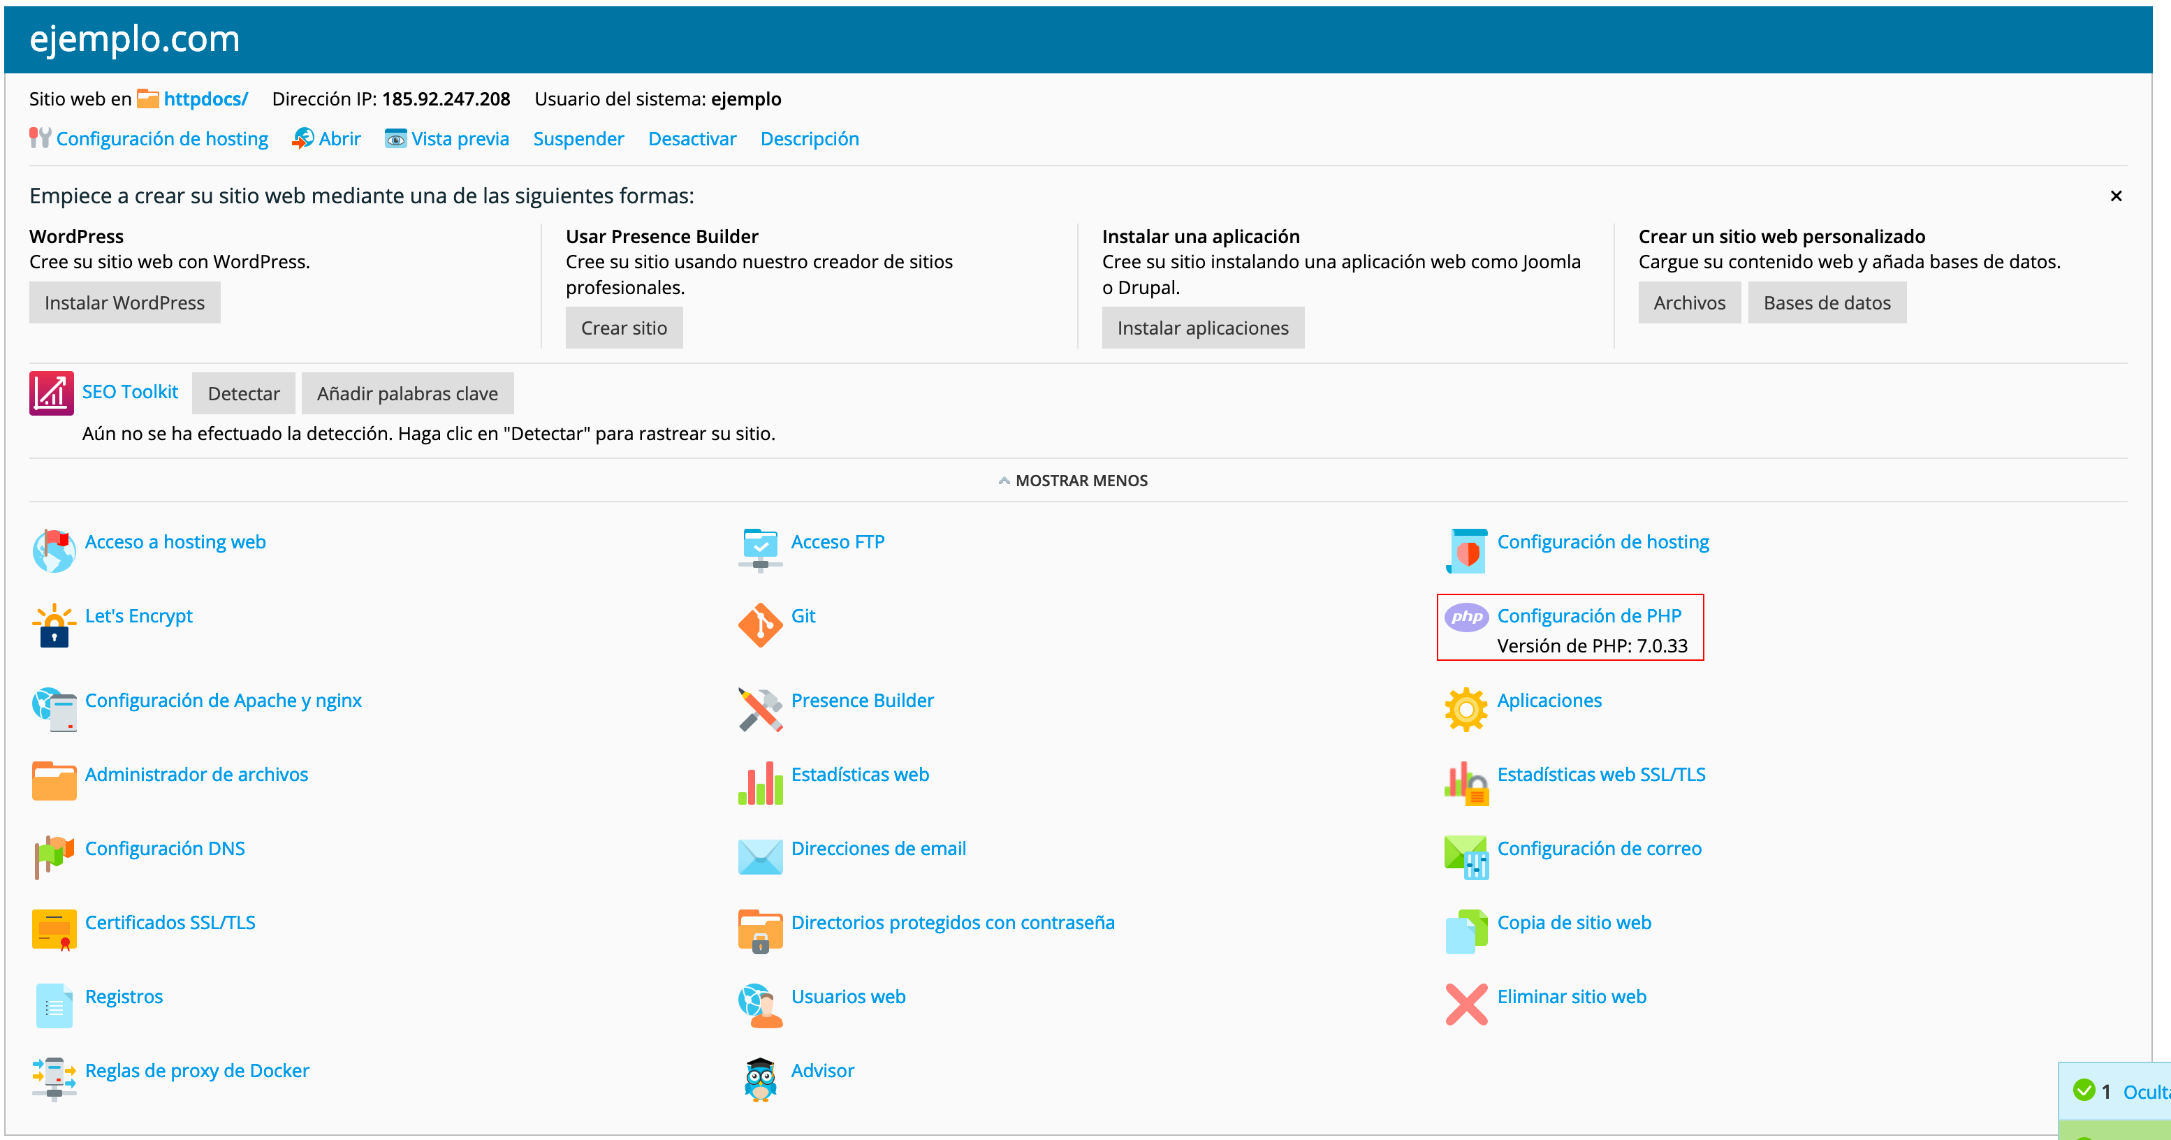
Now we can select the PHP version
Now we choose the PHP version in the dropdown (you can see it in the following image) and save:

HOW TO CREATE AN EMAIL ACCOUNT IN PLESK
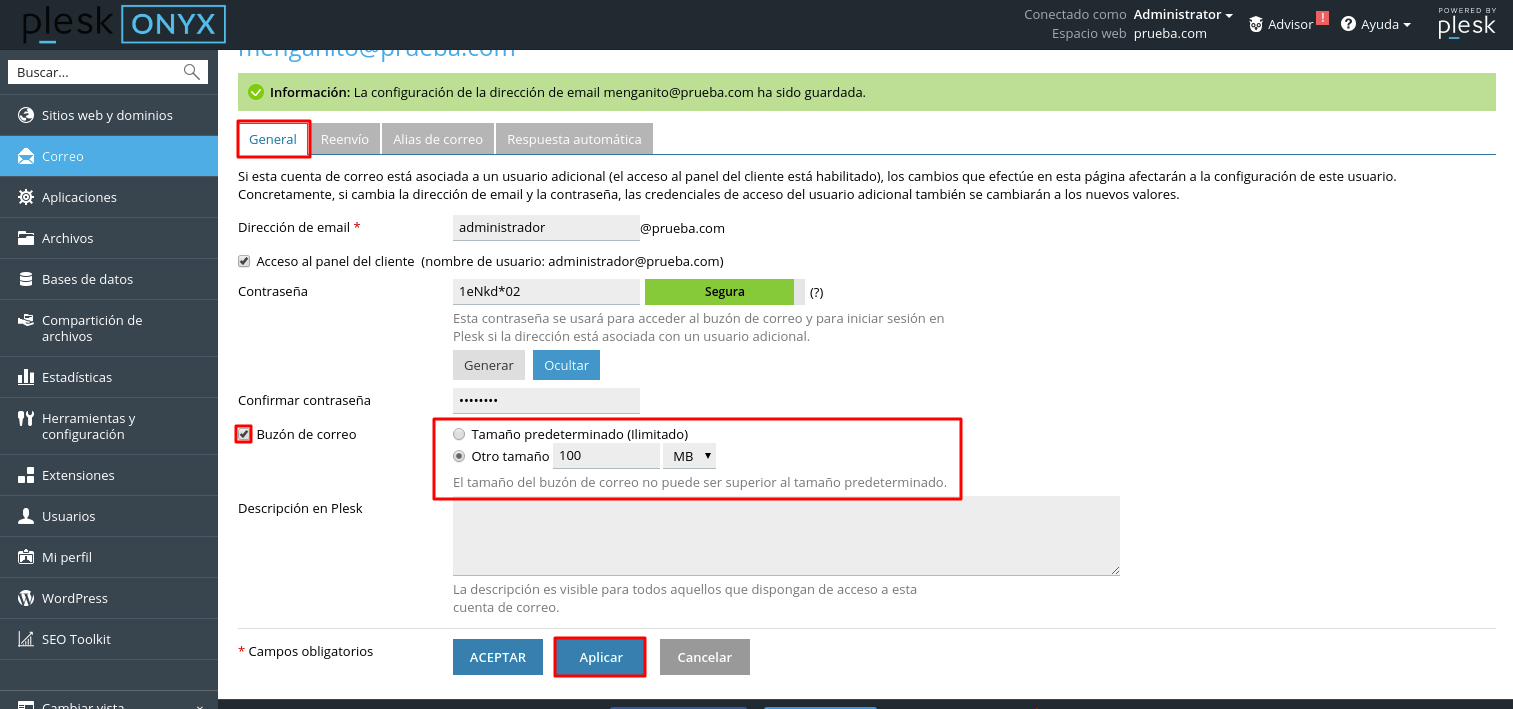
If we want to create an email account in the Plesk panel, we select the section of "Mail" and in tab "Email addresses" we click on the button «Create email address»

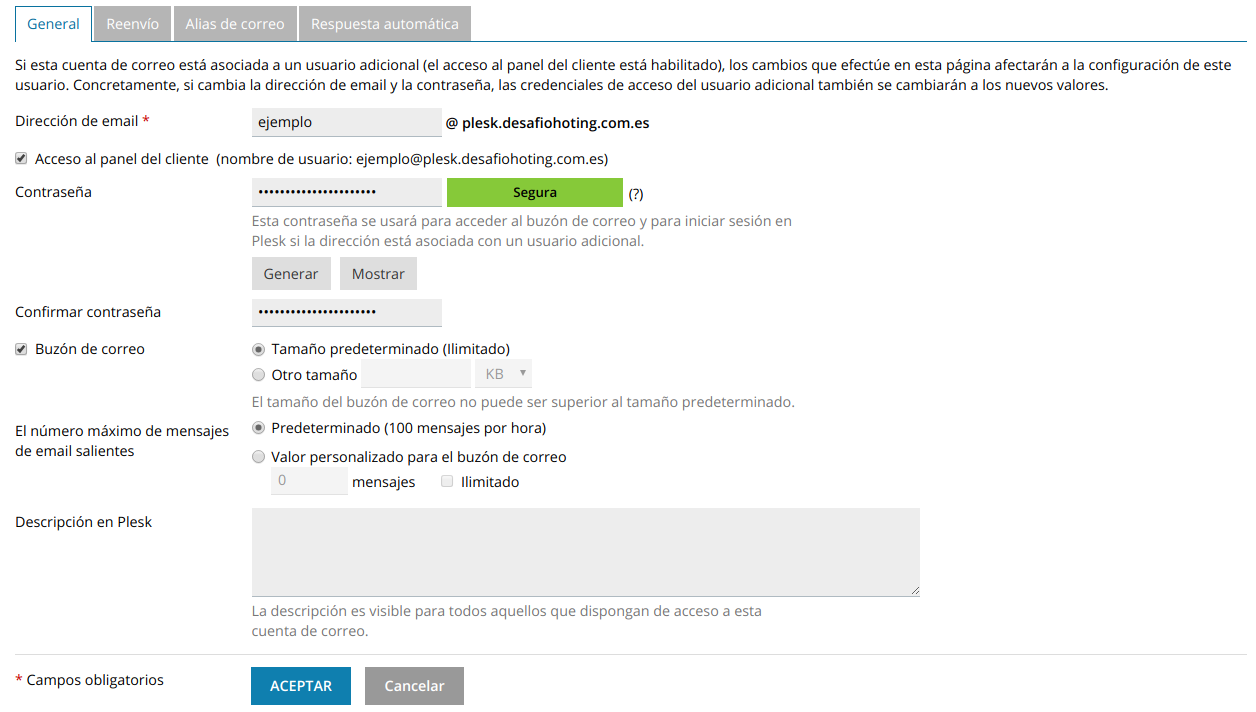
Then we fill in the following fields:
- Email address: We write an address and select the domain to which the email belongs.
- Control panel access: We mark this box if we want the email account that we are going to create to have access to the control panel.
- Password
- We make sure that the box "Mailbox" is marked.
- We can define the space available for emails and the maximum number of outgoing emails.We click on "To accept":
PAUSE: If you need to configure your email account in Gmail, Thunderbird or Outlook Hotmail we leave you a link to the guides on our blog
HOW TO CREATE MAIL ALIAS IN PANEL PLESK
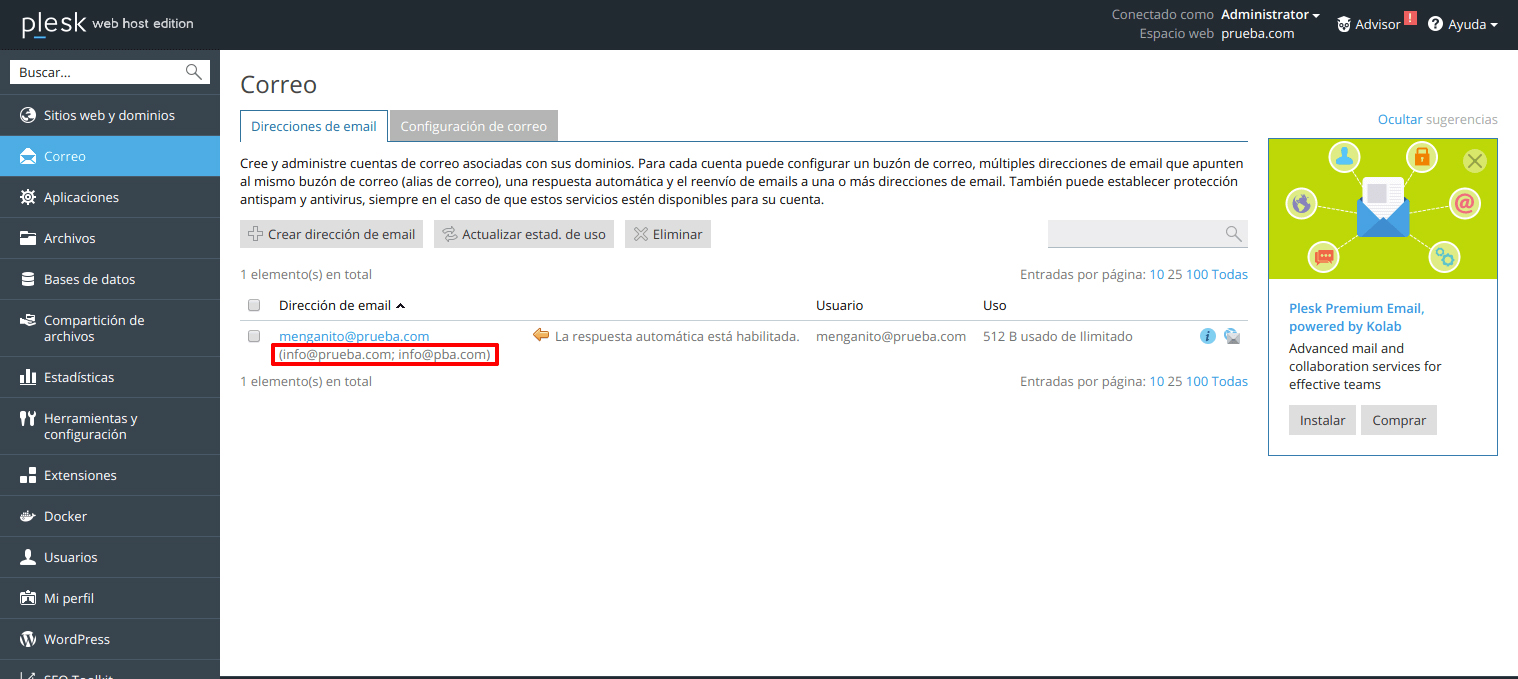
Aliases are other secondary email accounts linked to a main email account, all emails sent to the email accounts configured as Aliases will reach the main account:
These are the steps to add an Alias mail:
In the mail section of the Plesk panel we select the email account for which we want to create an Alias in the E-Mail addresses tab
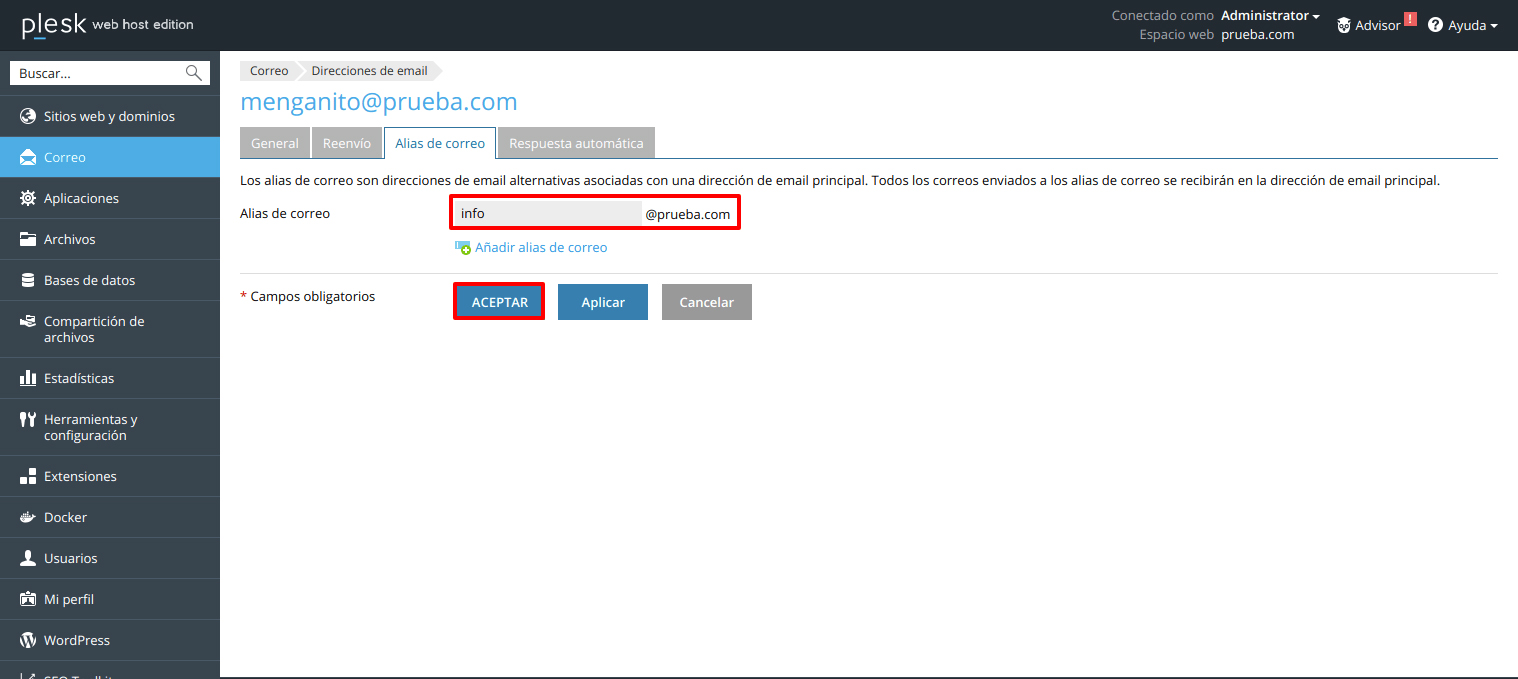
Next, we go to the tab "Email aliases" and we add a new alias address and click the accept button.
HOW TO CHANGE EMAIL PASSWORD IN PLESK PANEL
If you need to change the password of an email account you can do it like this:
Select the tab "Mail" and click on the email address where you want to change the password
Fill in the fields "Password" y "Confirm Password" then click "To accept".
HOW TO CREATE MAILING LISTS IN PANEL PLESK
Mailing list is a group email address to which a number of users are subscribed. Mailing lists are used to send email messages to multiple recipients at the same time. E-mails sent to list subscribers can range from plain text to colorful newsletters and promotions with embedded images and attached multimedia links or presentation materials.
How does it all work ?: Create an email address for a mailing list in Plesk, and subscribe users to it. Then send your message to the address on the list, and all subscribers receive it.
To set up a mailing list and subscribe users to it:
- If you have access to multiple subscriptions, select the required subscription in the subscription box at the top of the screen. Or, to see the sites for all your subscriptions, select "All subscriptions".
- Go to the tab tab «Mail» >> «Mailing lists».
- Click on «Create mailing list».
- Enter the address of the list, and if you have multiple websites, select the website where the mailing list will be created. To subscribe users to the mailing list, enter their email address, one address per line.
- Notify postmaster mailing list of list creation, select the check box «Notify administrator in the creation of the mailing list».
- Click on "To accept".
To subscribe or unsubscribe users:
- Go to the tab tab «Mail» >> «Mailing lists».
- Click on the address in the list.
Do one of the following:
- To subscribe users to the mailing list, enter their email addresses in the subscribers field, one address per line.
- To unsubscribe users, delete their addresses in the field "Subscribers".
- Click on "To accept".
To delete a mailing list:
- Go to the tab tab «Mail» >> «Mailing lists».
- Select the check box corresponding to the mailing list you want to remove and click "Remove".
- To confirm the deletion, click Yes.
To deactivate the mailing list service and all mailing lists created under the currently selected subscription:
- Go to the tab tab «Mail» >> «Mailing lists».
- Click on "Deactivate the Service".
To activate the mailing list service for the currently selected subscription:
- Go to the tab tab «Mail» >> «Mailing lists».
- Click on "Activate the Service".
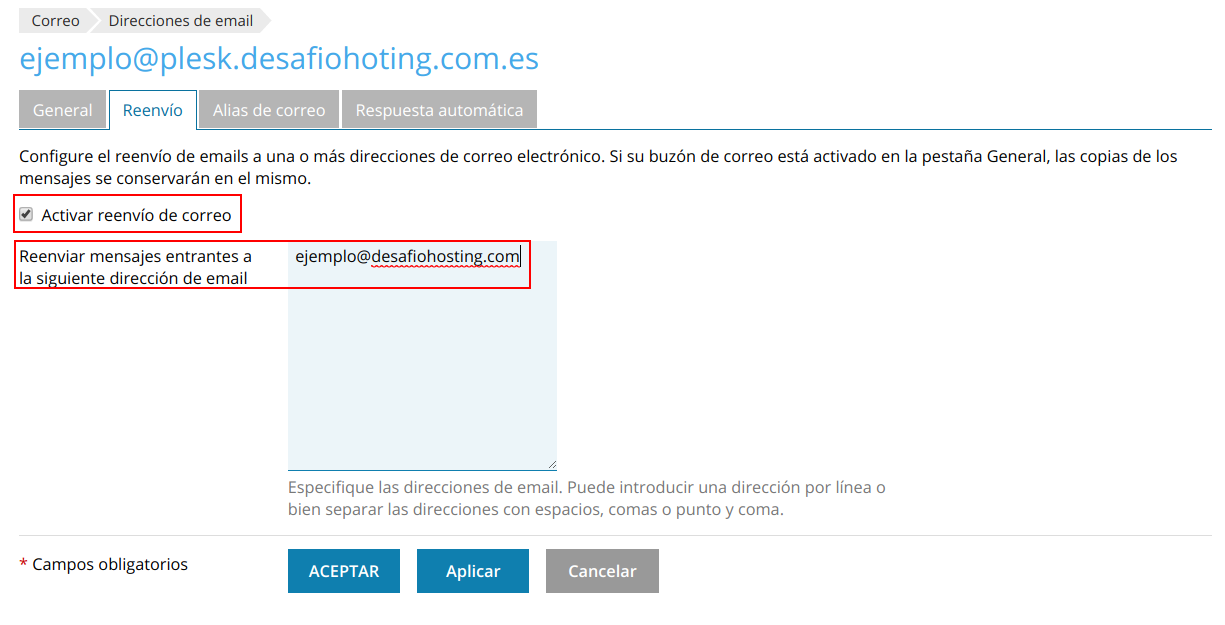
HOW TO CONFIGURE FORWARDERS IN PANEL PLESK
First we must go to the section of "Mail"
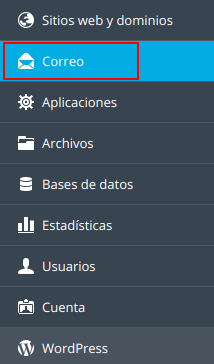
Once inside, we select an email from those that we have created:

A window will open for us. We select the section of "Forwarding" and we click on Activate mail forwarding. In addition, we can also specify which email address we want all forwarded emails to be addressed to. You can see it below:
HOW TO SEE WEB PAGE STATISTICS IN PANEL PLESK
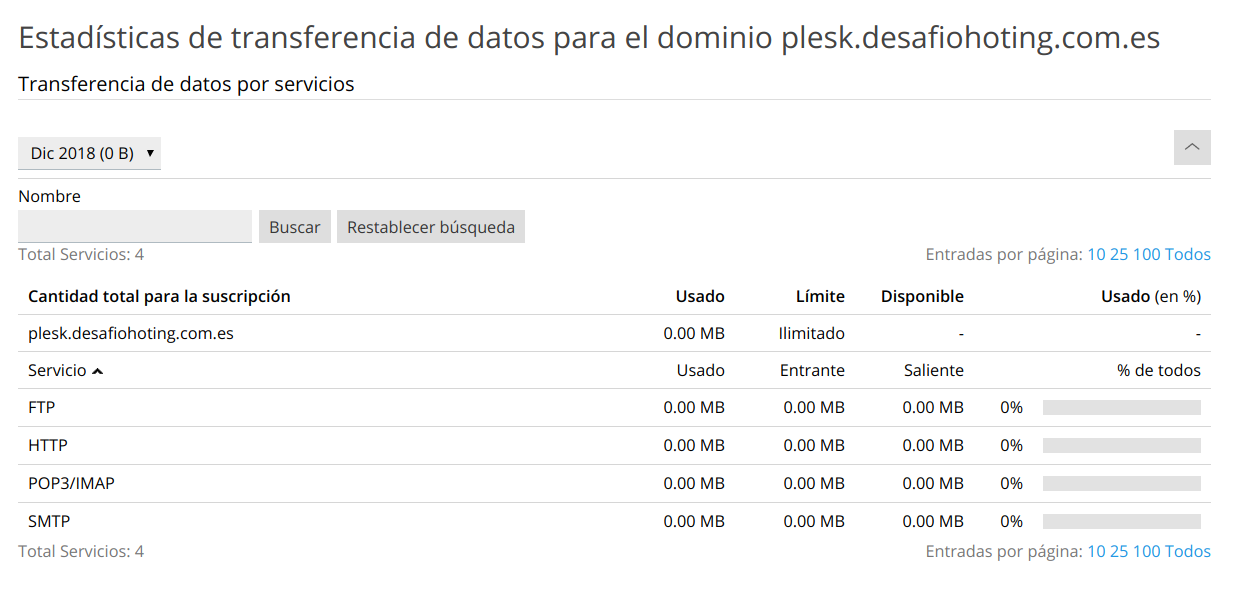
To be able to see statistics of our Plesk, such as the occupied hard disk space or data transfer, it is as simple as going to the section of "Statistics" and a window will open on the right where we can see basic statistics such as the "Disk space" or "Traffic".
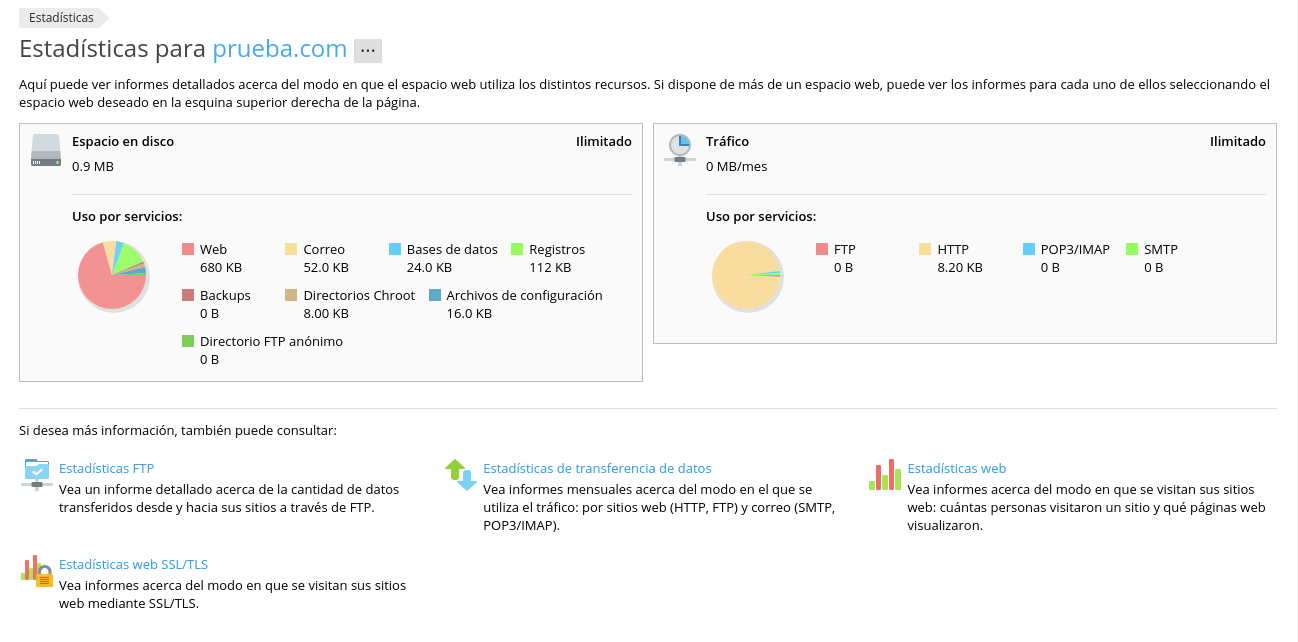
Also if we select the option "Data transfer statistics" We will be able to consult, in a more detailed way, the monthly reports of the traffic that is being used.
HOW TO CONFIGURE AUTORESPONDERS IN PLESK
From the main page of the Plesk panel, we click on the tab "Mail".
- We select the email account to which we want to configure the auto-reply:
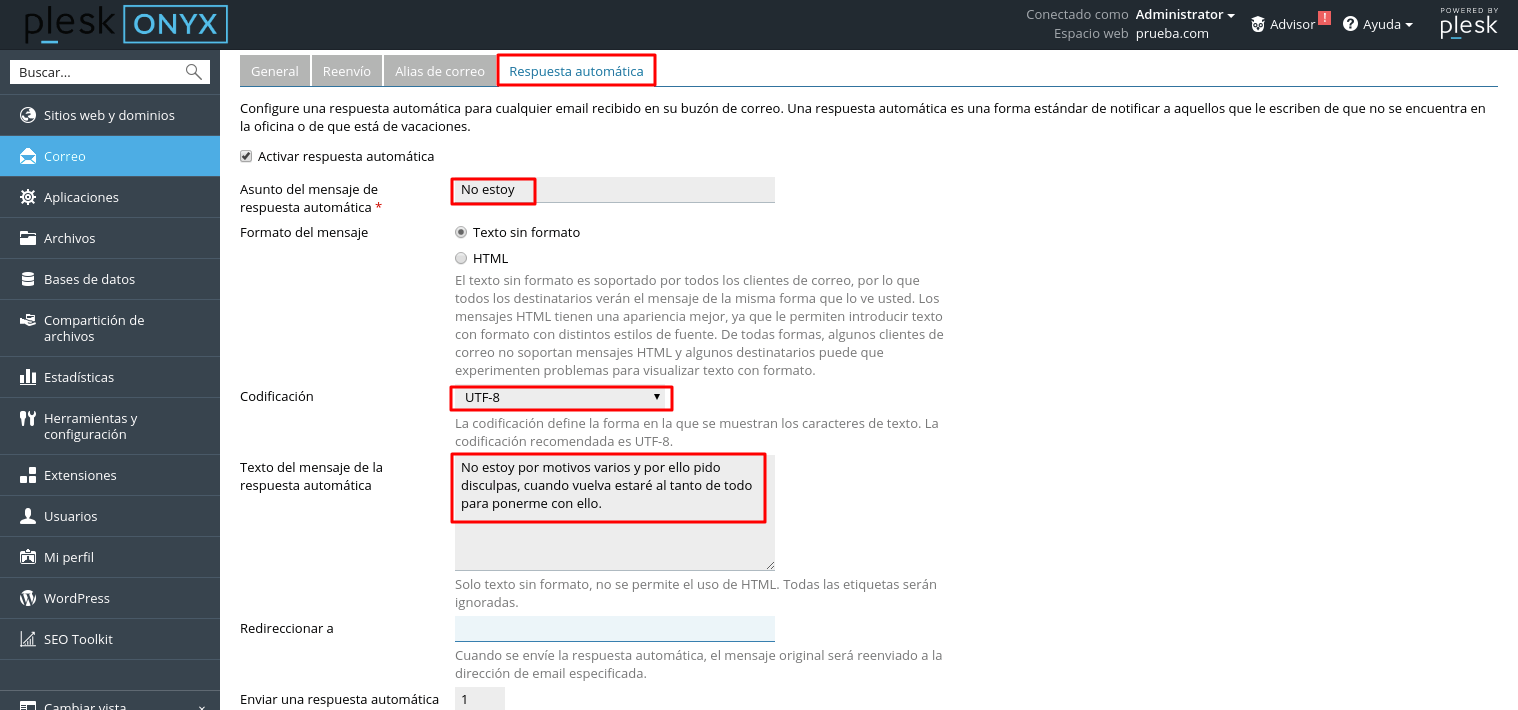
- We click on the tab «Automatic reply»


- We check the box "Activate automatic reply"
- Automatic reply message subject: Here we can write the subject for the automatic reply.
- Message format: Plain text.
- Coding: We leave it in UTF8
- Auto reply message text: We write the text of the message.
- Redirect to: If we want to forward incoming messages to another email address, we write it here.
- Send an automatic reply: The default value is "Once a day", which means that if multiple messages are received from the same email address in a single day, Plesk will send an automatic reply for the first message only. If the value is "1", then Plesk will send automatic reply for the first and second messages, and so on.
We can also attach a file for the auto reply message. Once all the fields have been filled in, we click on "To accept".
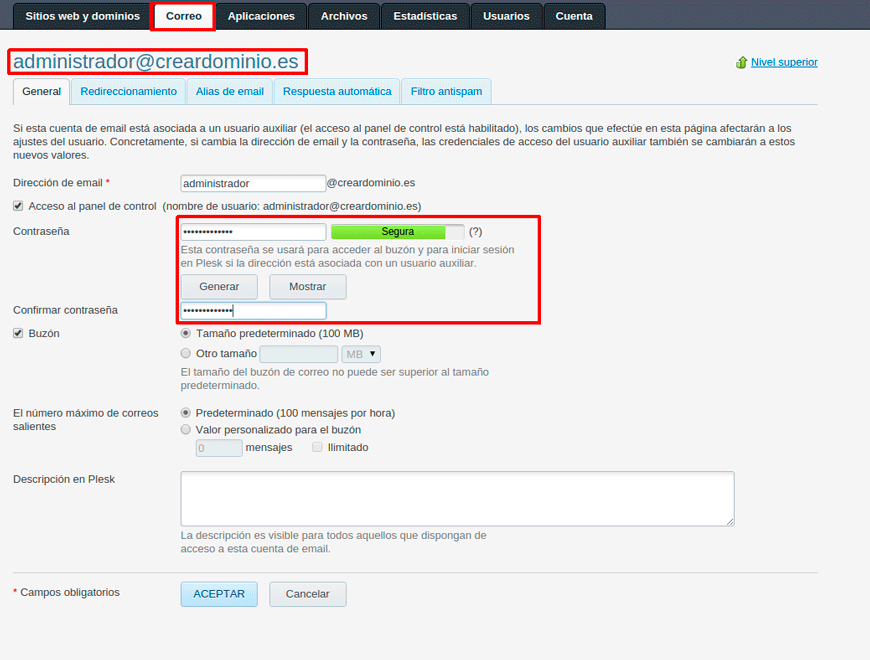
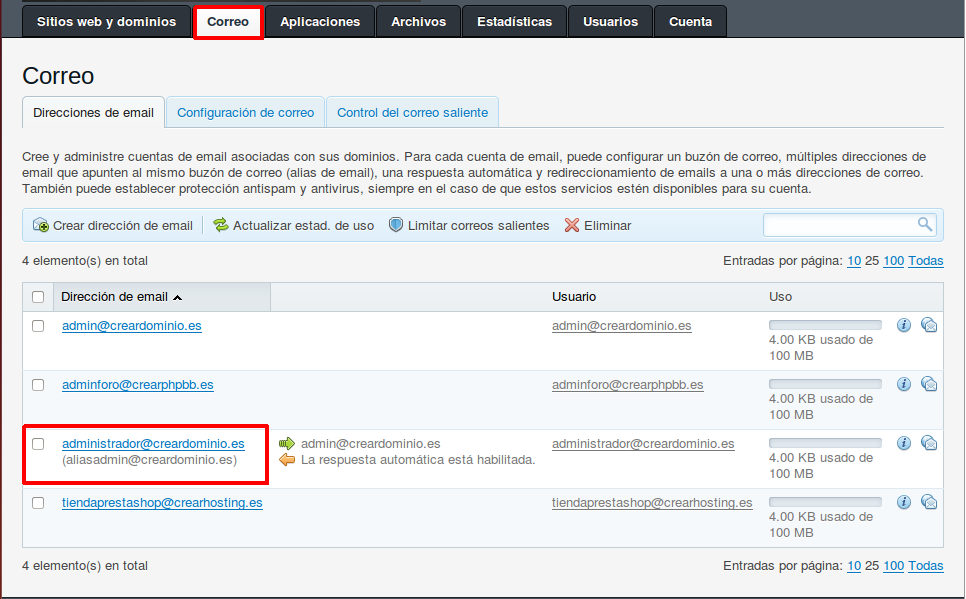
HOW TO CONFIGURE MAIL FORWARDING TO ANOTHER ACCOUNT IN PANEL PLESK
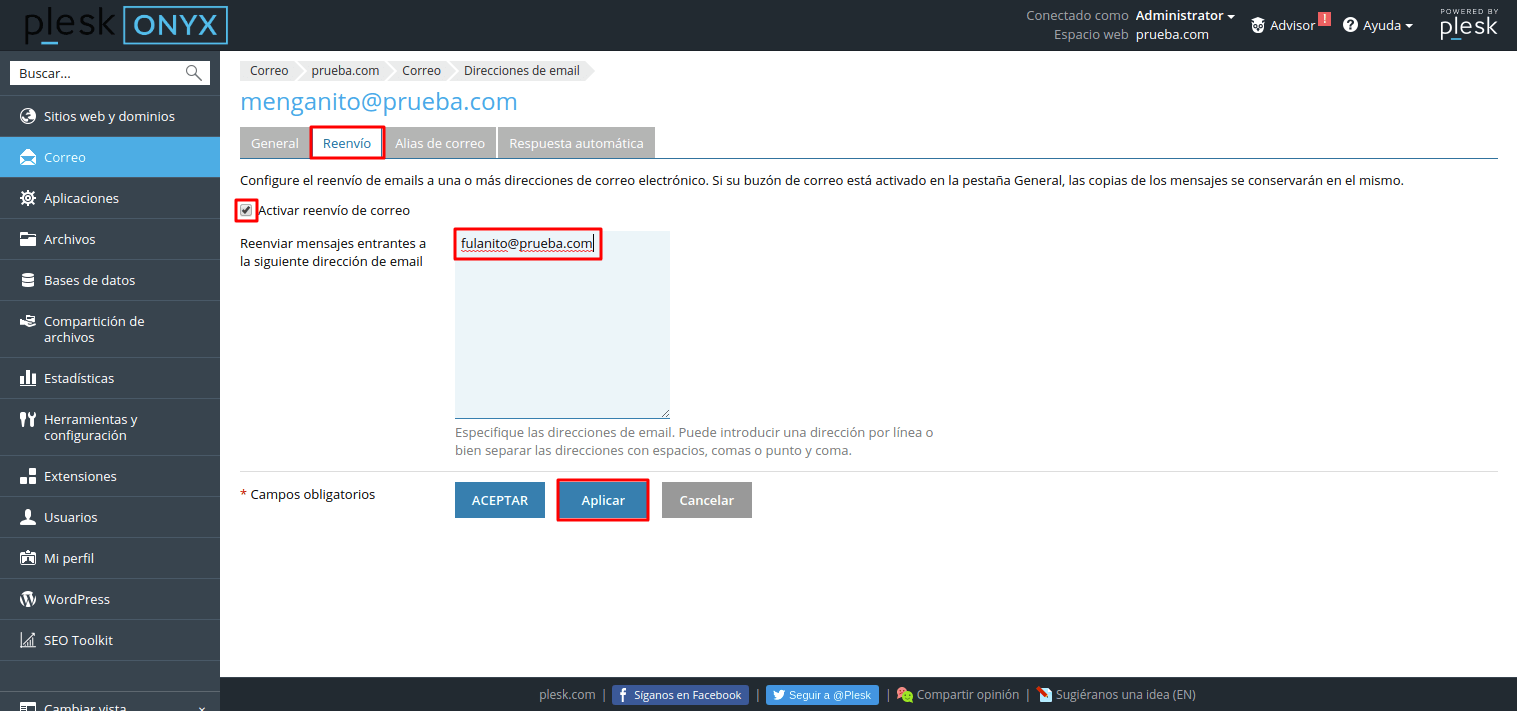
To activate the forwarding of email from one account to another, we go to the tab "Mail" from the Plesk panel and click on the account to which we want to activate forwarding:
Now we go to the tab "Redirection" and we mark the box "Activate mail forwarding":

Next we write the email account to which we want to redirect. We can put more than one email account and click on the button "Apply":
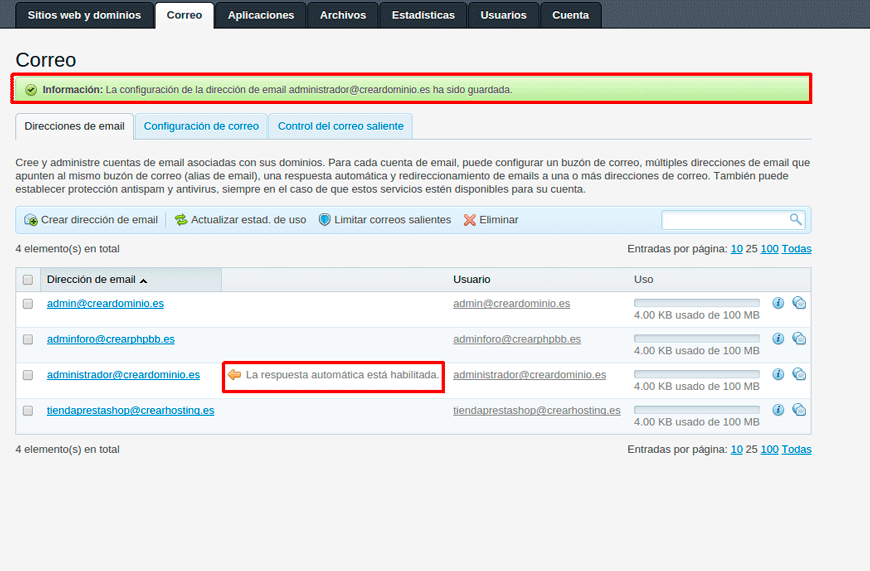
If we want this email account (administrator@creardominio.es) not to save any email that is going to be redirected, we go to the tab "General" and uncheck the box "Mailbox" and click on "To accept"
And now we can see that this account has the automatic responses activated:
HOW TO LIMIT EMAIL SENDING IN PANEL PLESK
Your hosting provider may place limitations on the number of outgoing email messages per hour, usually in order to restrict possible spam. A subscription, domain, and mailbox have their own limits. By default, the limit values are defined by the hosting provider. You may need to increase the limits to send more email messages, or lower the limits to avoid excess outgoing mail.
Note: The options described below are shown only if the limitations on outgoing mail are activated by your hosting provider. Also, some limits may not be available (for example, the limit on the number of outgoing emails from a mailbox), depending on the mail server used in Plesk.
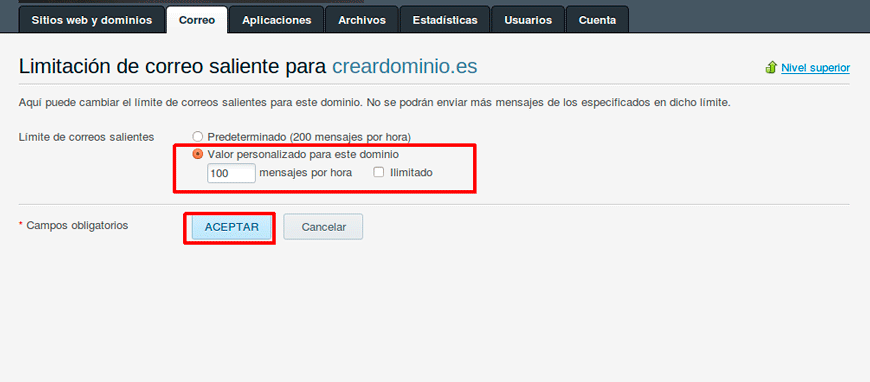
How to set limits on the number of outgoing emails for a domain:
Ir a «Websites and domains» >> «Mail» and select one or more domains for which you want to change the limit, using checkboxes.
Click on "Limit outgoing emails" in the toolbar.

Edit the limit in the outgoing message field and click "To accept":

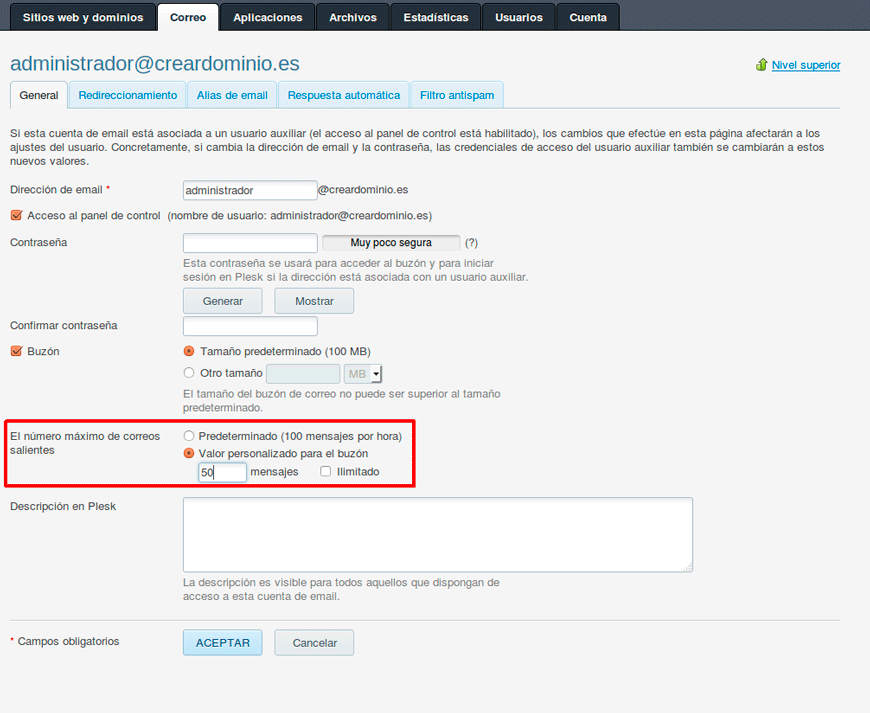
To set limits on the number of outgoing email messages for a mailbox:
From the tab "Mail" we click on the email account and activate the box "Custom value for mailbox" and we specify the number of outgoing emails:
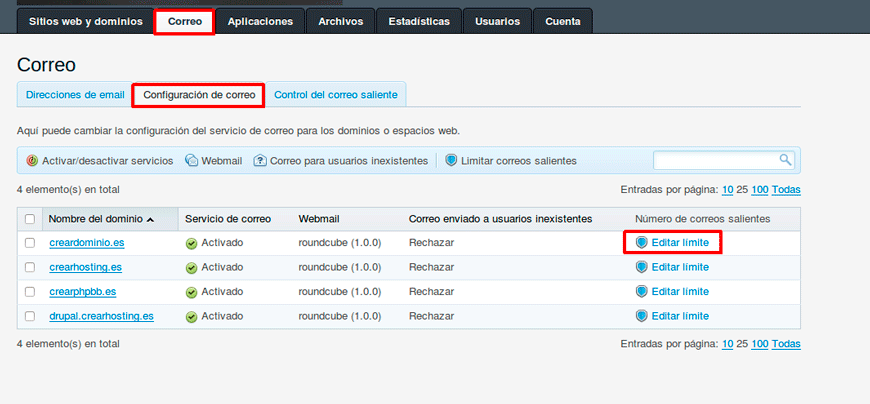
You can also limit all emails related to a domain:
We go to the tab «Mail» >> «Mail configuration» >> «Edit limit»:
And we edit the limit of outgoing messages:
PROTECTION AGAINST SPAM IN PLESK
- From the Plesk panel we access the tab "Mail",
- We select the email account in which we want to enable the anti-spam filter.
- We select the tab "Antispam filter":
- We check the box "Activate antispam filter for this email address":
- We can also specify what to do with incoming emails that are considered spam
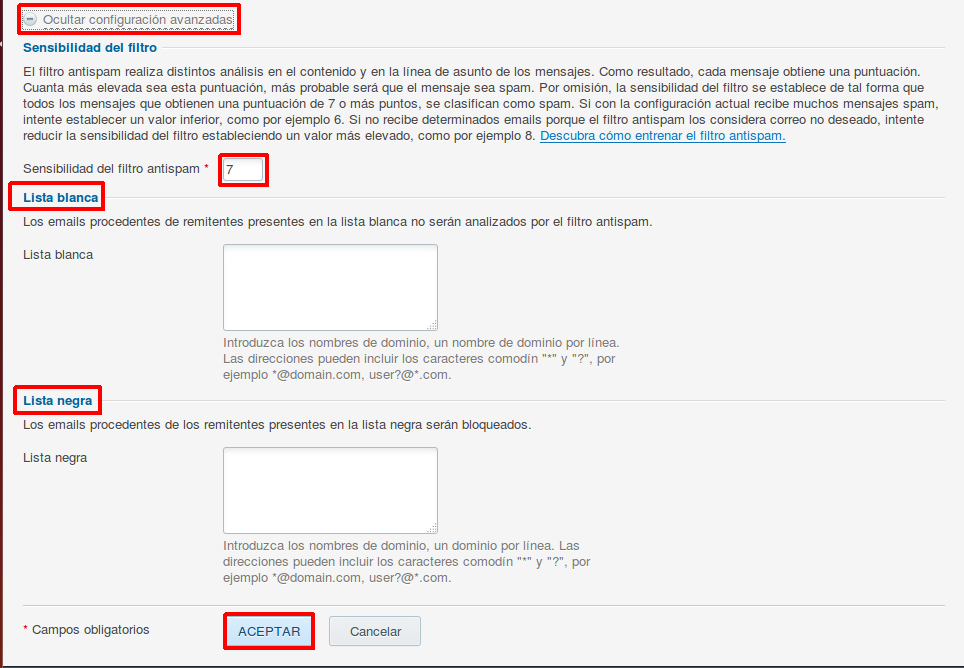
- Once this is configured we click on "To accept" and if we want to configure more parameters on the antispam filter we will click on "Show advanced configuration"

Advanced configuration options, we can select these options:
- Specify the antispam filter sensitivity
- Specify in the "White list" the domains from which we receive mail and which contain important information. So that the antispam does not classify it as spam mail.
- In the black list we will add the domains from which we receive junk or spam mail.
How can we add a certain domain in the above lists?
Example: We write *@domain.com or if we want to put a specific account of a domain user@*.com
NOTE:
If you access your mailbox through the IMAP protocol, you must select the option "Move spam to Spam folder" so that spam messages appear in their corresponding folder.
Since all messages are automatically deleted from the spam folder after 30 days, you will need to check the contents of the spam folder on a regular basis so that you do not lose any important messages and move them to the inbox.
When the option is selected "Move spam to spam folder", you can train the spam filter and improve its accuracy by moving spam messages from the Junk Mail Inbox and non-spam messages from Spam Mail to the Inbox.
If you need to adjust the sensitivity of the spam filter, click Show advanced configuration, and write a number of points that a message must meet to be considered spam.
If you need to save the email of certain senders, type email addresses or domain names you can add them in the white list field.
HOW TO CREATE A DATABASE IN PLESK
With Plesk we can create and delete databases, we can do it like this:
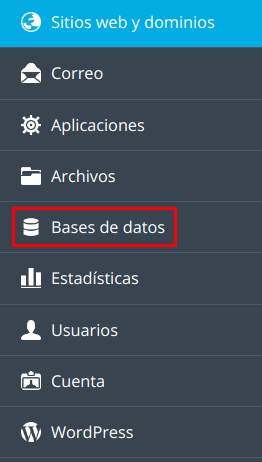
- In the section "Websites and domains" and select "Databases":
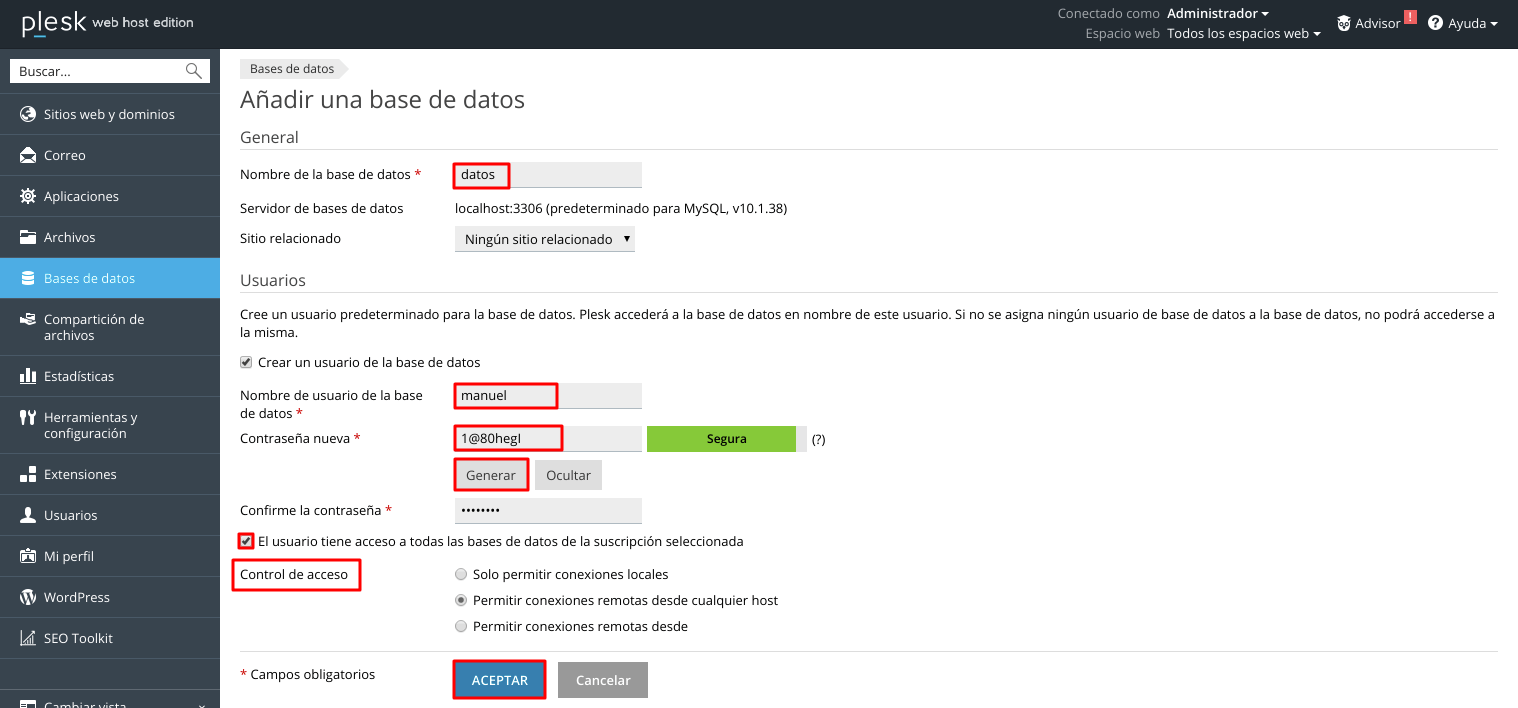
- Now we will click on "Add new database":
- We complete the following fields:
- Database name: If your subscription grants you the corresponding permission, you can choose a database type and the database server on which you want to create it.
- We select the option create user in database: We fill in the username and password. We can also assign permissions to this new user. Remember that a database must have at least one registered user to be able to access it.
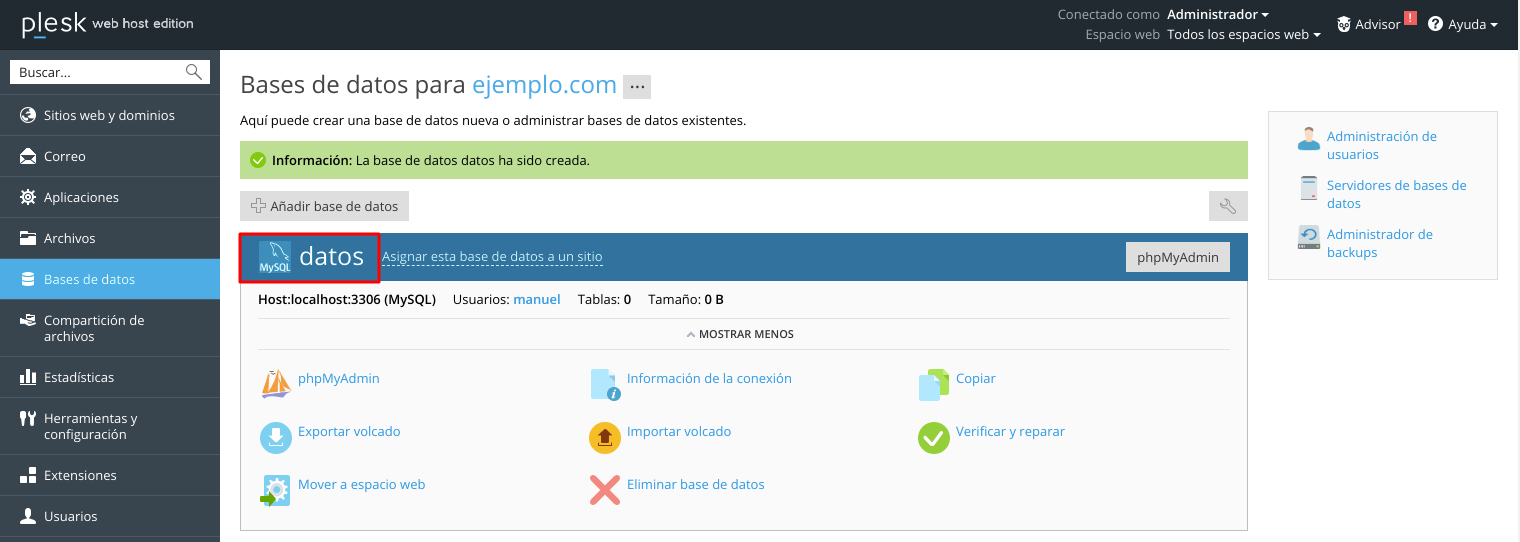
- Once we accept it, we should be able to see our database in its respective domain, as shown in the following image.

HOW TO CREATE NEW PLESK DATABASE USERS
To access the database in Plesk we must enter the name of a user account associated with it.
Any database user can be set as the default for a database. Plesk always accesses the database using the default user credentials, even if there are other users associated with the database. If a database has multiple associated user accounts, and none of them are default, the first account in the list will be used.
There are two types of database user accounts in Plesk:
- The user account with access to a single database: If you collaborate with other people in the management of a website and you want to grant them access to the database, you must create user accounts for each of them. Each of these accounts is used to access a single database. In this case, you must first create a database and then user accounts.
- Universal user accounts they have access to all databases. Universal users have access not only to all existing databases, but to all newly created databases as well.
If you are going to install a series of web applications on your site, it might be advisable to create a universal user account, so that all applications can access their databases with this account. In this case, you must first create a user account, and then specify the installation of applications.
Note: A universal user acts only within a database server. If you use multiple database servers, create a separate, universal user account for each server.
OPERATIONS WITH DATABASE USERS:
- select "Databases" in the left sidebar
- We will select the option «User administration».
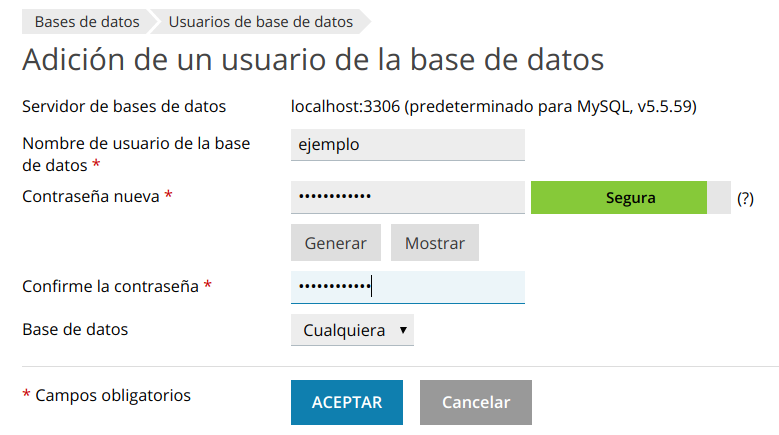
- To add a new user, click on "Add database user"
- Fill in the following fields:
- Database user name: Name of our user.
- Password: User password
- Database: We must choose which specific database you want to associate the new user with. Note: If we want to register a universal database user, we select "Anyone"


Notes:
- You can remove a default database user only by removing the database associated with this user. Alternatively, you can edit the user and delete the Default User Flag: For this database option, and then delete the user.
- If a database user was created by an APS application, you can remove this user only by deleting the respective application in Access Settings
Starting with Parallels Plesk Panel 12.0, remote access to a database can be allowed or prohibited, or access allowed only from specified hosts. The access settings apply to individual database user accounts. For more information, see the section on Configuring Up Custom Access Rules.
HOW TO COPY DATABASES IN PLESK
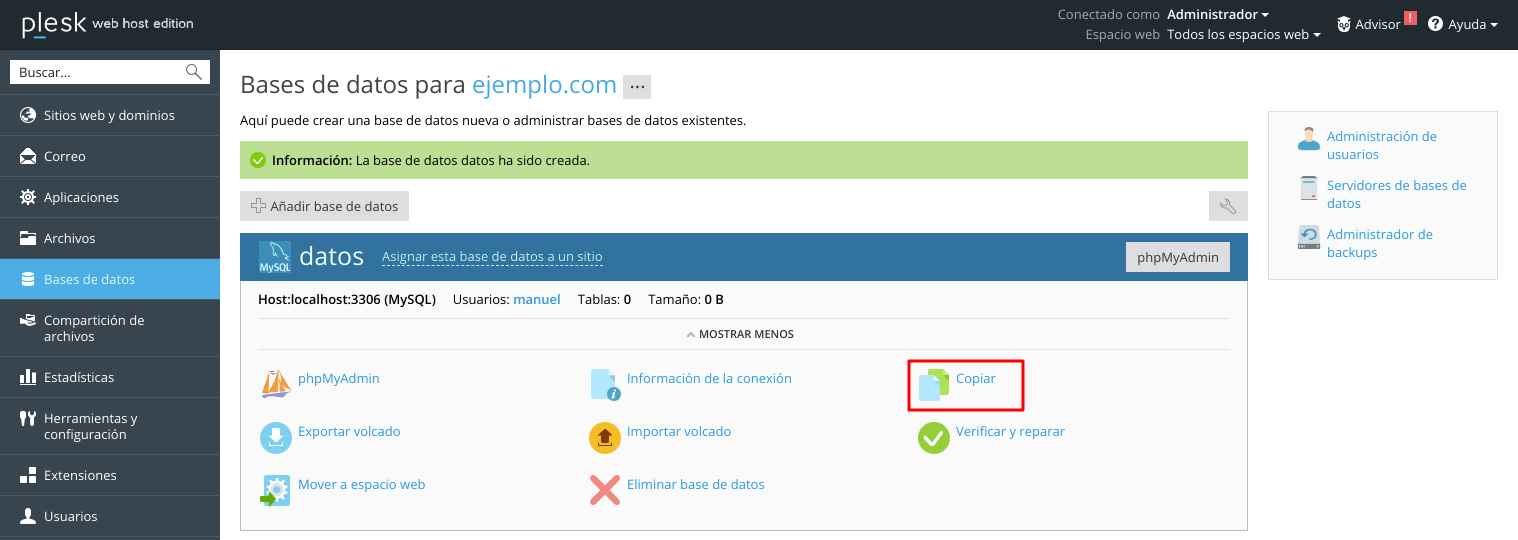
Plesk allows you to copy databases from one Plesk registered database server to another, as well as to any remote server, as long as the source and destination servers are of the same type (eg MySQL).
To copy a database we select «Websites and domains» >> «Data bases» >> «Copy»:
You must specify the destination server, subscription, and database name. For a remote server, you must select "Others" in the list of target database servers and provide the following additional information:
- Hostname or IP address from the remote database server.
- Username and password of the remote database server administrator. (For example, the credentials of the MySQL administrator).
- Copy Types: When copying a database, you can choose a full database copy that includes data from the tables (the Create a full copy option), or copy only the database structure (In the latter case, Plesk will create tables without data in the target database).
NOTE:
When an existing database is chosen as the target, those tables in the target database, whose names also appear in the source database, will be replaced.
HOW TO ACCESS THE PHPMYADMIN DATABASE IN PANEL PLESK
To access the PhpMyAdmin database in the Plesk Panel:
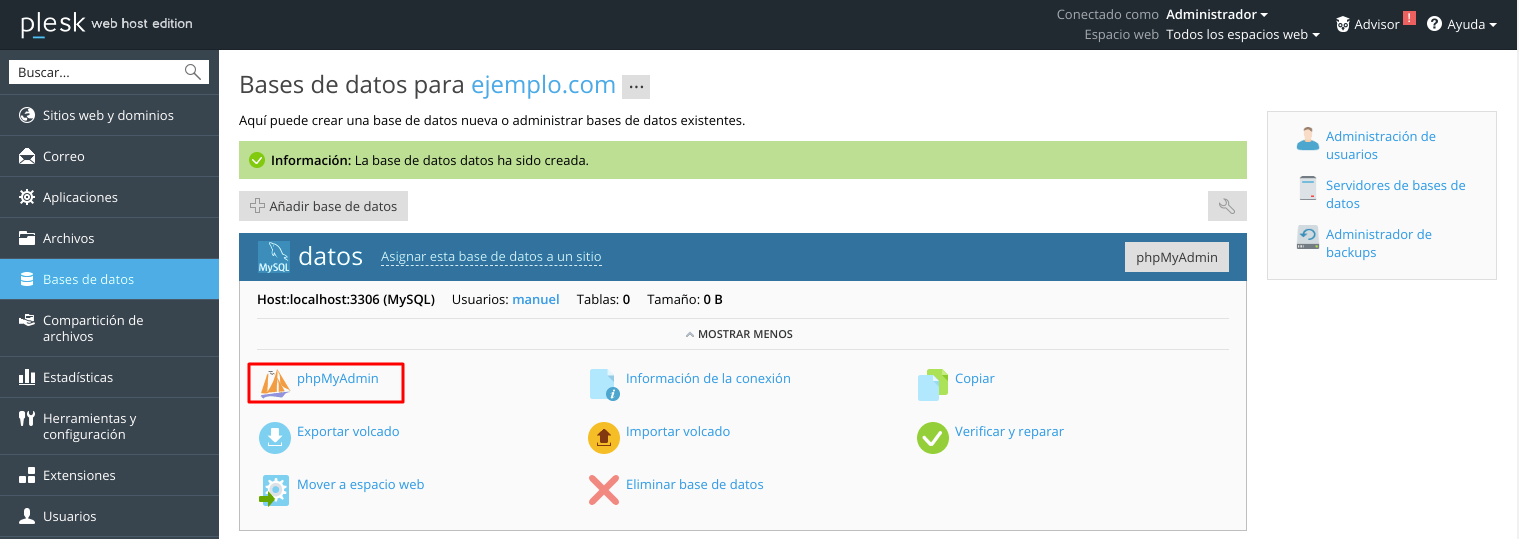
- Using the WebAdmin link on the tabs «Websites and domains» >> «Databases» we select the database and "PhpMyAdmin".
- The phpMyAdmin window will open.
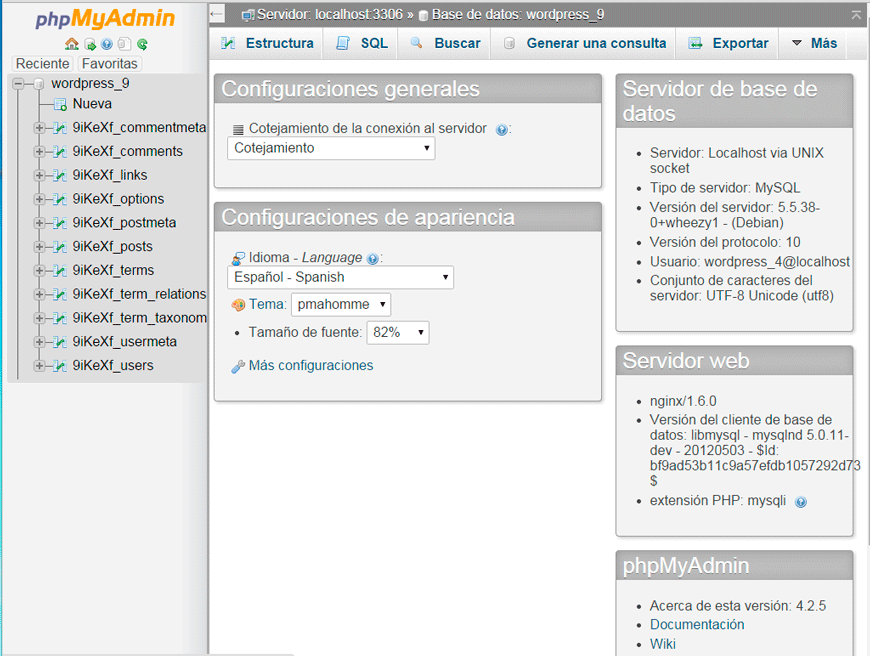
In this case, Plesk automatically uses the corresponding database user credentials.
If you need to access your database using other tools (like SQL Server Management Studio) or want to give other applications access to it, you will have to provide these tools and applications. We explain it to you below:
- To connect to MySQL and PostgreSQL, you will need to provide the hostname (or IP address) And the Username database and password.
- To connect to Microsoft SQL Server, you will also have to specify the Microsoft SQL Server instance. For Microsoft SQL Server 2008, Plesk uses the named instance MSSQLSERVER2008. Therefore, the host can be specified as mydomain.com \ MSSQLSERVER2008 or 123.123.123.123 \ MSSQLSERVER2008. For Microsoft SQL Server 2005, Plesk uses the default instance (MSSQL 2005), and it is not necessary to specify the instance name.
HOW TO EXPORT OR IMPORT DATABASE IN PLESK PANEL
In Plesk, we can export or import a database, we explain it below:
- Export a database: Save a source database to a file that can be used for storage or distribution.
One of the reasons for exporting databases is security. While Plesk for Windows offers different functionality for database backups, in Plesk for Linux, export is the only option for creating independent database backup files.
Additionally, databases can be backed up with other data during subscription backups and then restored separately. See the Backup and Recover section of Websites for more information.
- Import a database: Restore the data from the archive to a destination database. You can import a database for the same or another database server. The only restriction is that the target database must be of the same type, for example MySQL.
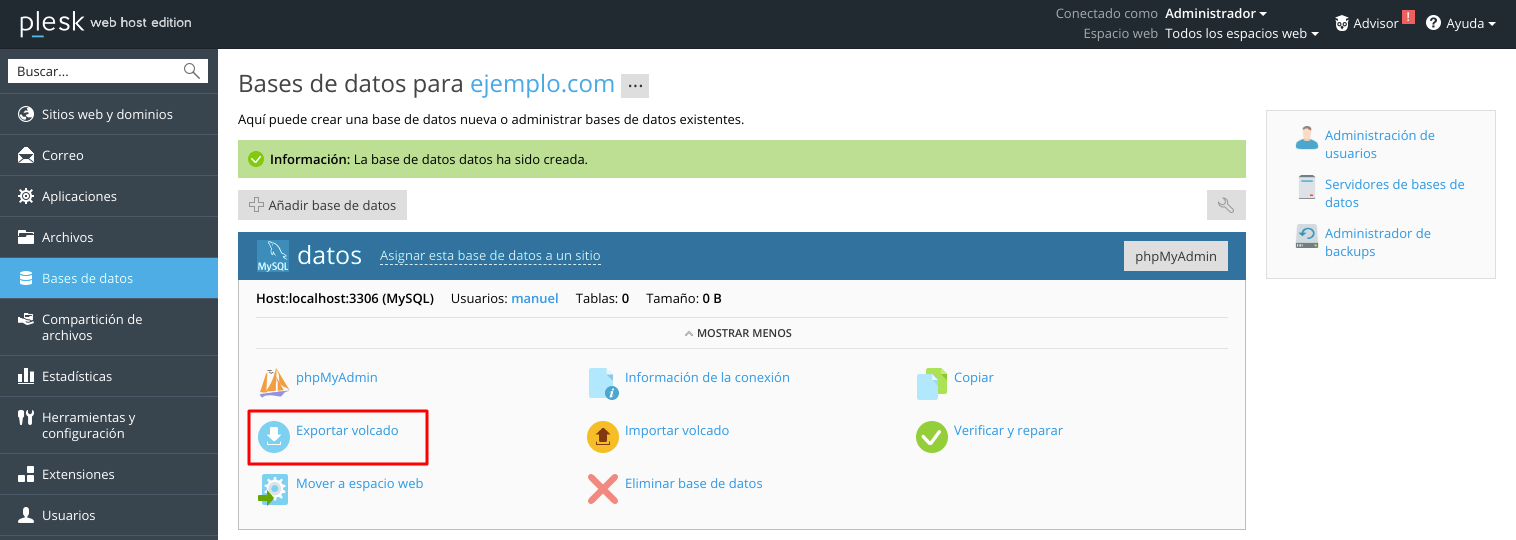
EXPORT A DATABASE
To export a database in the Plesk panel we must click on "Export dump" and then we will select the folder or directory in which the export of the database will be stored.
IMPORT A DATABASE
To import click on "Import dump" and then we select the file within our team and thus carry out the import.
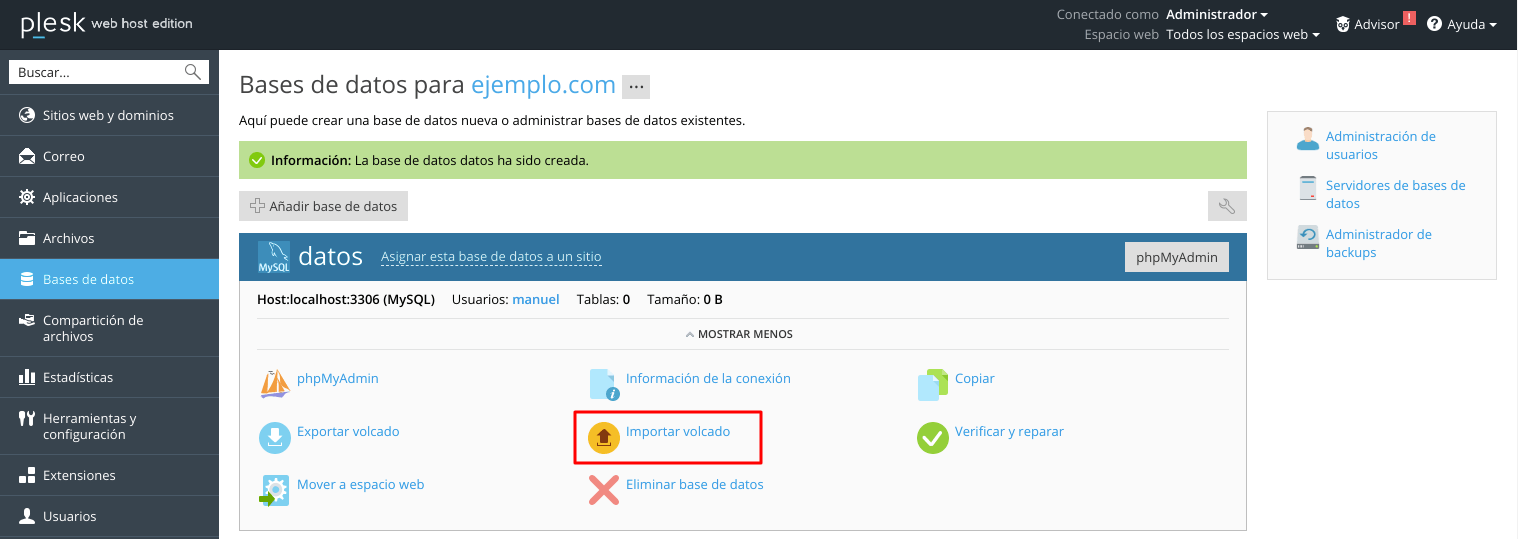
Note: It is recommended that you import data into a new database.
For instructions on how to import and export with database management tools, see the built-in tools in help sections.
HOW TO CREATE BACKUP WEBSITE IN PANEL PLESK
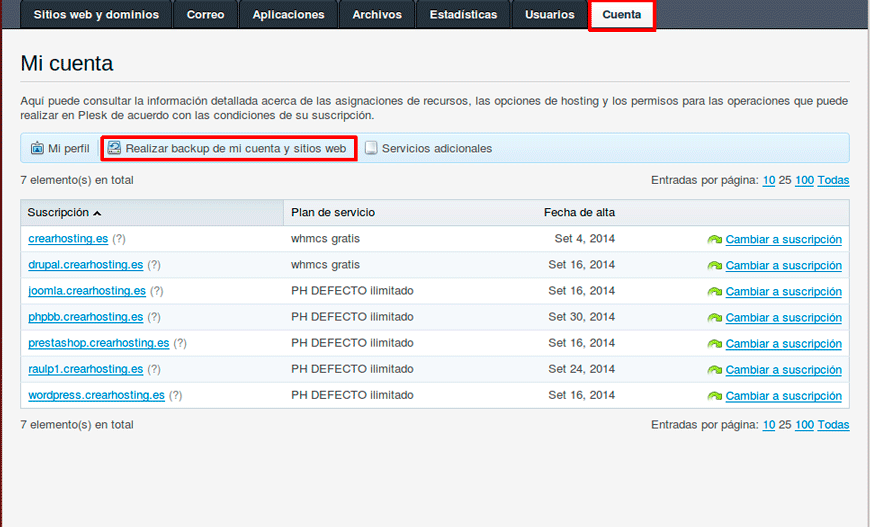
To back up all data related to your account and all your subscriptions:
- If you have access to multiple subscriptions, select the required subscription in the subscription box at the top of the screen. Or, to see the sites for all your subscriptions, select "All subscriptions".
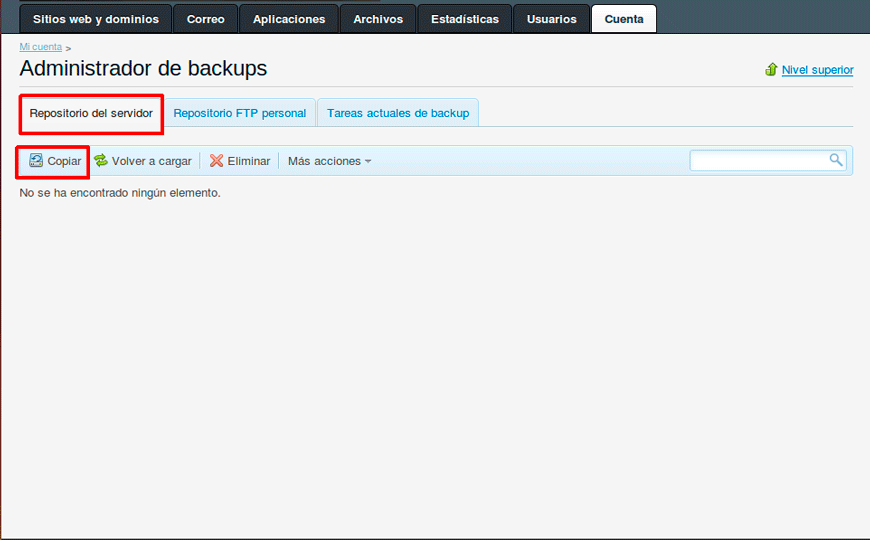
- In the "Account" select "Back up my account and websites"
- Now we make sure that we are in the tab "Server repository" and we will click "Copy":
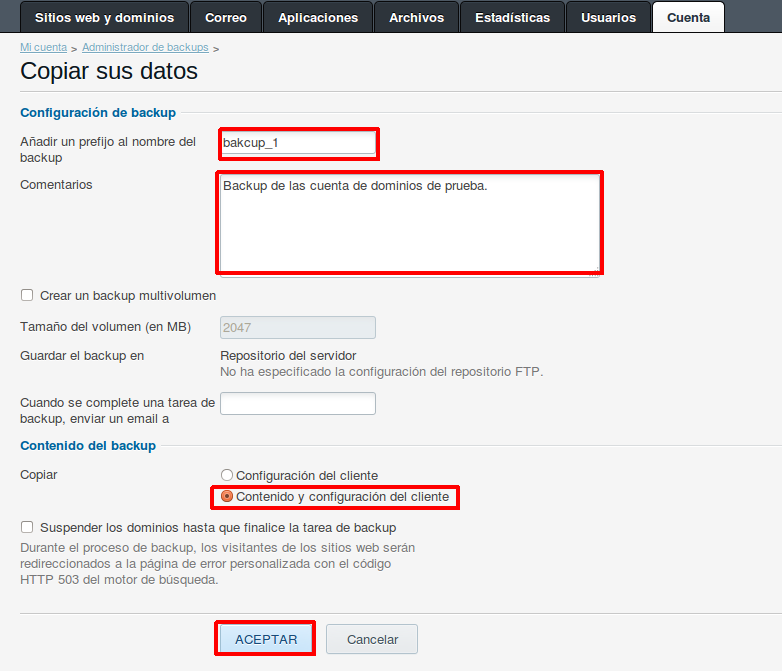
- Next, we are going to fill in the following fields:
- Backup name prefix: You cannot specify an arbitrary file name, but you can configure Plesk to add a prefix to backup file names. (Note that Plesk automatically adds the backup file creation date and time (in Universal Time) to the backup file names).
- Comment: A brief description about the backup.
- Create a multi-volume backup: Splitting the backup file. To create a multi-volume backup, select the check box and specify the size of the volume in megabytes.
- Save the backup in: Location where you want to save the backup file.
- Send an email to: Email notification upon completion of backup. If you want to receive notifications of the backup, enter your email address.
- Backup content: You can back up only the account or account settings and all data (including databases).
- Suspend domains until backup job is complete- Select this option to prevent users from making changes to the content or settings of websites while they are being backed up.
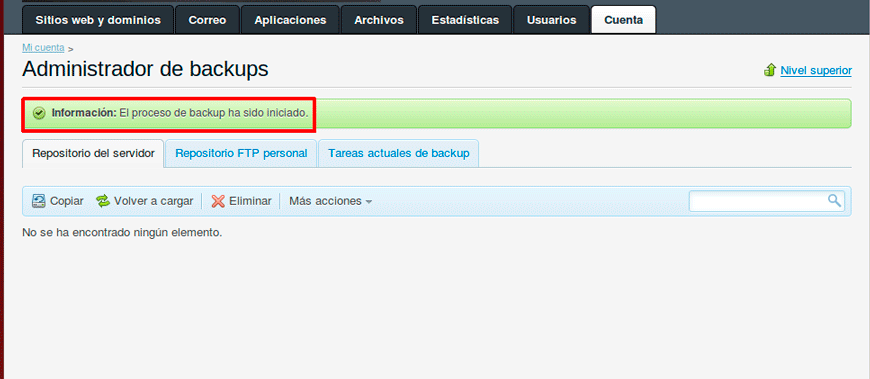
- When the backup is complete, the backup file will be saved to the selected repository.
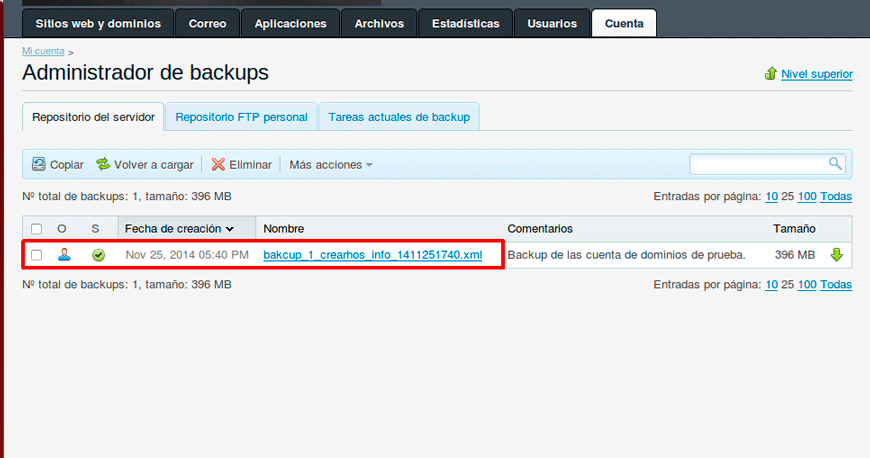
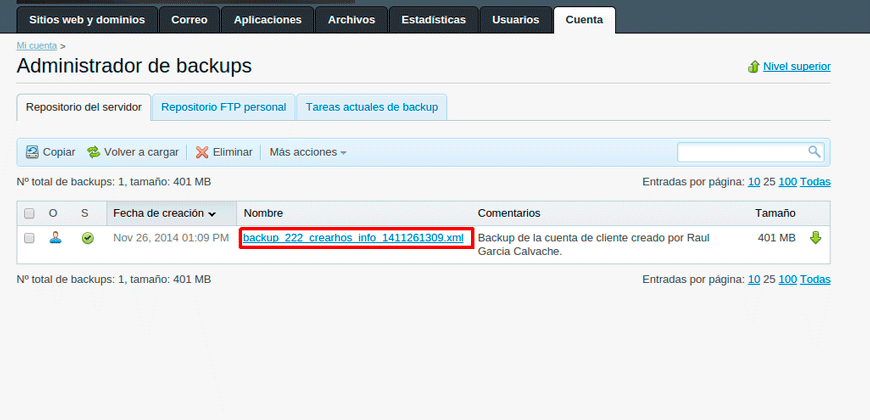
- In the "Server repository" the backup we just made appears:
Note:
If they select this last option, once the backup is restored, you will have to manually switch on each domain alias for each site that requires a domain alias. This can be done in the Websites & Domains tab> alias domain name> Activate.
Click Copy.
HOW TO PROGRAM BACKUP COPIES IN PANEL PLESK
If you prefer to schedule backups in Pesk on a regular basis:
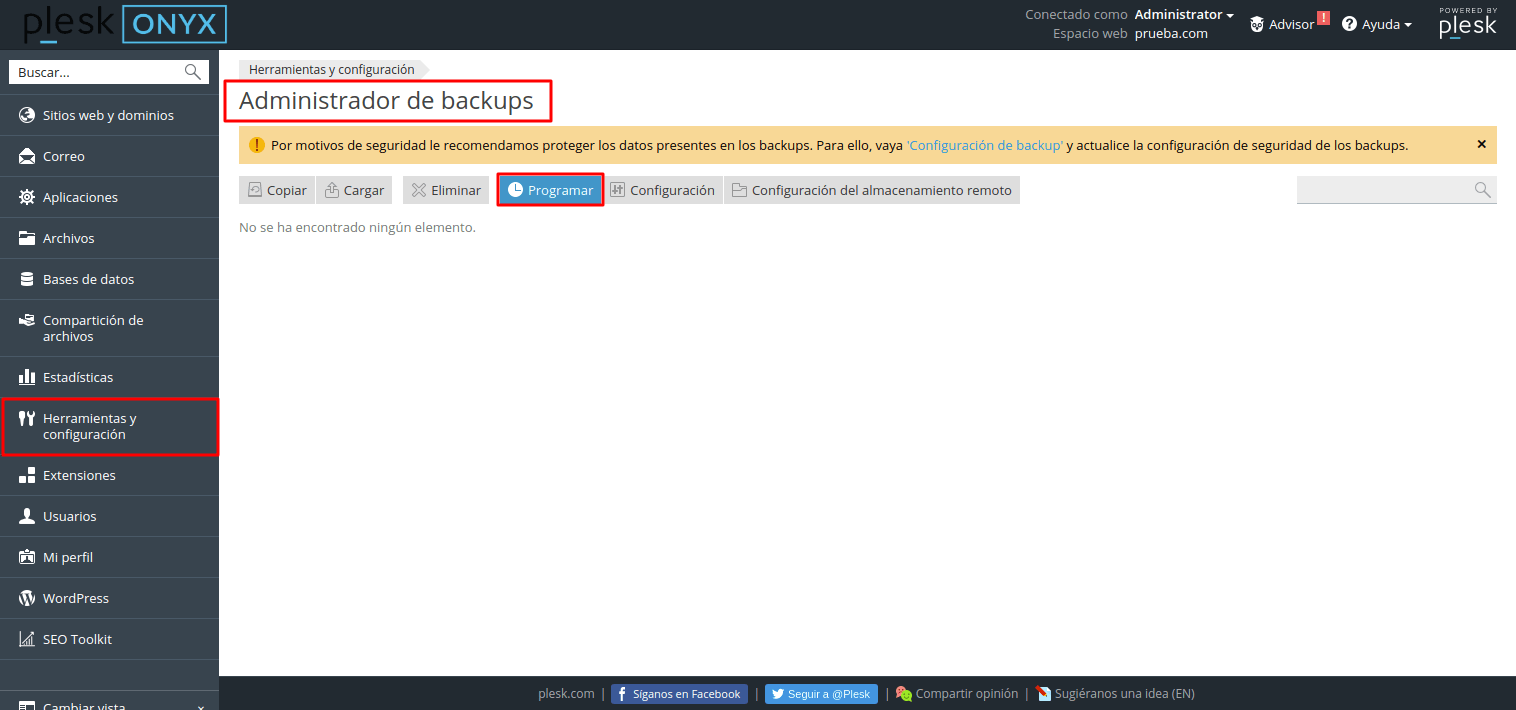
- In the "Tools and Settings" select "Backup management":
- Then we click on "Program"
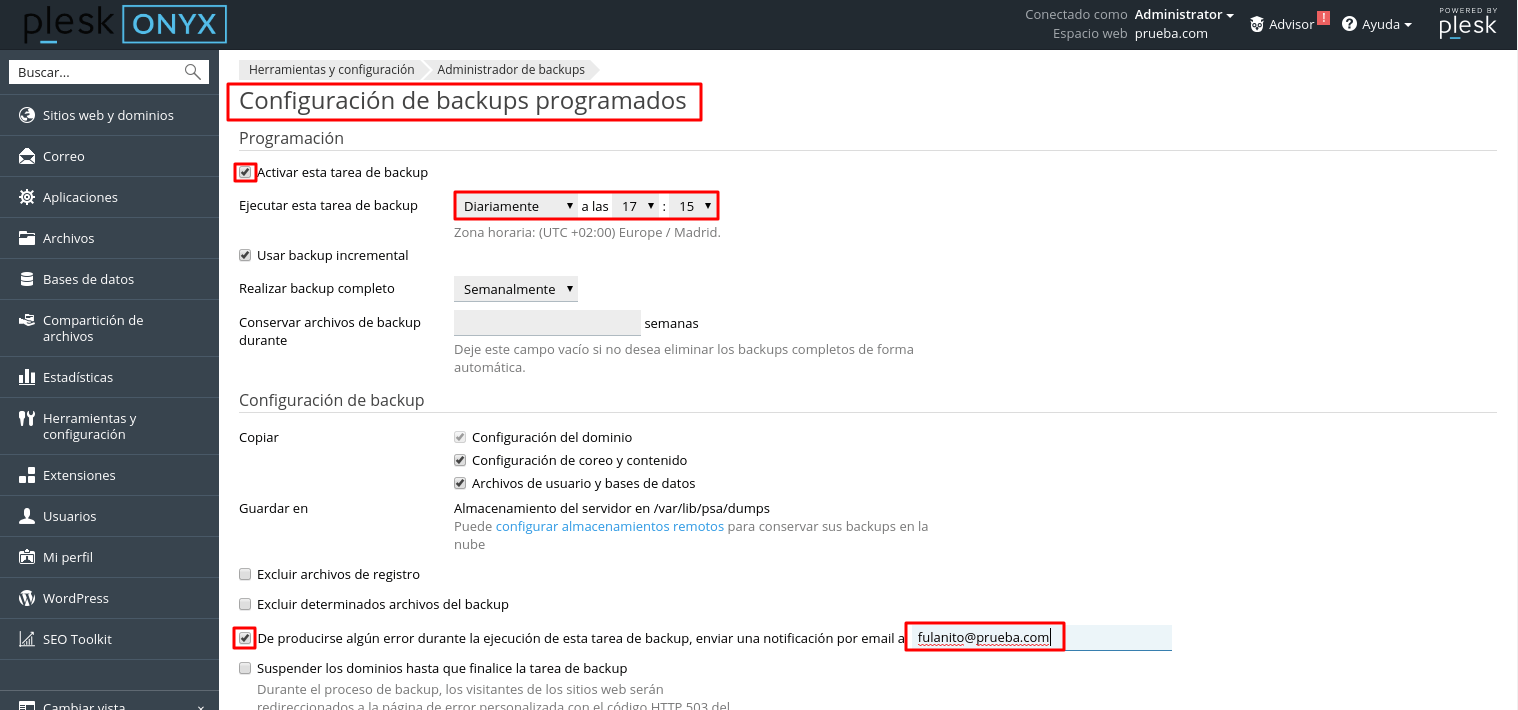
- Now we are going to configure the following parameters:
- We check the box "Activate this backup task"
- Take full backup: We choose how often we want the backup to be made: We can choose between "Daily", "Weekly", "Monthly" (If we select daily we must specify at what time the backup will begin, if it is weekly we will specify the day of the week and the time, and if it is monthly the day of the month and the time)
- Add a prefix to the Backup name: We introduce a name for the backup.
- Maximum number of backups in the repository: Enter a number if you want to recycle the backup files: When this limit is reached, the oldest backup files will be deleted.
- Backup content: We select what we want the backup to be. We will mark "Content and configuration of the client". You can also make a backup only of account settings or only elements such as databases, or files.
- Send email if an error occurs during the copy process: If we want to be notified by email in case an error occurs during the backup.
- Suspend domains until backup job is complete- Select this option to prevent users from making changes to the content or settings of websites while they are being backed up.
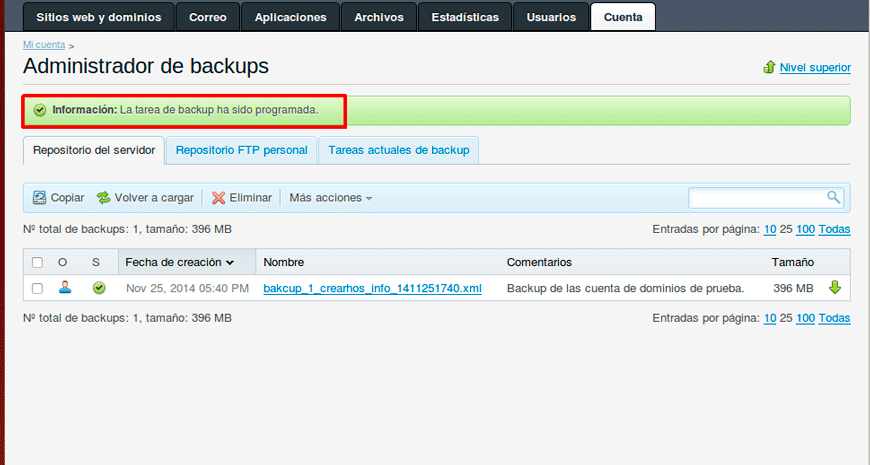
- Here we can see that the backup has been scheduled correctly:
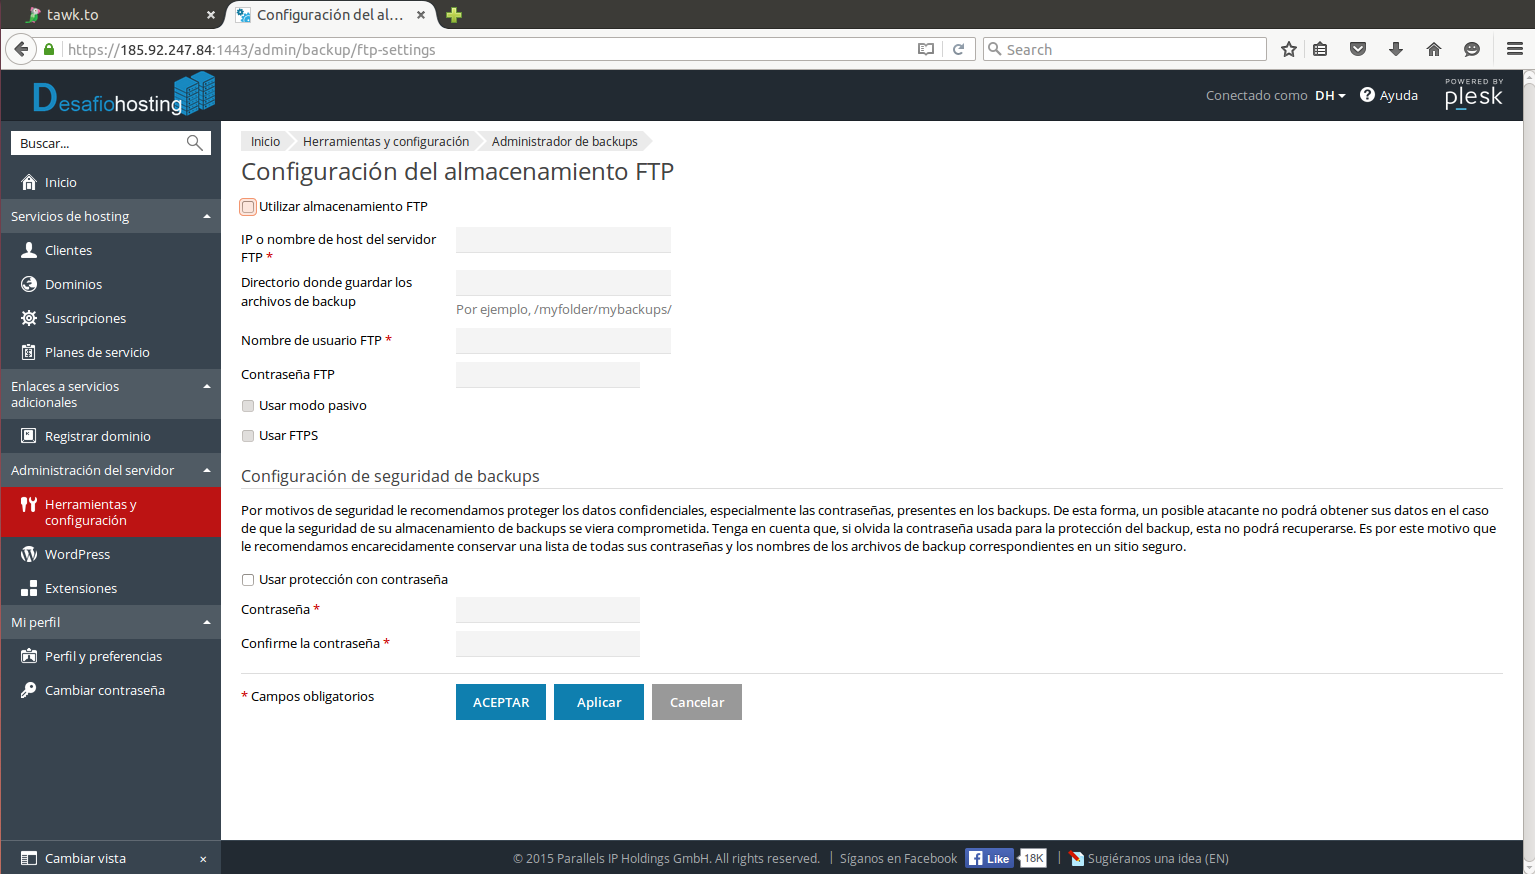
HOW TO STORE BACKUP IN FTP WITH PANEL PLESK
We can use the ftp storage to save our backups outside the server in the ftp, being a way to save space on the server.
In the last option (ftp storage configuration) indicate the configuration for your personal remote ftp storage where the backup files should be saved.
HOW TO RESTORE SECURITY COPY IN PANEL PLESK
To restore a backup from the server repository:
- In the "Account" select "Back up my account and websites":
- Next we select the backup from which we want to restore (If we have more than one):
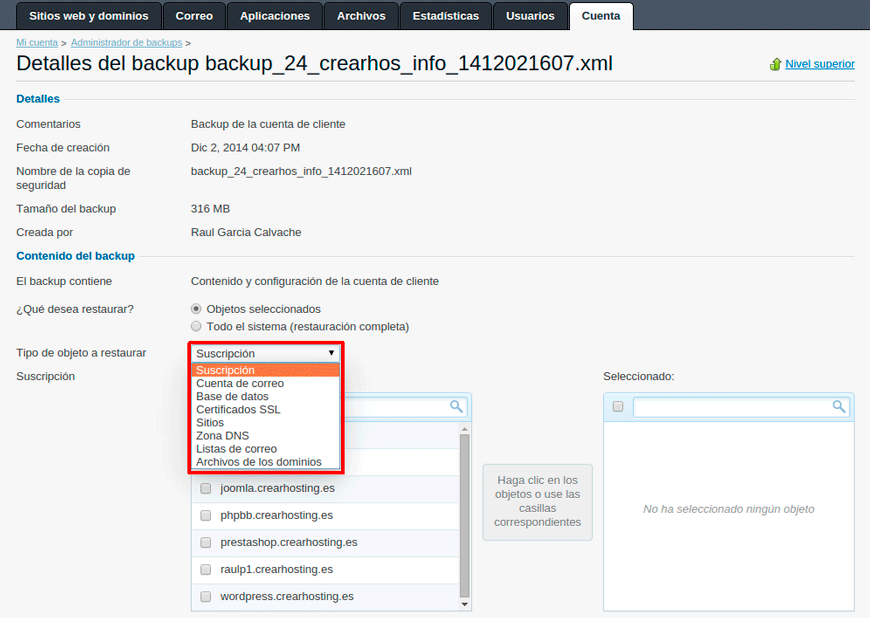
- Select which elements we want to restore:
- After you have selected a backup file name from the backup list, Plesk starts the restore wizard.
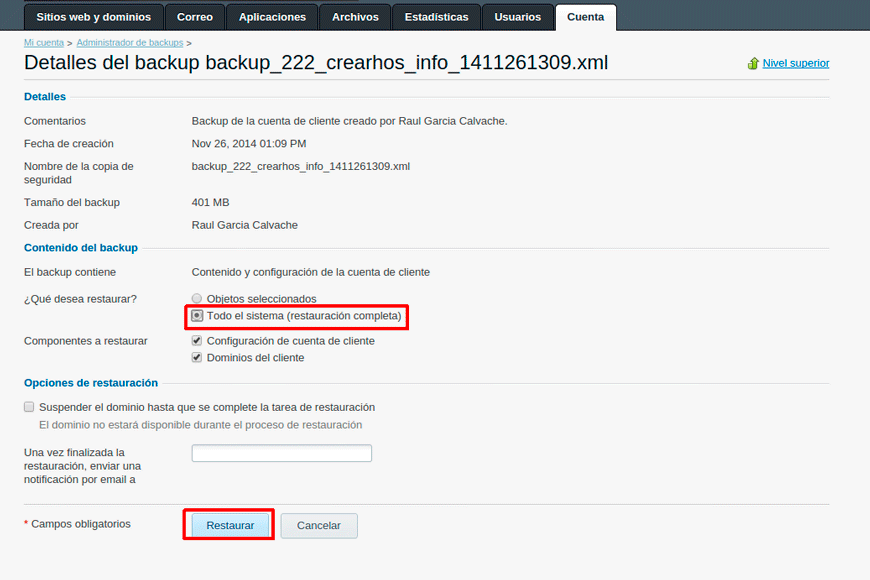
We will select the option "Entire System (Full Restore)" If, for example, we need to restore one or more domains but leave other domains intact, we must select the domains that we want to restore.
You can restore data from backup files kept in:
The internal Plesk repository: To restore the backup files from the Parallels Plesk Panel repository, select the name of the backup file you want to restore in the Account tab> Back up my account and websites> Repository Server tab.
An external FTP repository: To restore the backup files from the Parallels Plesk Panel repository, select the name of the backup file you want to restore in the Account tab> Back up my account and websites> Personal FTP Repository tab.
Select data to restore
Note:
Starting with Parallels Plesk Panel 12.0, you can select which objects to restore from a backup. You can restore a particular site, file, database, and so on. This will help you restore only what you need to restore, without overwriting other objects. For example, if you want to restore only the DNS zone for one domain, example.tld, there is no need to restore the settings for all other domains. Restoring selected objects is possible only from backups created in Parallels Plesk Panel 12.0 or later.
To restore all objects: Select the Entire System (Full Restore) option.
If prompted, specify the types of data to restore, such as domain settings, content virtual host, databases, or mail and account settings. For example, if you select mail settings, the mail settings of all domains will be restored.
To restore specific objects of a particular type, such as a mailbox or DNS zone for a domain:
- Select the selected option objects.
- Select the type of object you want to restore. For example, the database.
- Select the subscription the object belongs to in the Subscription box (applicable for all object types except subscription). Click on the box to see the list of all subscriptions or type the first letters of the subscription name, and Plesk will find matches. For example, example.com.
- Select one or more objects of the selected type. For example, wordpress_database_8.
Specify restore options:
"Suspend domains until restore job is complete". Select this option if you want to avoid potential conflicts that can occur when users modify site content or settings while sites are being restored.
"Once the restoration is finished send a notification by email": Enter your email address if you want the control panel to notify you when the restoration is complete.
If we choose the option "Selected objects" We can select the type of objects that we want to restore:
And if we choose the option "Entire System (Full Restore)"

We select the elements that we want to restore, by default both are marked "Customer account settings" y "Customer domains" and click on "Restore":
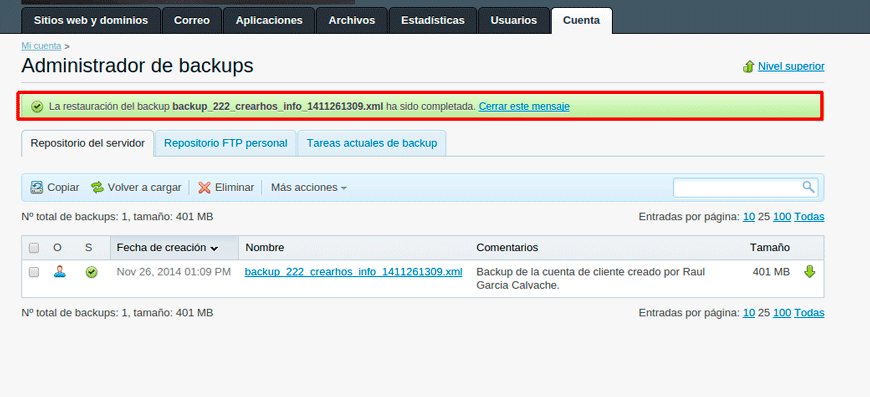
We can see that the restoration has already started, we wait a few minutes for it to finish:
Once the restoration process is finished, it shows us the following message:
HOW TO ADD FTP ACCOUNT IN PANEL PLESK
If you need to create an additional FTP account to the one established by default, we follow the following steps:
NOTE:
If you have access to multiple subscriptions, select the required subscription in the subscription box at the top of the screen. Or, to see the sites for all your subscriptions, select All subscriptions.
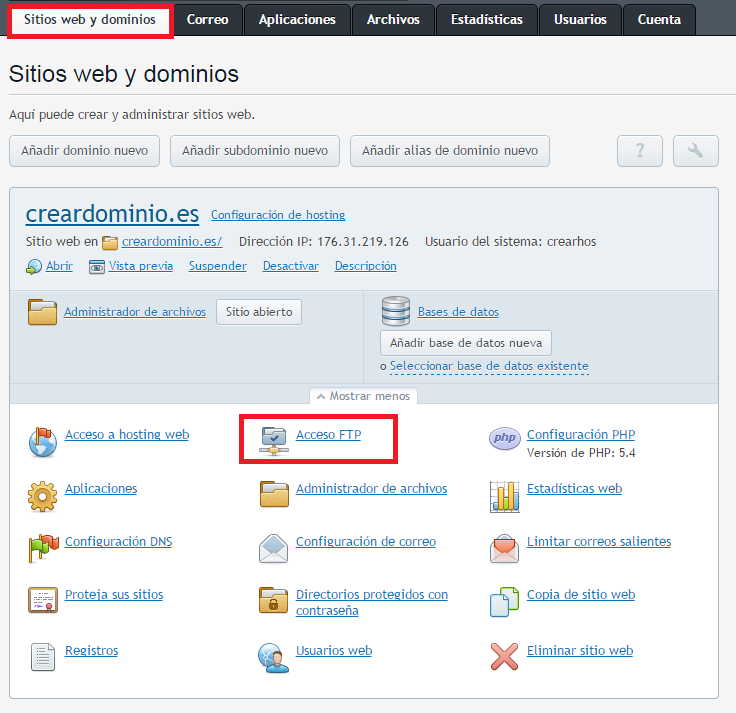
- On the Websites & Domains tab and click "FTP access".
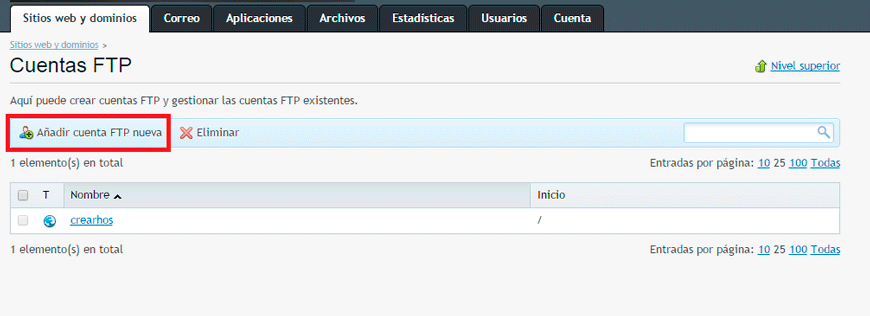
- In the "FTP accounts", Click on «Add new FTP account»:
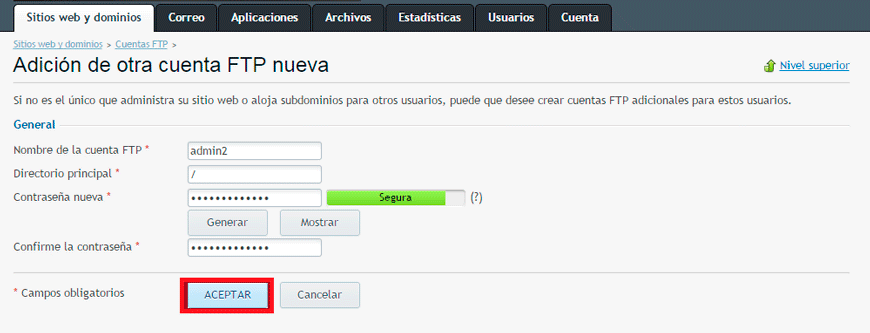
- We have to fill in the following fields:
- FTP account name: Enter an arbitrary name.
- Principal Directory: Select the directory in which the user will be taken when he or she connects to the FTP account.
- New password.
- Confirm password.
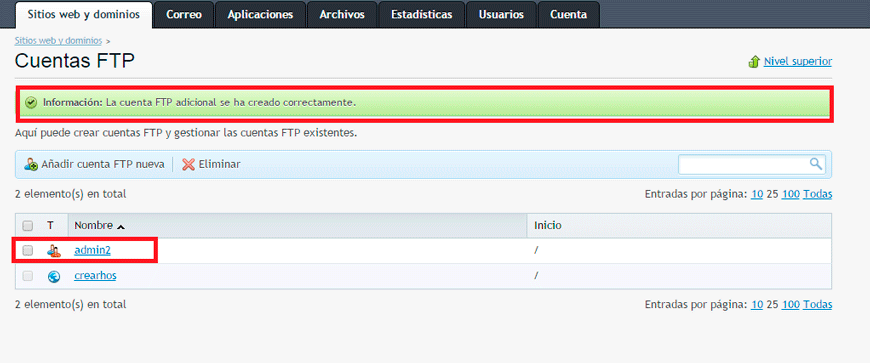
- In the hosting window, if you don't grant any permission, a connection will be made to the FTP account, but the content of the home directory will not be shown to the user. Click on "To accept".
TO CHANGE THE PROPERTIES OF AN FTP ACCOUNT:
- In the "Websites and domains" and click "FTP access".
- Select the name of the FTP account from the list.
- Make the necessary changes and click "To accept".
TO DELETE AN ADDITIONAL FTP ACCOUNT:
- In the "Websites and domains" and click "FTP access".
- Select the checkbox corresponding to the FTP account you want to remove and click "Remove".
- Confirm the deletion and click OK

HOW TO CHANGE FTP ACCESS DATA FOR PLESK PANEL
If you have access to multiple subscriptions, select the required subscription in the subscription box at the top of the screen. Or, to view the sites of all your subscriptions, select "All subscriptions."
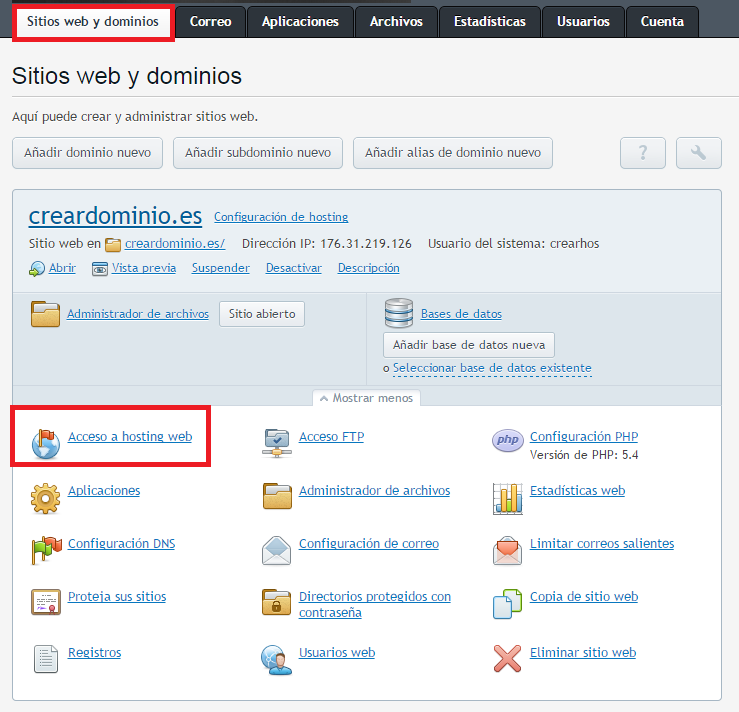
- Click on the tab «Websites and Domains».
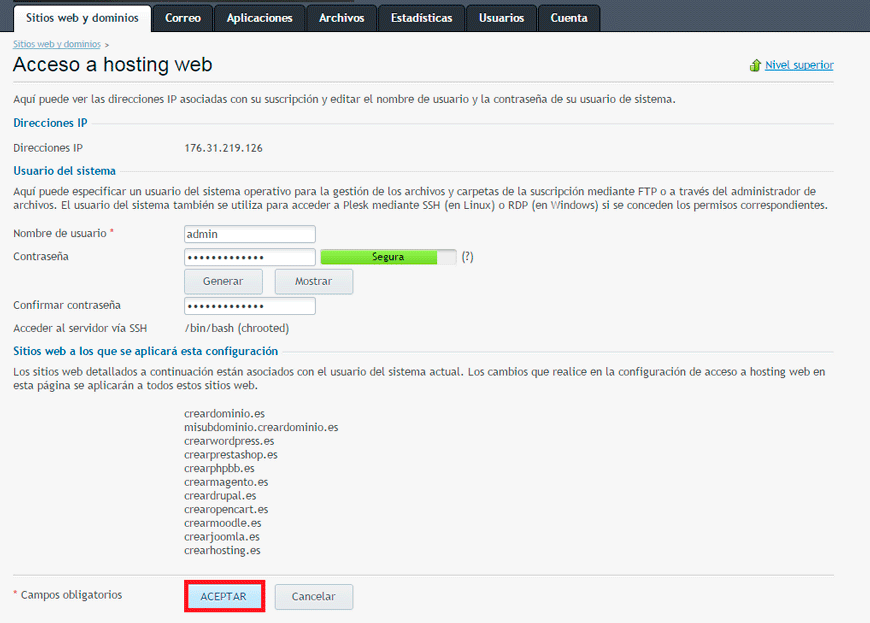
- Click on "Access to web hosting":
- Enter a new username or password.
- Click on "To accept".
HOW TO INSTALL WORDPRESS AUTOMATICALLY IN PANEL PLESK
We are going to install wordpress in a few simple steps:
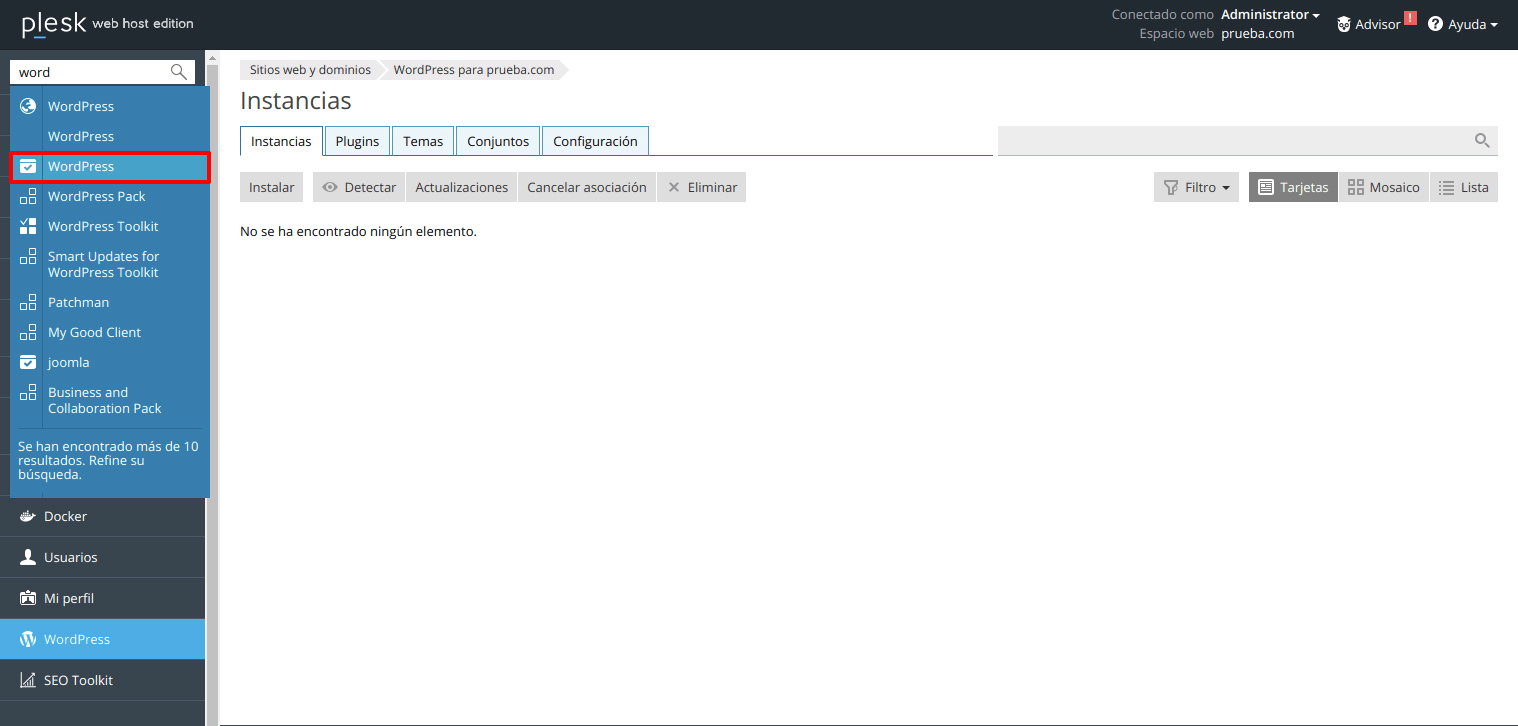
- In the search engine that is on the left side of our Plesk panel we look for: "WordPress" and we click on it.
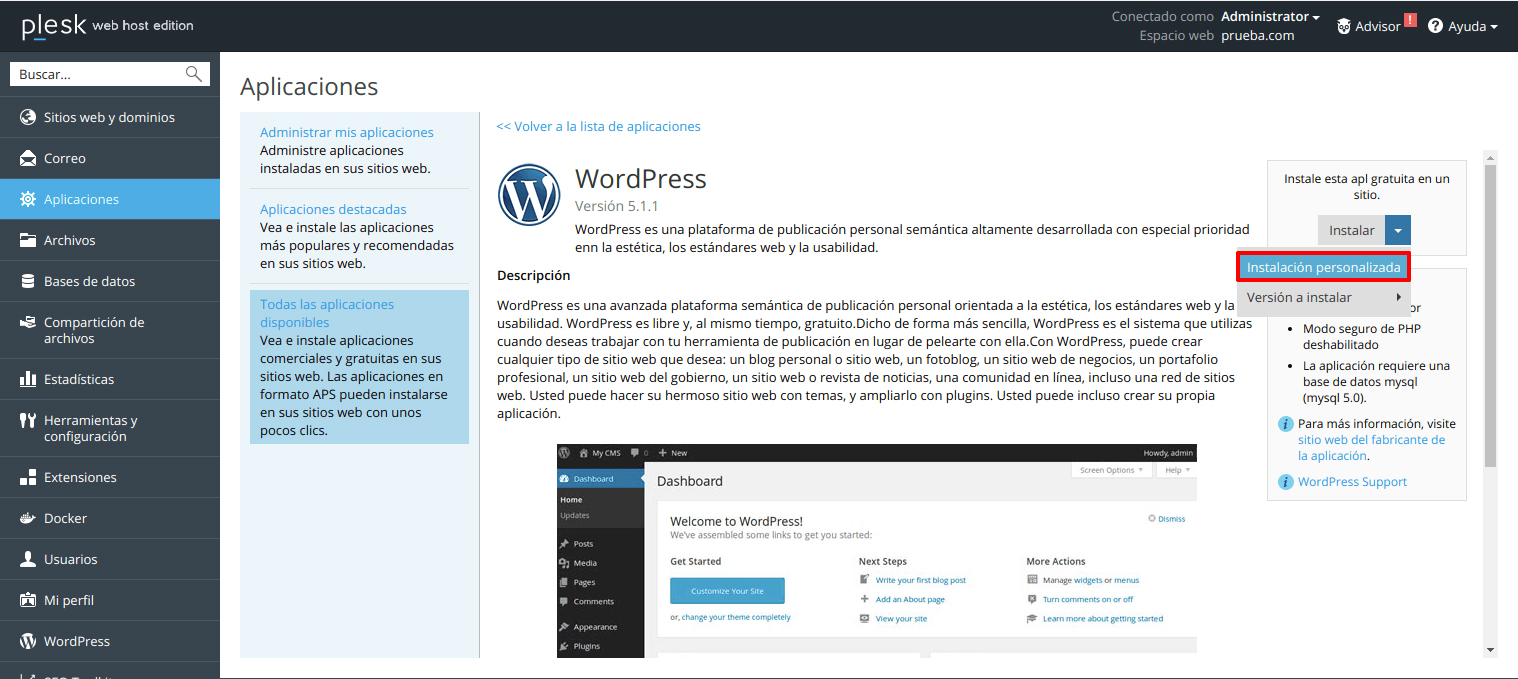
- Within the applications panel we select «Installation customize»:
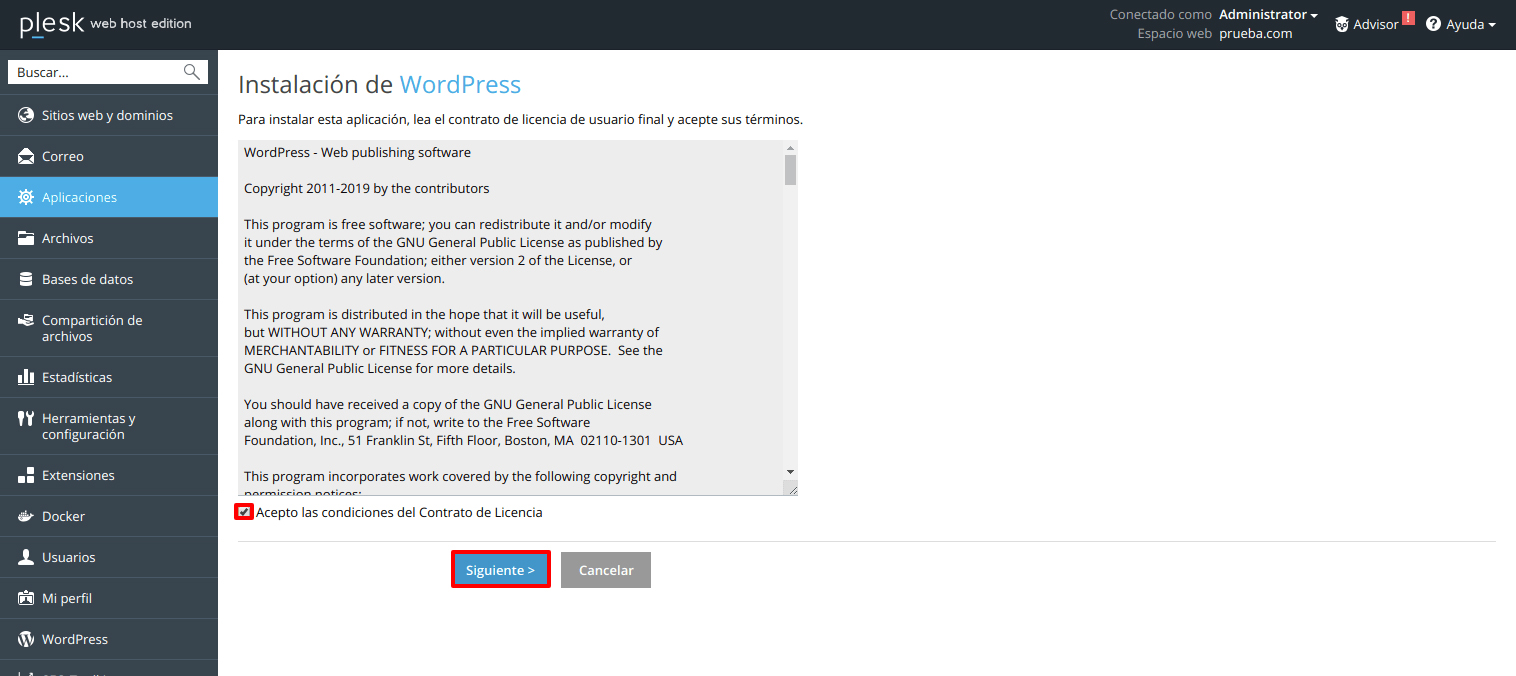
- We accept the WordPress installation terms:
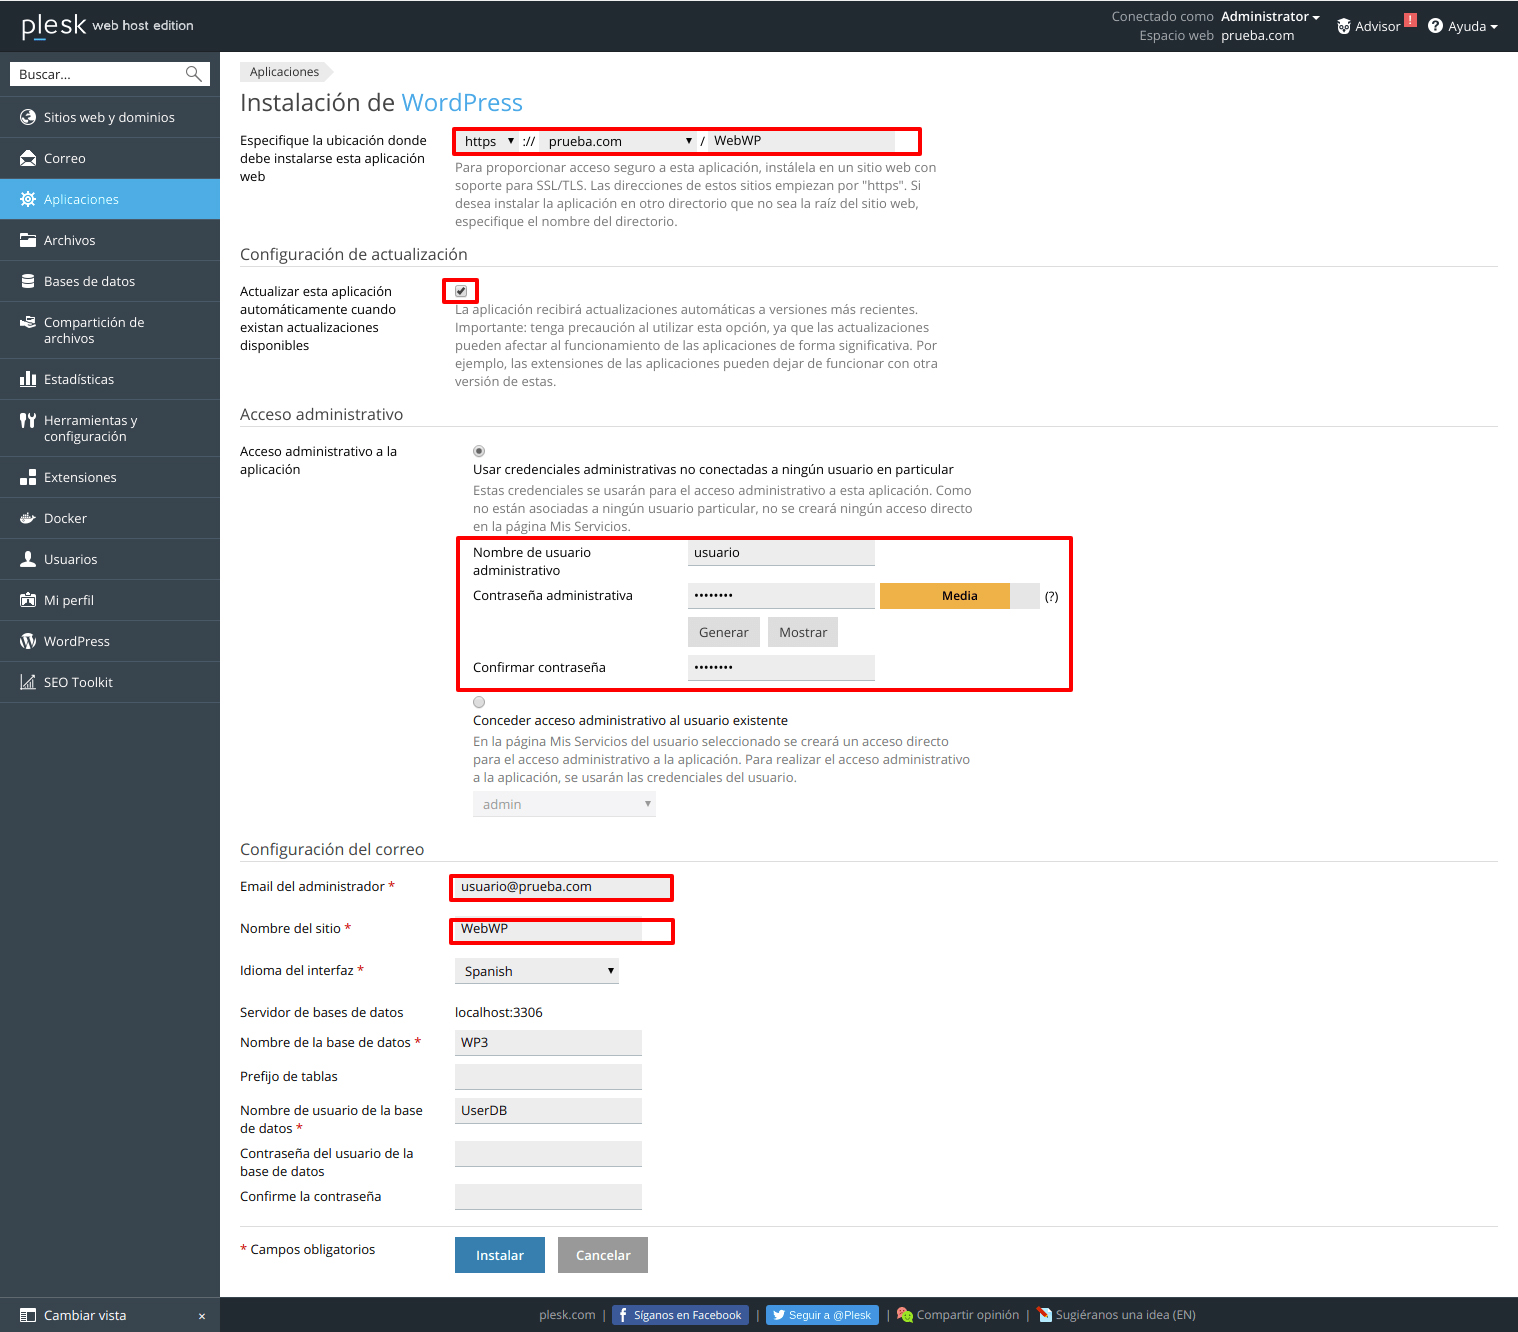
- Now we are going to configure the parameters of the WordPress installation:
- We are going to specify the domain directory on which we are going to install WordPress (it must be a domain without any content) for example «Http://crearwordpress.es».
- Update settings: We can mark this option if we want this application to update automatically.
- Administrative Access:
- We fill in the fields related to the "Mail configuration":
- Administrator email: We will write an email address.
- Name of the site: It will be the name that WordPress will show once installed.
- Interface Language: Let's select «Spanish»
- Database name: We can leave the default name or put one of us.
- Database user password: If we leave this field blank, a password will be automatically assigned to the database user-
- Once the password is confirmed, click the button "Install"
select "Use administrative credentials not connected to any particular user" In the following fields we write a username and password.
HOW TO ACCESS WORDPRESS ADMINISTRATION IN PLESK
Now if we want to access our WordPress from the main page of the Plesk panel we must click on "Websites and domains":

Once there, we will locate the domain in which we previously installed WordPress and we will access our website from it.
The WordPress page will open.
HOW TO INSTALL PRESTASHOP VIRTUAL STORE IN PLESK PANEL
Tutorial on how to install your Prestashop virtual store with our Plesk Auto-installer.
Steps to install Prestashop automatically:
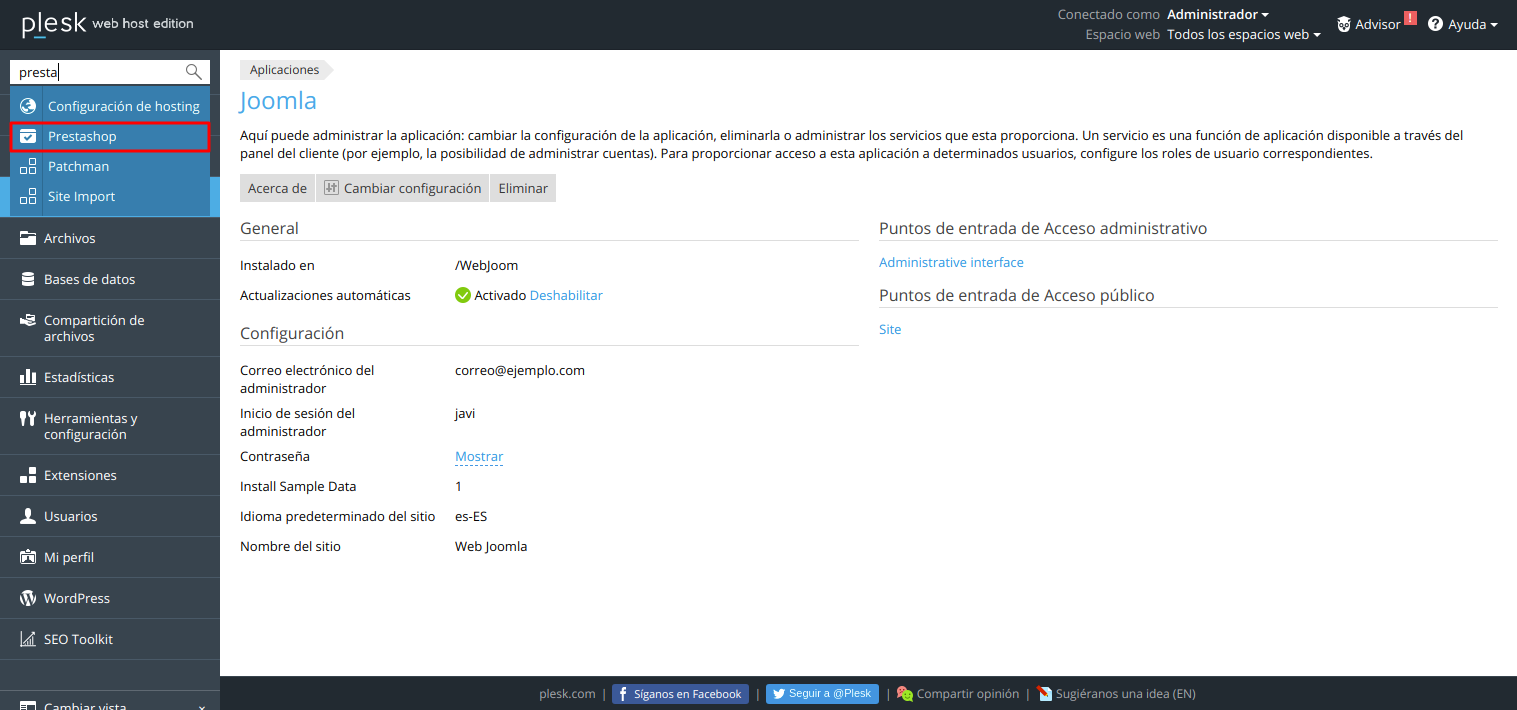
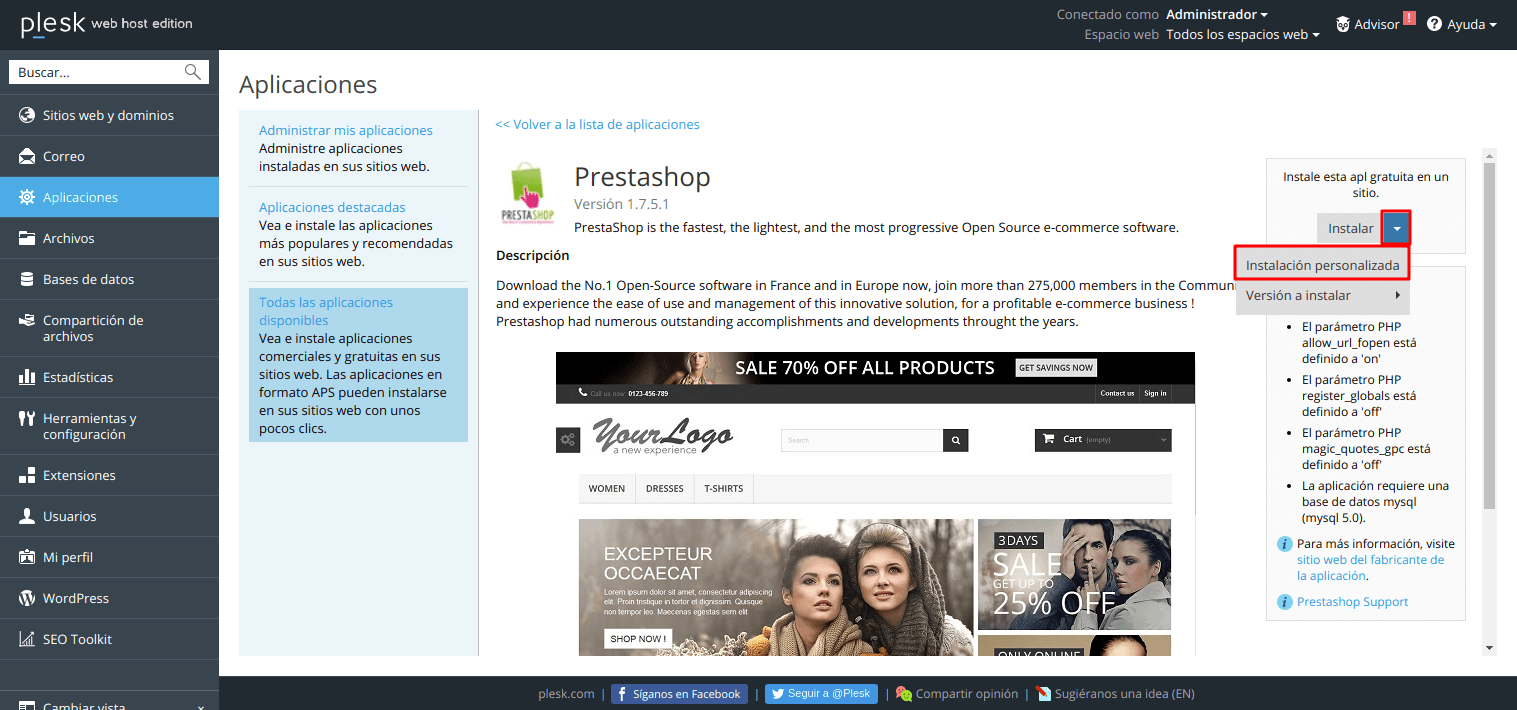
- We will go to the top of the left sidebar and enter the name of the application "Prestashop" and then we will click on the "magnifying glass":
- The Prestashop application appears, now we will select "Install (Custom)":
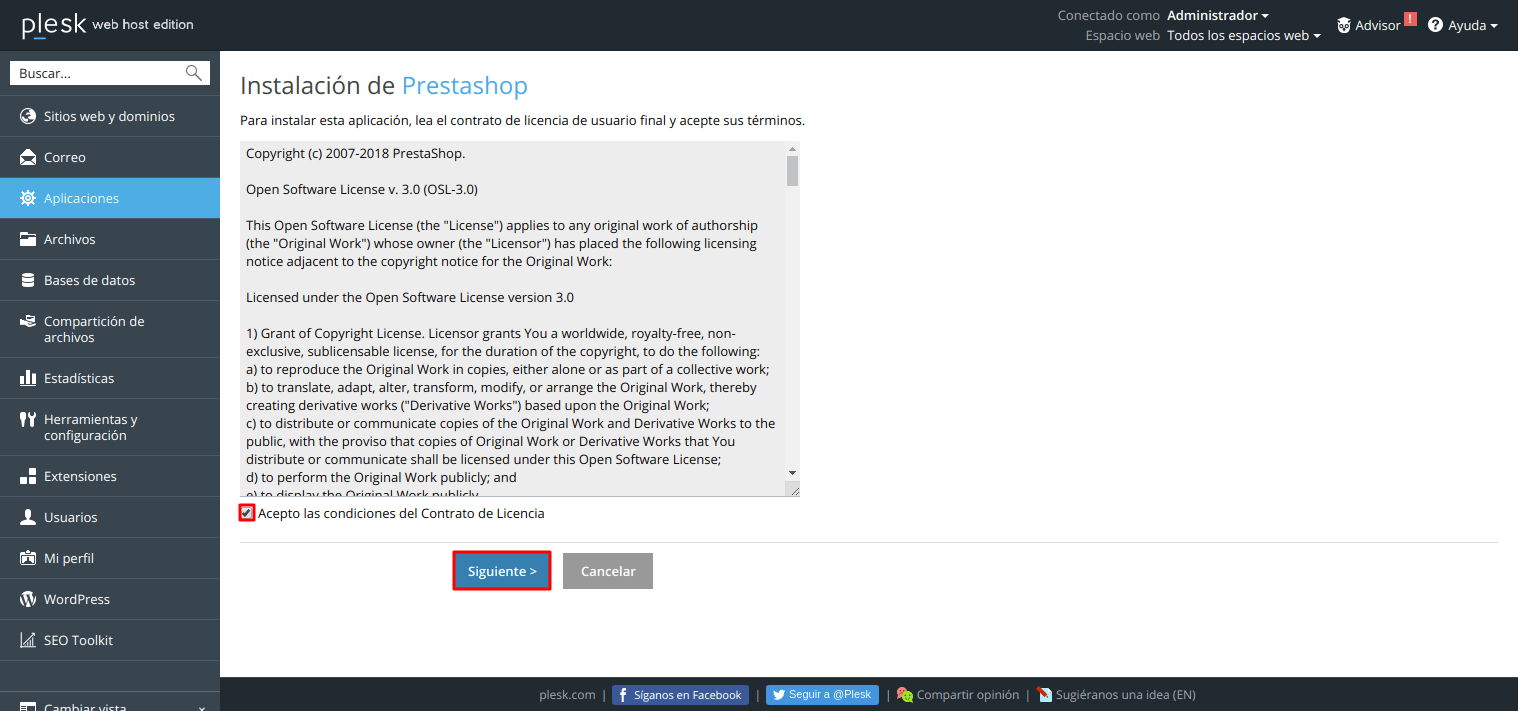
- We accept the Prestashop installation terms:
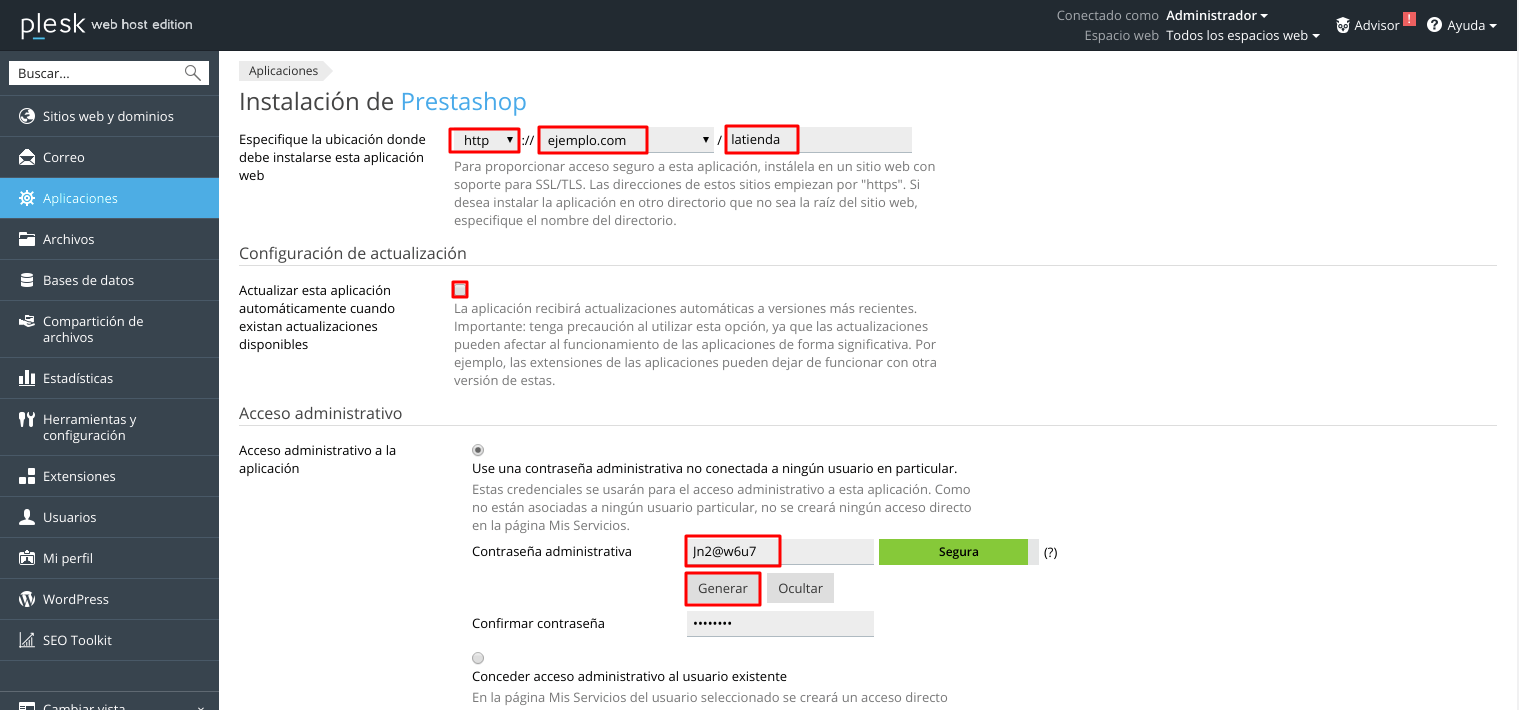
- We fill in the necessary parameters to complete the installation of Prestashop:
- Select the domain and folder in which the application will be installed (in the example image the root folder of the domain "createprestashop.es" is used):
- Update settings: We will check this box if we want the application to update automatically.
- Administrative Access: We will select the option "Use an administrative password not connected to any particular user", we will write and confirm the password.
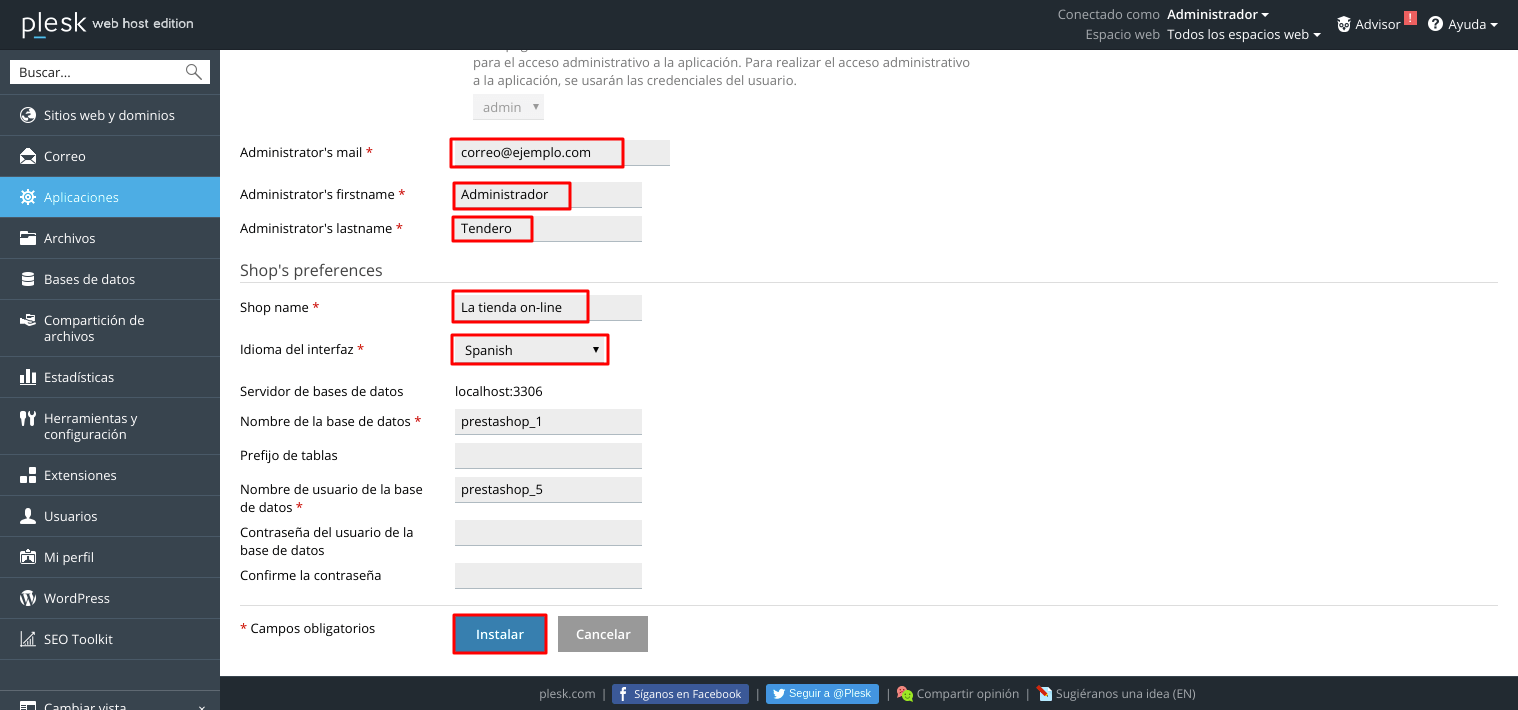
- Fill the following fields:
- Administrator email: Our email.
- Administrator Name: Our name.
- Administrator Surname: Our last name.
- Store E-Mail: A valid email in which you will receive notifications from our Prestashop store.
- Store Name: The name of our store will be displayed once the application is installed.
- Database name: We can leave it by default, or write another name for the database.
- Tables prefix: It is recommended to leave it as default.
- Database username: You can leave the default username or define one for us.
- Database user password: We can define a password for the database user or leave it blank, if we leave it blank it will be generated automatically.
- We click on "Install" to finish the installation
- We can see that the Prestashop installation has finished successfully:
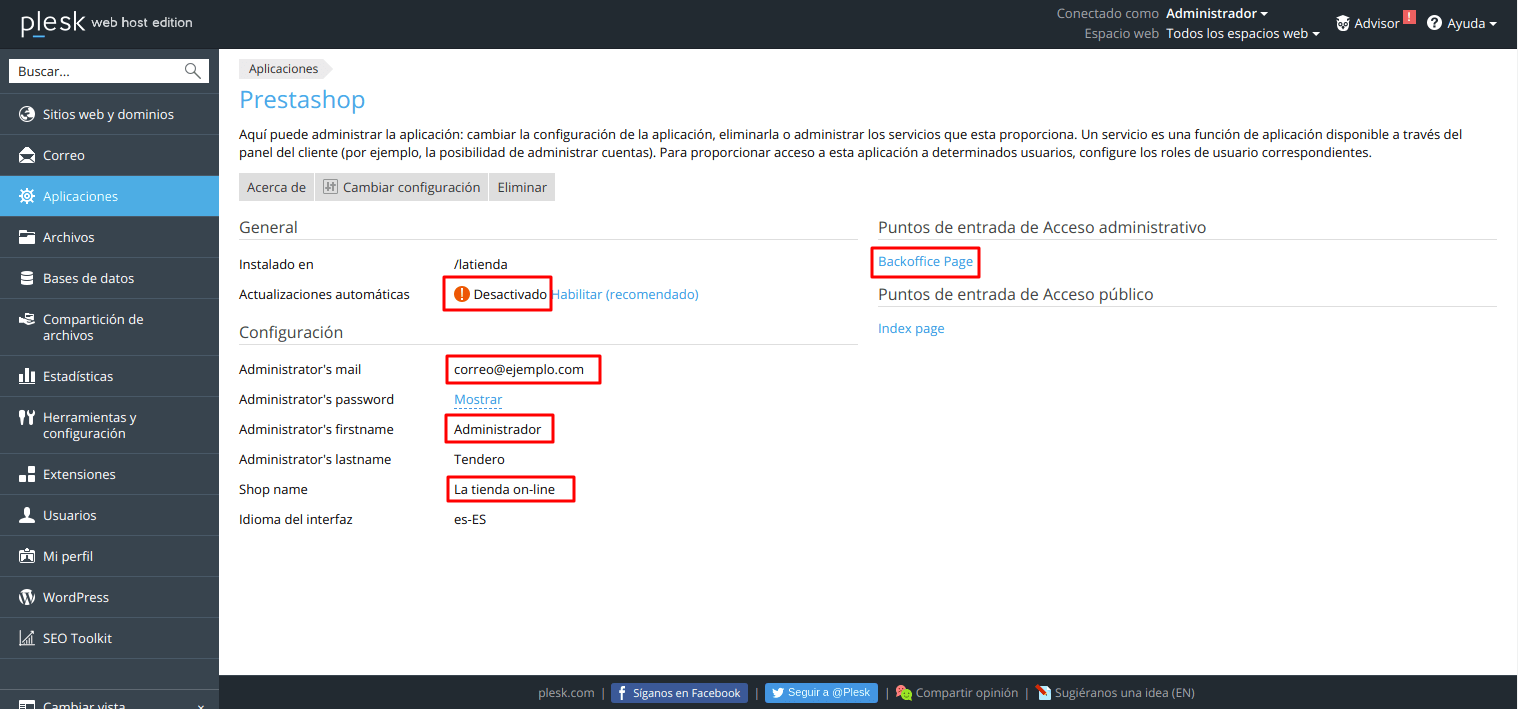
HOW TO ACCESS PRESTASHOP ADMINISTRATION IN PLESK
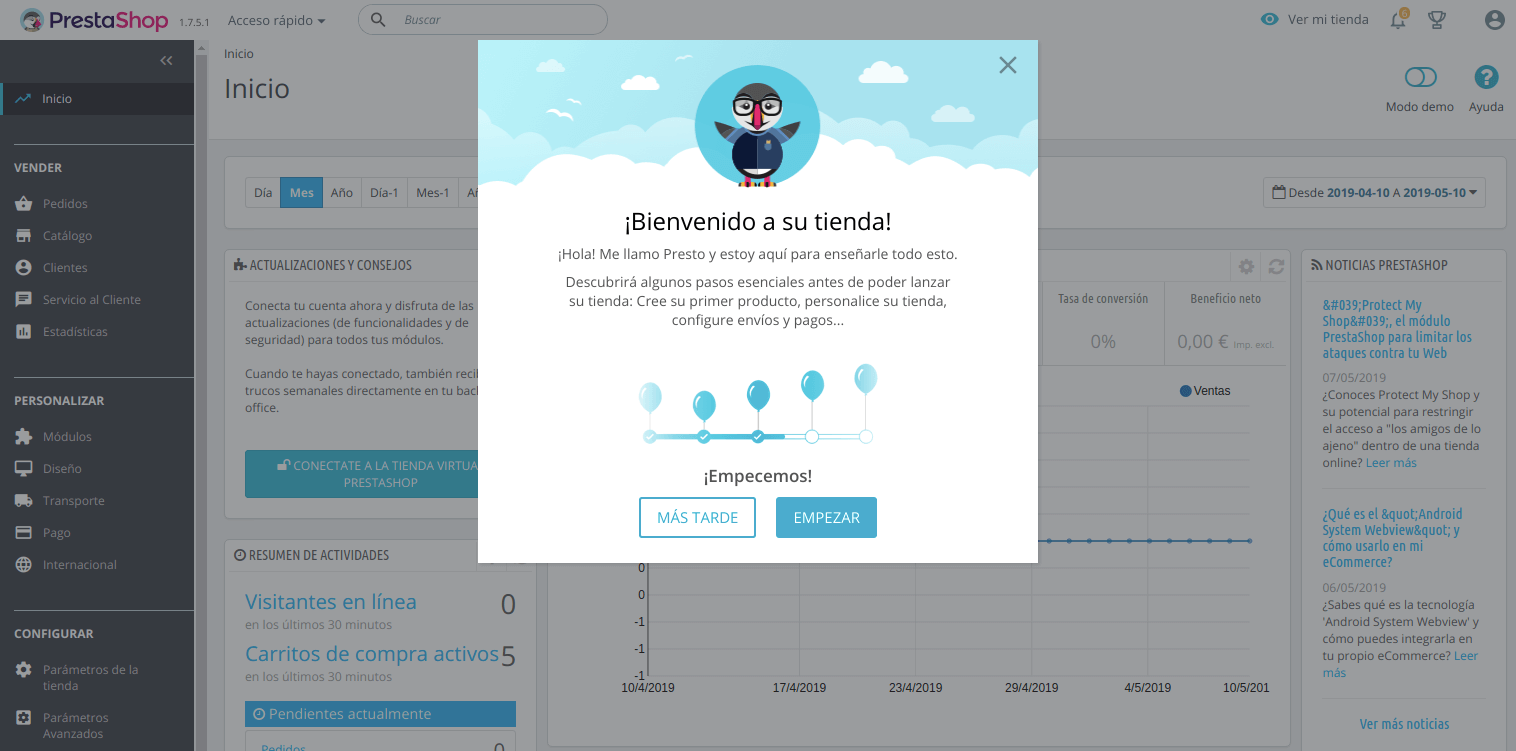
To access Prestashop from the Plesk panel in the "Websites and domains" tab, select the domain on which we have installed Prestashop and click on "Open":
We can see the default page of our Prestashop store:
HOW TO INSTALL MAGENTO VIRTUAL TENT AUTOMATICALLY IN PLESK PANEL
Steps to install a Magento virtual store automatically from the Plesk panel:
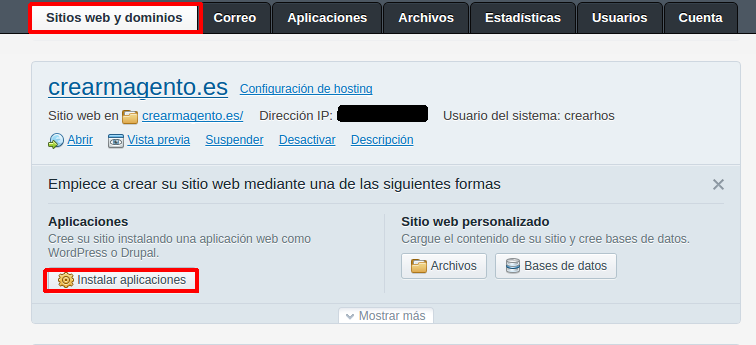
- From the main page of the Plesk panel "Websites and domains" we position ourselves on the domain in which we want to install the Magento application and click on "Install applications":
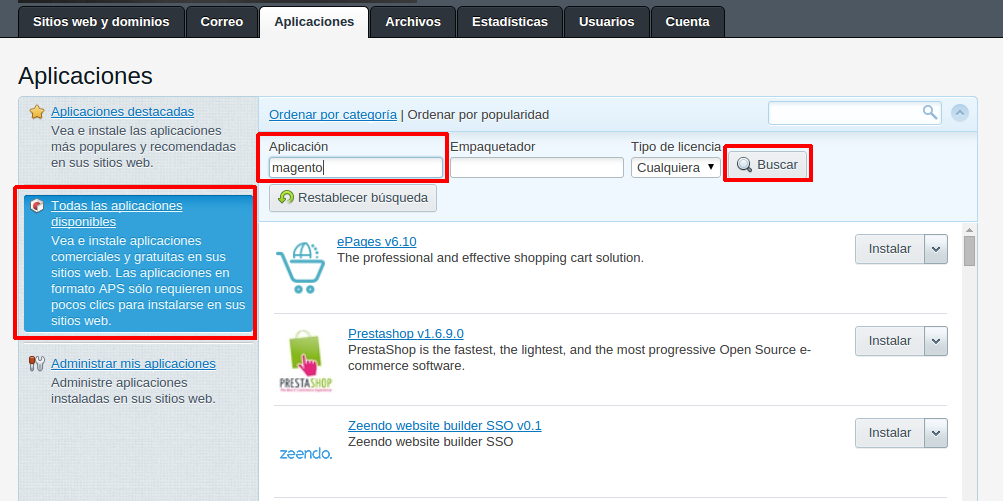
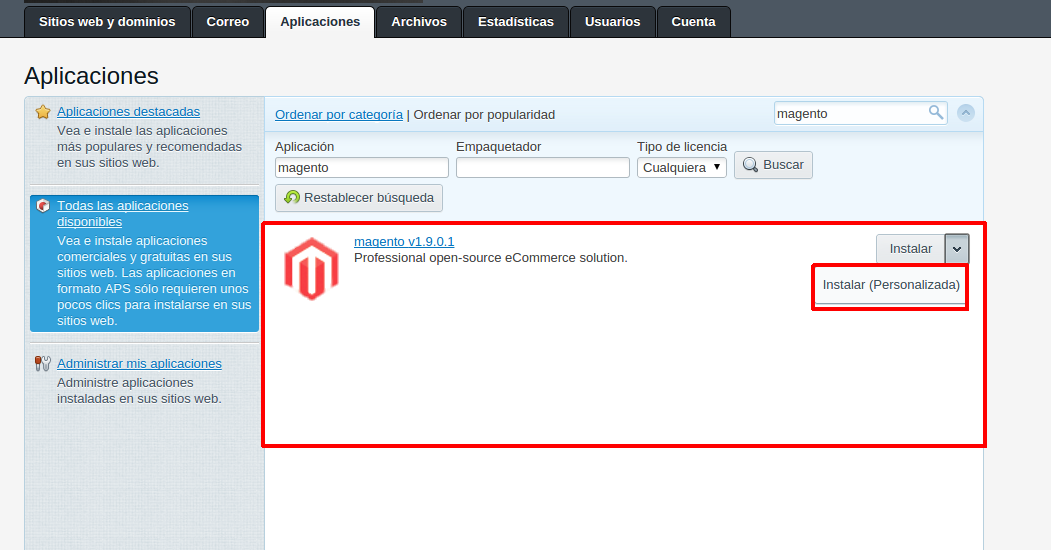
- In the countryside "Application" we will write the name of the application and click on "Search":
- We select the Magento application and click on "Install (Custom)":
- We wait while Magento downloads:
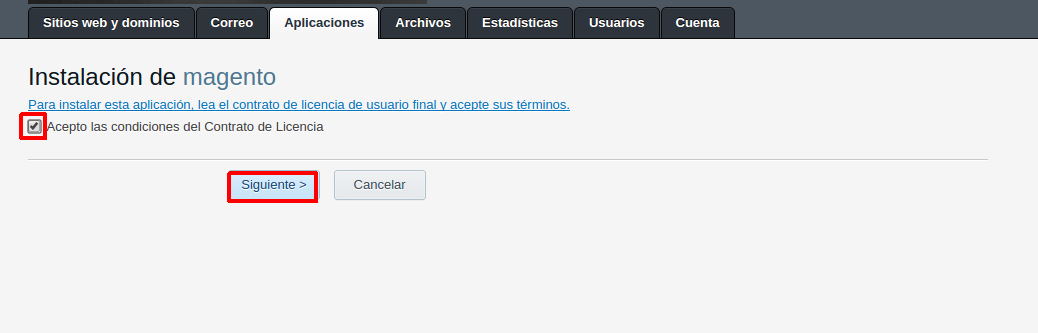
- We accept the installation license terms and conditions and click "Following":
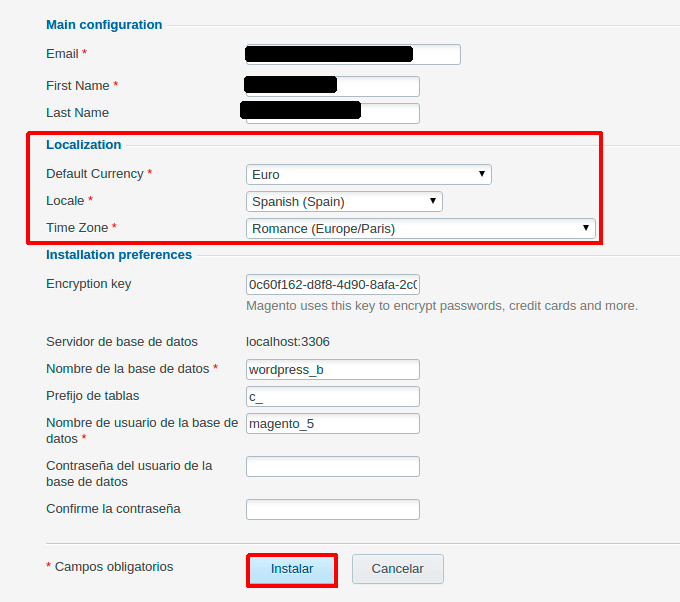
- Then we will fill in the following fields:
- Installation directory and domain Magento (In this case it will be installed in the root directory of the domain creamagento.es).
- We check the automatic updates box if we want Magento to update automatically (not recommended)
- We make sure that the option "Use administrative credentials not connected to any particular user" is marked
- We write the username and password of the administrator.
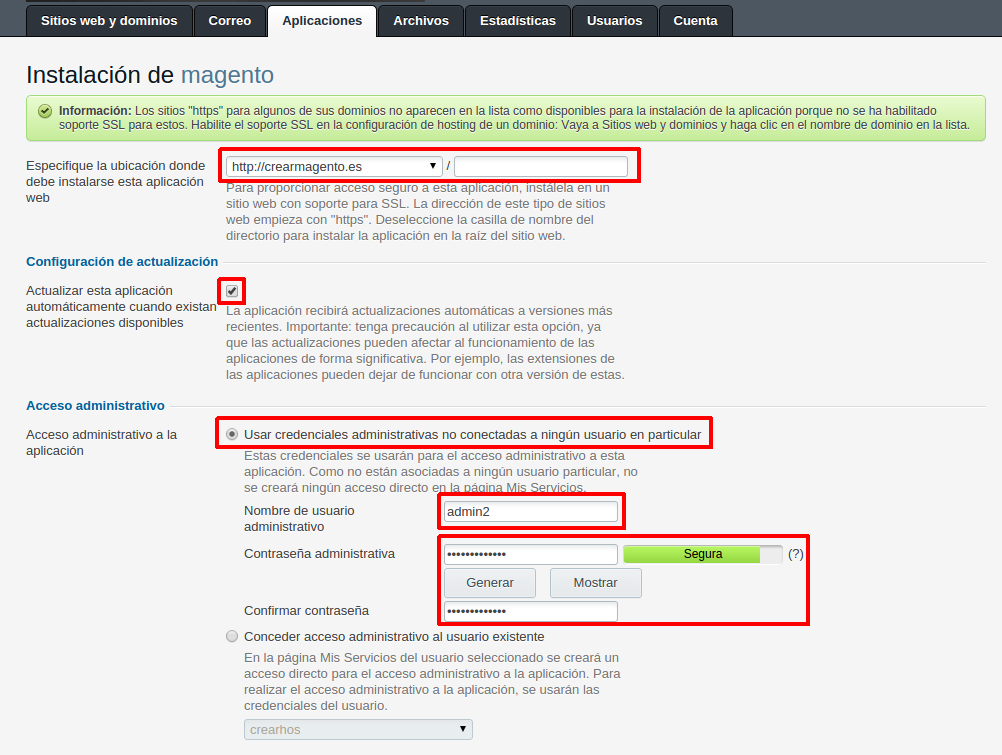
- Fill the following fields:
- Administrator email.
- First name: Our name.
- Last Name: Our last name.
- Default Currency: We choose the type of currency that will be used in our store (we are looking for euro).
- Local: We select a language.
- time Zone: We select our time zone.
- We click on "Install":
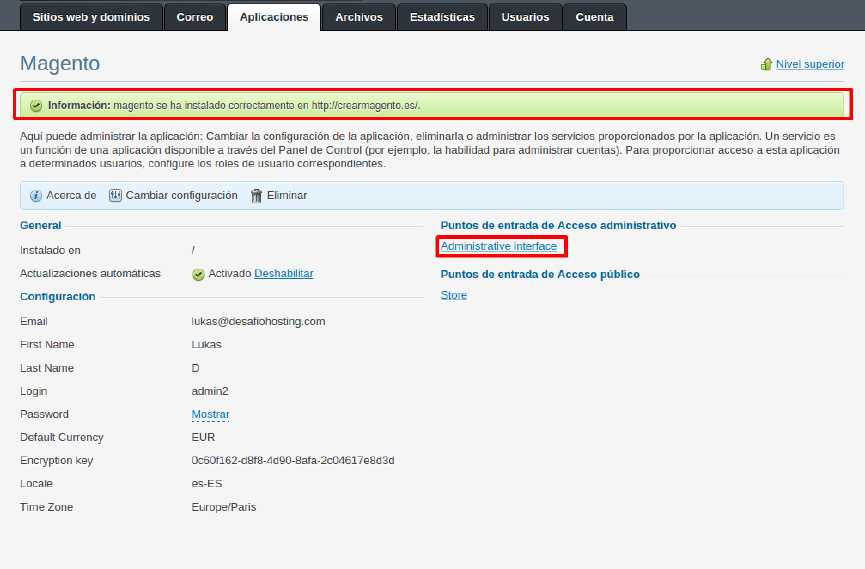
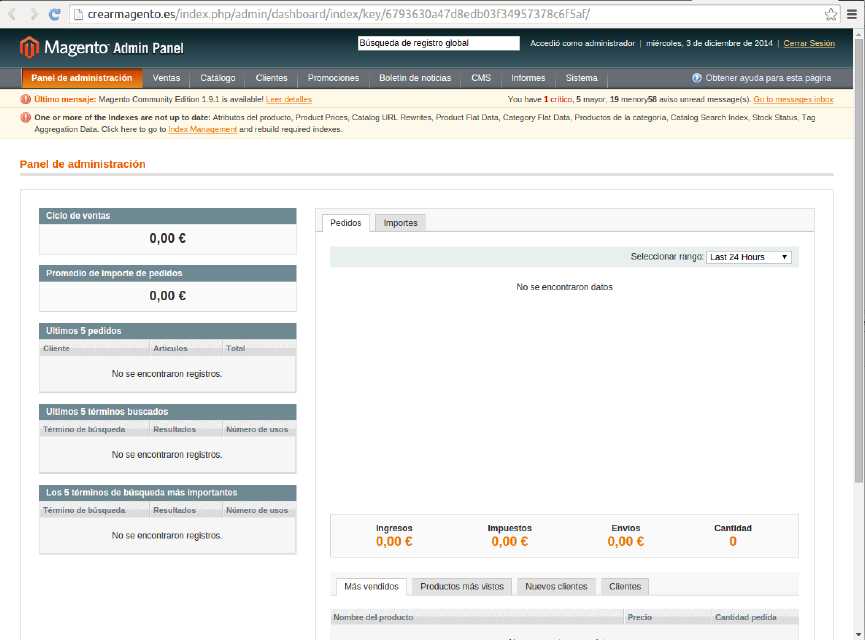
- We can see that the installation has concluded, now to access the administrative panel of our Magento store, we click on Administrative Interface:
- This would be our administration interface in Magento:

HOW TO ACCESS MAGENTO ADMINISTRATION IN PANEL PLESK
To access the administrative panel of our Magento we must follow the following steps:
There are two ways to access: From the Plesk panel or directly from the browser by typing the url of our domain in which our Magento store is installed.
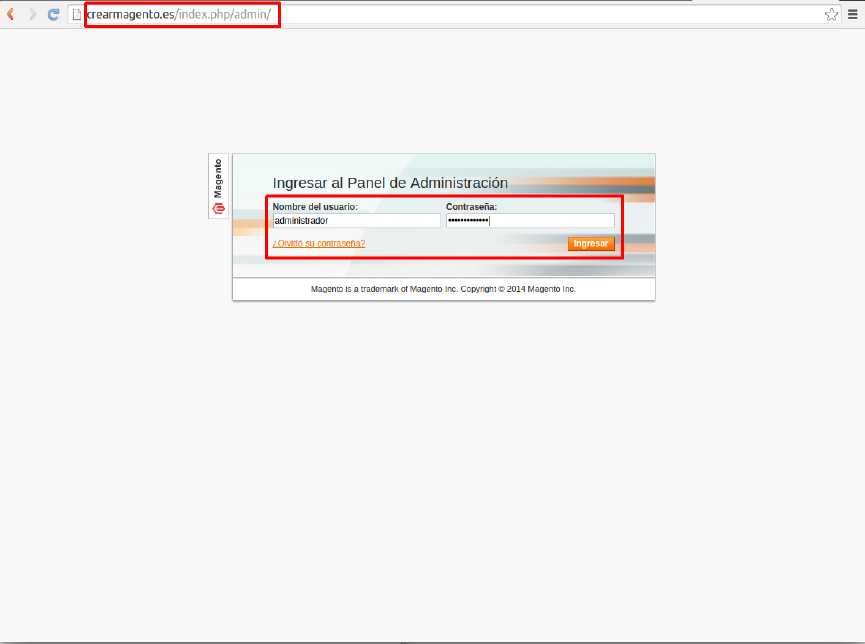
- FROM THE URL OF OUR DOMAIN:
- We will write the following url in the internet browser: yourdomain.com/index.php/admin (we change yourdomain.com for the name of your domain)
- We introduce the name and password of the Magento administrator user:
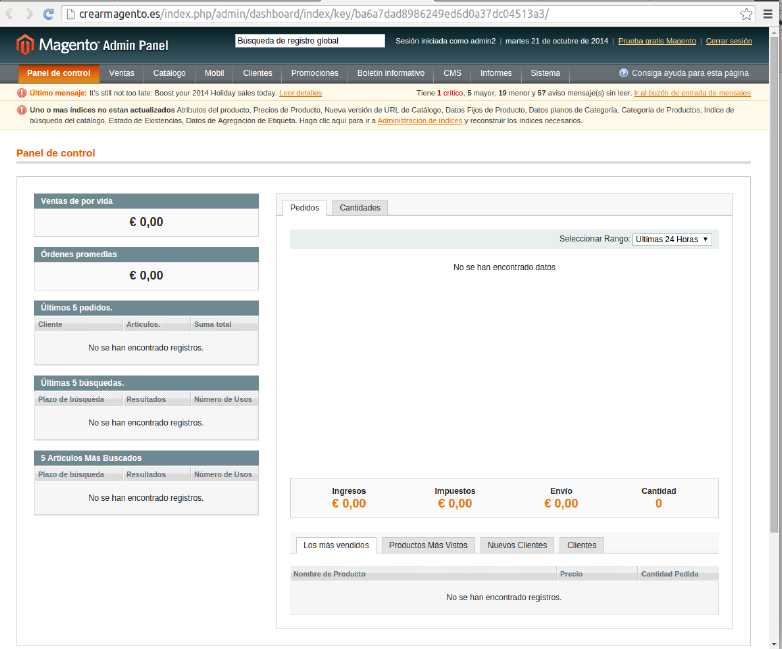
- And we already have access to the administration of our Magento store:
- IF WE WANT TO ACCESS FROM THE PLESK PANEL:
NOTE:
This option only appears if we have installed Magento automatically from the Plesk panel applications:
From the main tab of the Plesk panel "Websites domains" we will click on "Magento" in the domain that contains our Magento store:
Next we will click on "Administrative interface":
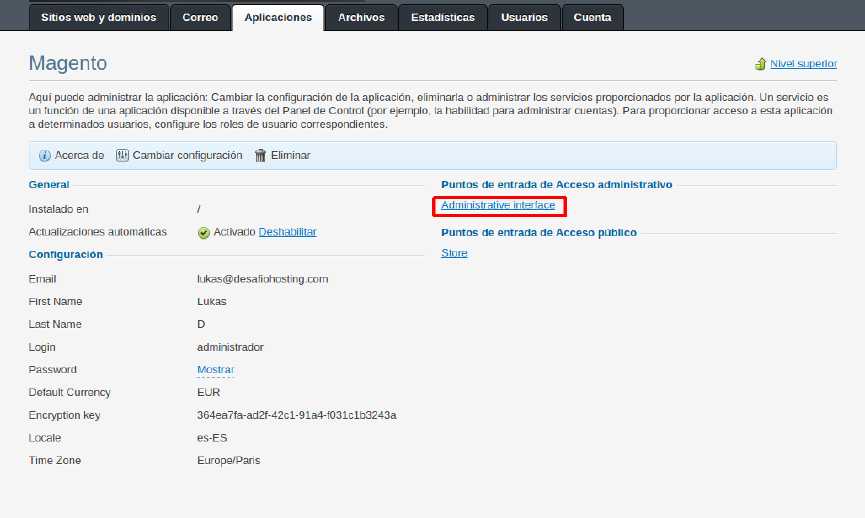
As the Plesk panel has the administrator user data saved, we can access the Magento store administration directly without identifying ourselves.
HOW TO CREATE FORUM PHPBB AUTOMATICALLY IN PANEL PLESK
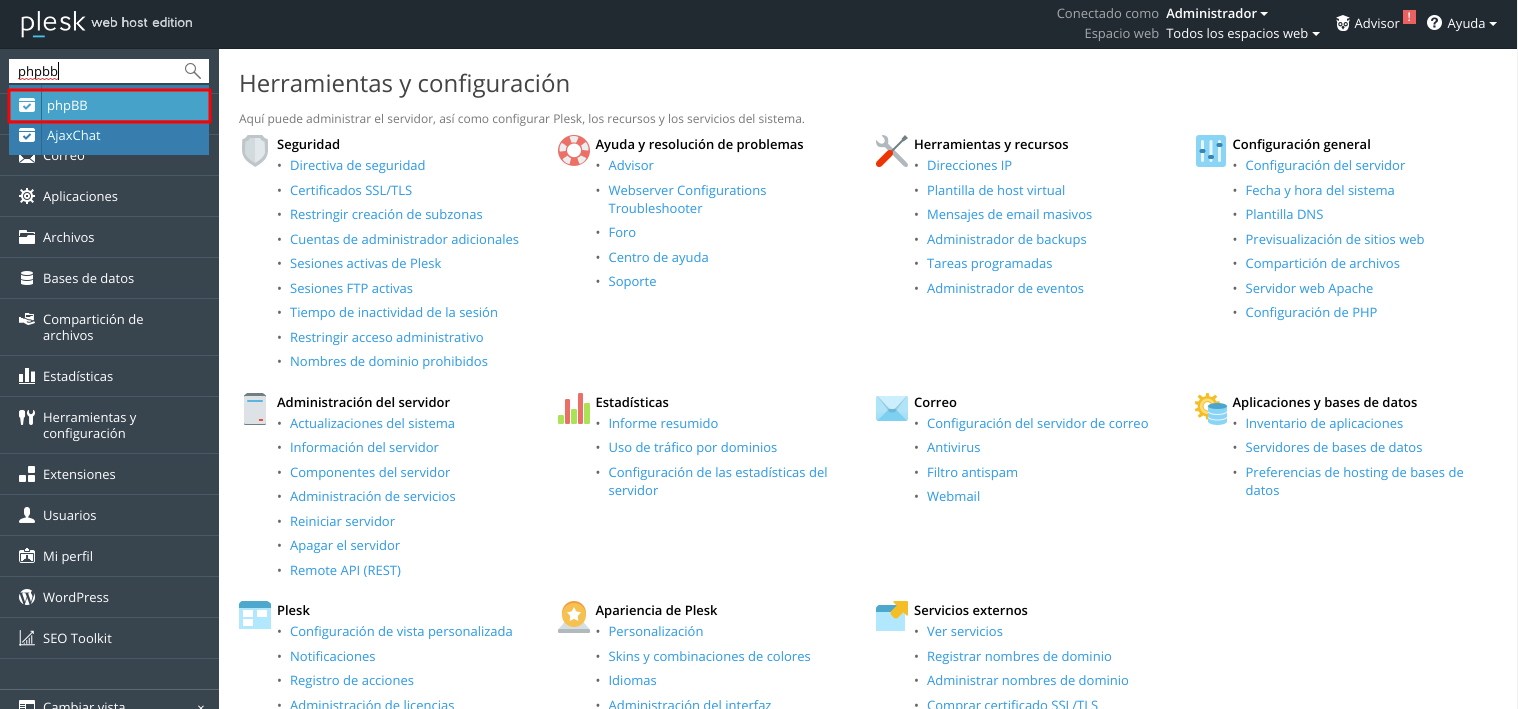
Next, we explain step by step how to install a phpbb forum automatically from Plesk
Now we will write "phpbb" and click on the "Search" button:
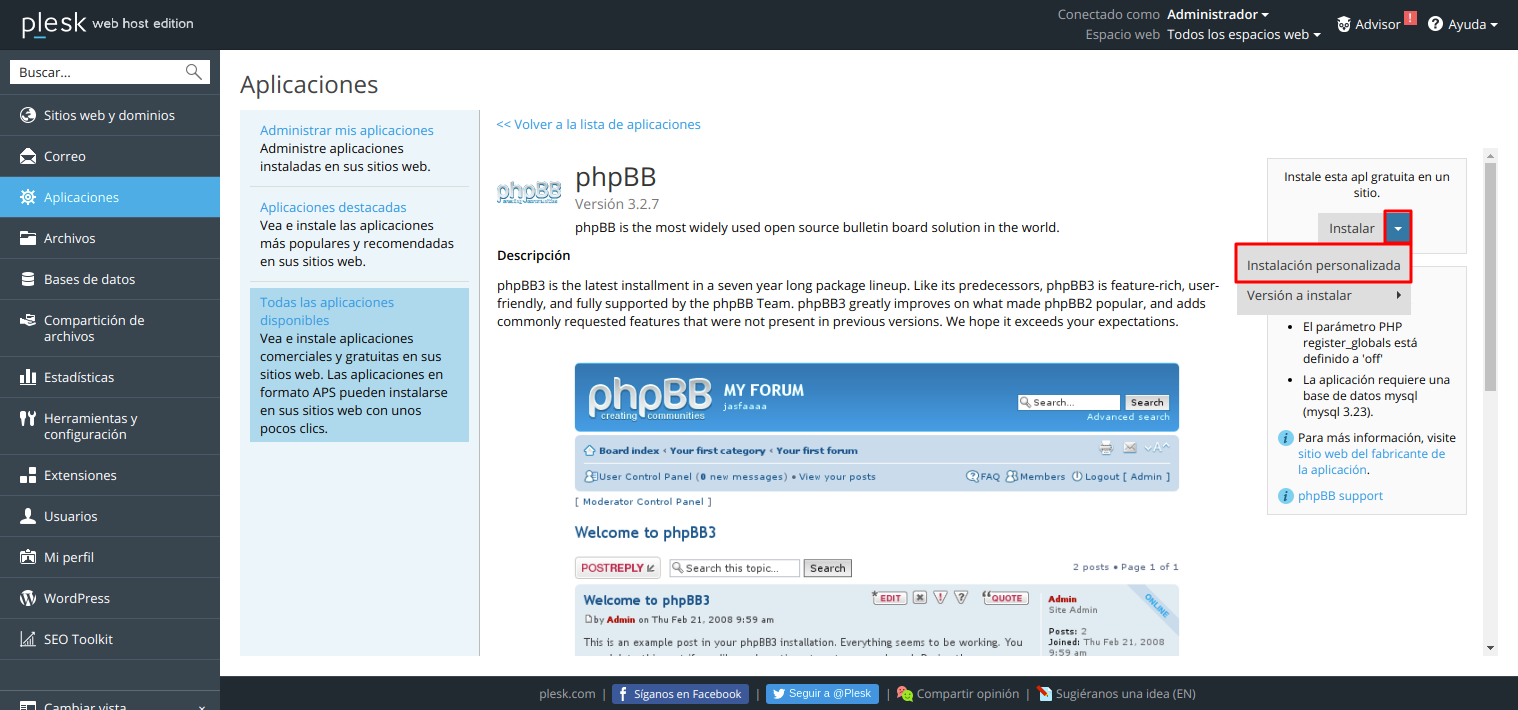
Once the search is finished, the application with that name appears, now we click on "Install (Custom)":
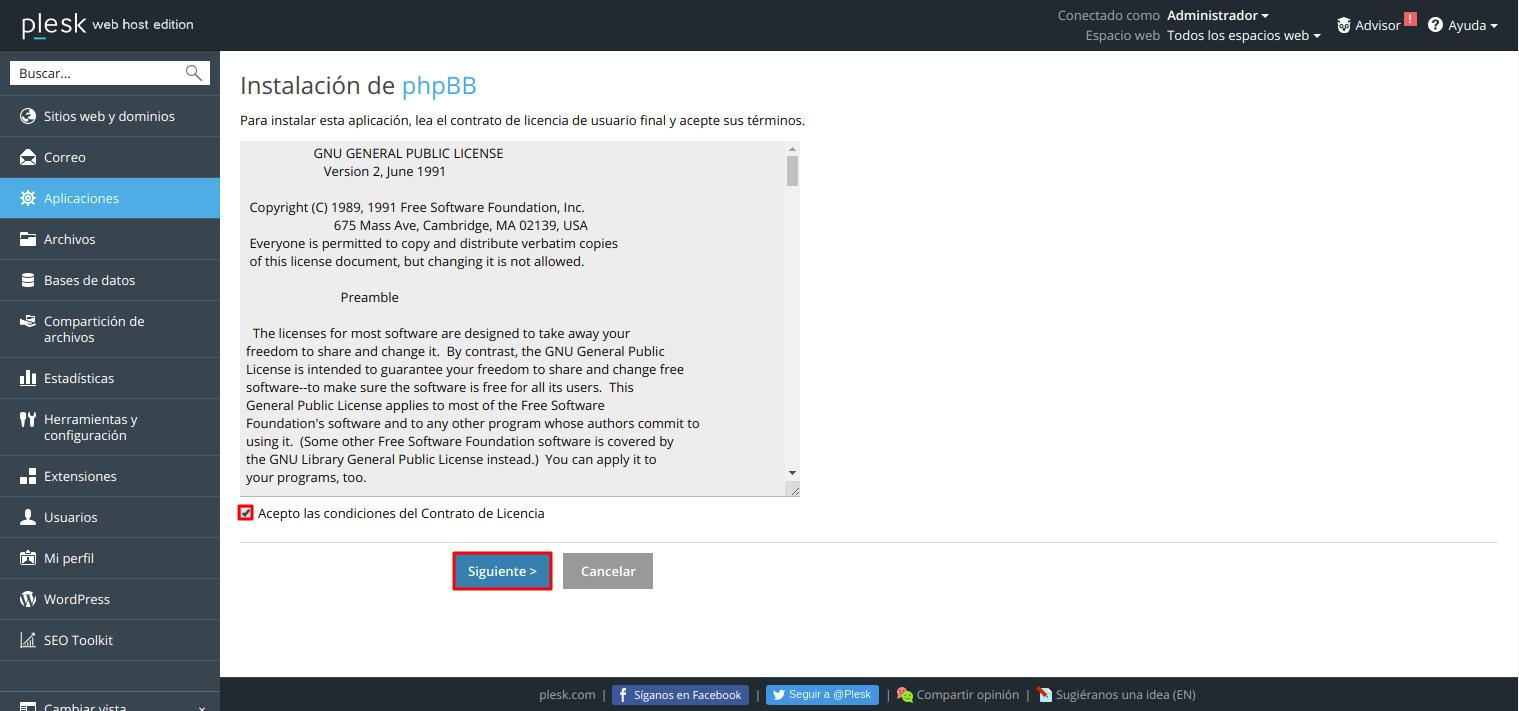
Next we are going to accept the installation terms of the phpbb forum:
Now we are going to fill in the different fields to complete the installation:
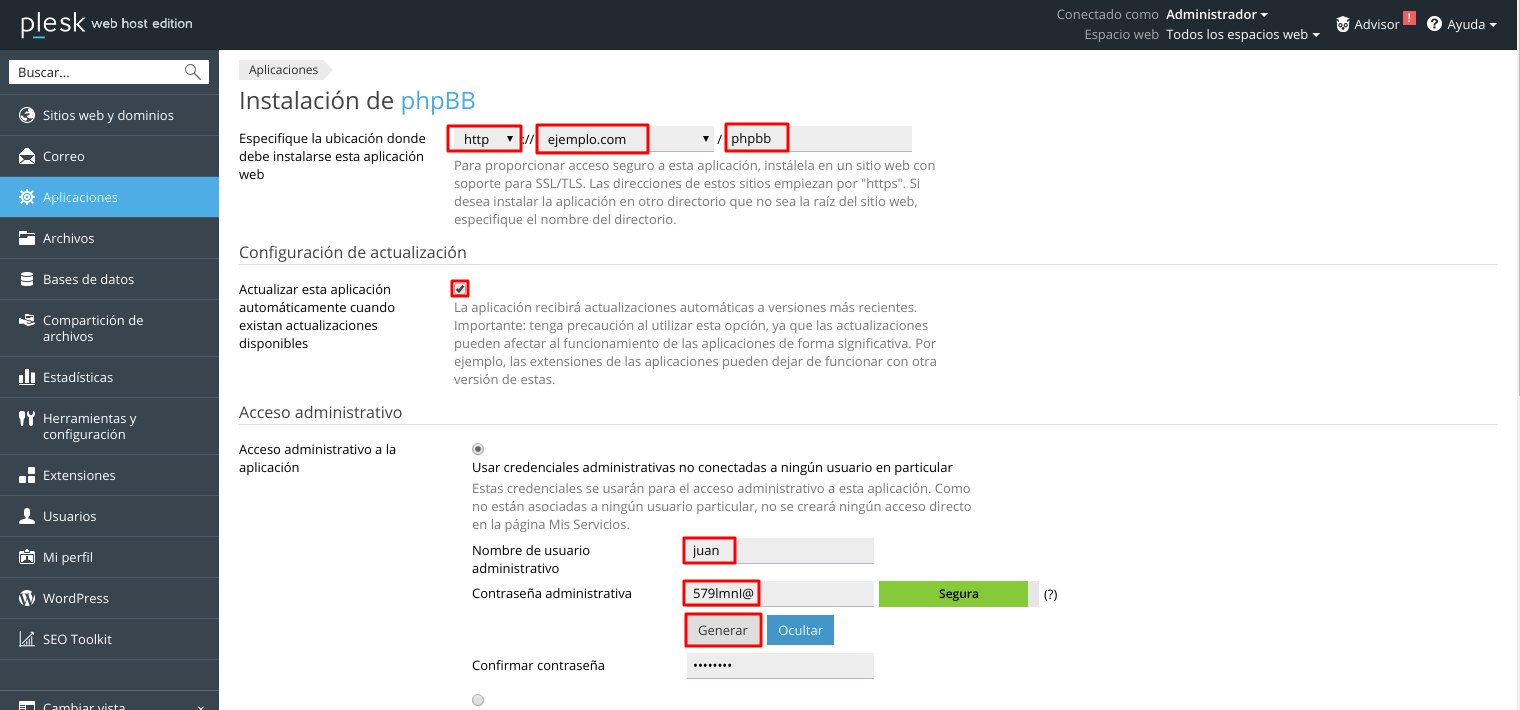
- Location where the application will be installed: We select the domain and the folder where we are going to install the phpbb forum (In this example it will be installed in the root folder of the domain "createphpbb.es").
- Update Settings>: We check this box if we want the application to update automatically if there are updates available.
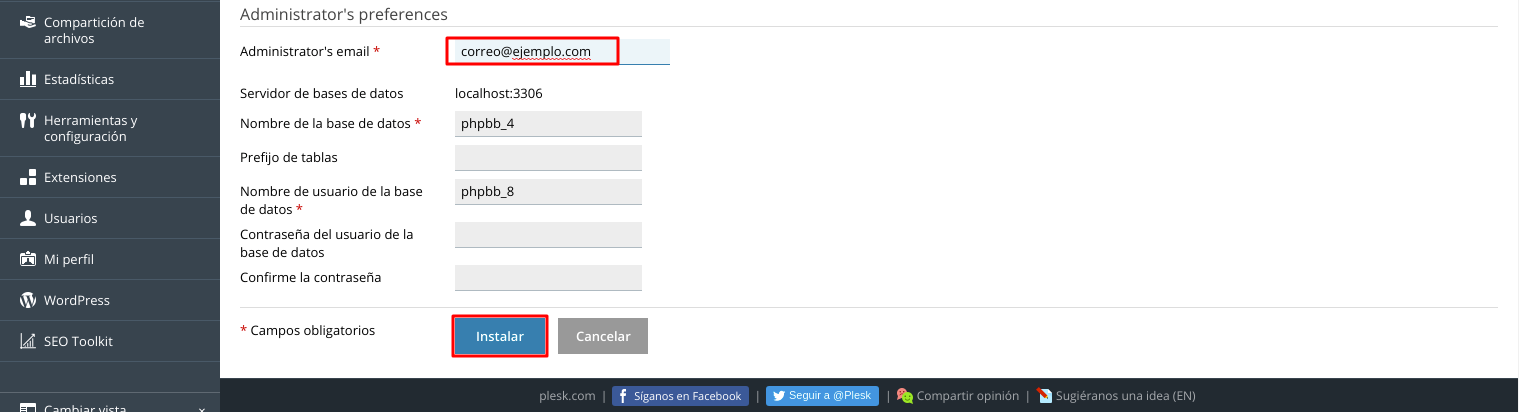
- Administrator's Preferences
- Administrator's Email:We write an email for the forum administrator account.
- Administrator's login: We write the username of the forum administrator.
- Password: Password and then confirm the password.
- Site description: Brief description about our forum.
- Site name: Forum name to display.
- Database name:It is recommended to leave it by default or, write the name of a database dedicated to our forum (previously created).
- Tables prefix: We leave it by default.
- Database username: We can leave it by default.
- Database user password and confirm password: We leave these fields blank.
Then we click on "Install":
We can see that the installation has been done correctly:
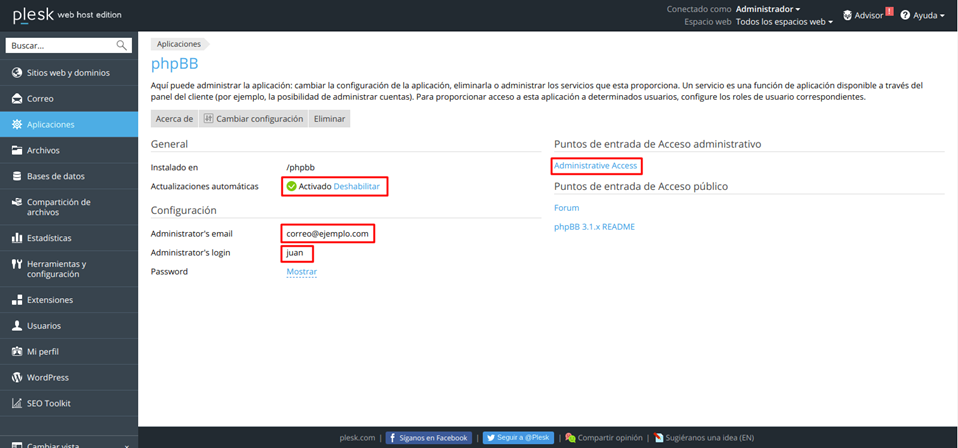
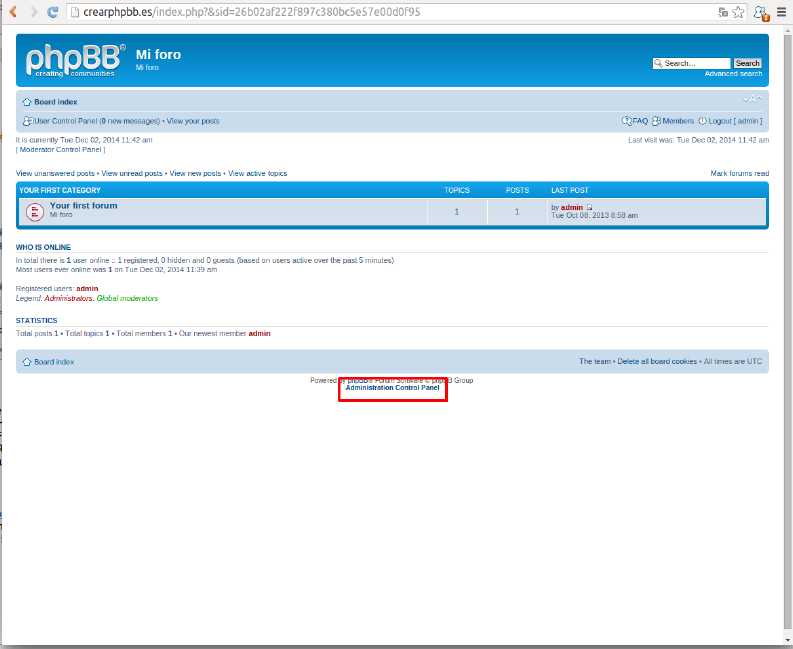
Now we go to the page of "Websites and domains" and on our domain of the forum we click on "Open":

In order to make changes we are going to log in as administrator:
Now we will click on the link that says Administration Access:
Next we need to re-authenticate as administrator:
And we can now access the forum administration panel:
HOW TO ACCESS PHPBB ADMINISTRATION IN PANEL PLESK
To access the administrative panel of our phpbb forum we must follow these steps:
We can access from the url of our forum directly or from the Plesk panel if we have access to it:
(If we access from the url of our forum directly we will skip a couple of steps).
If we access from the Plesk panel:
Note: This option only appears if we have installed phpbb automatically from the "Applications" tab of the Plesk panel:
From the main page of "Websites and domains" we will click on phpbb on the domain in which we have our forum:
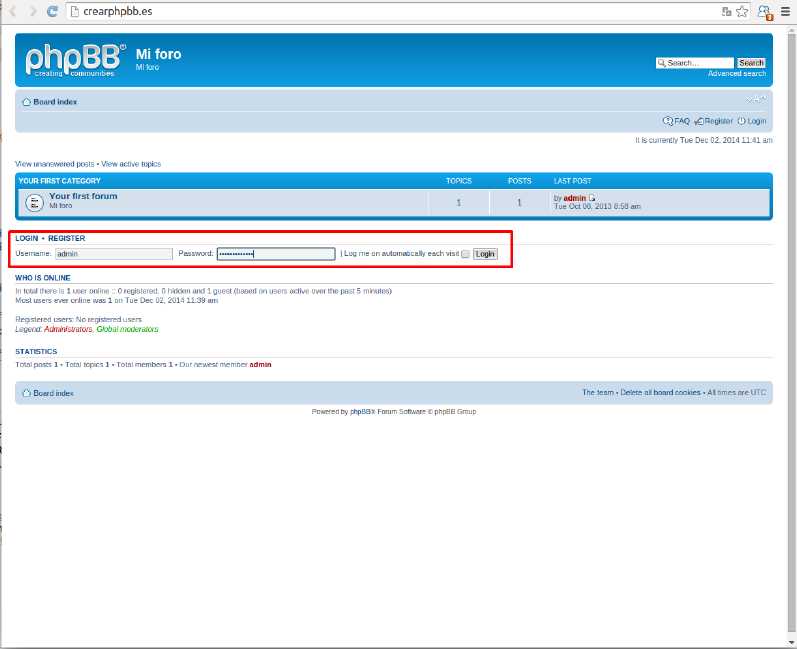
Next we will click on "Forum":
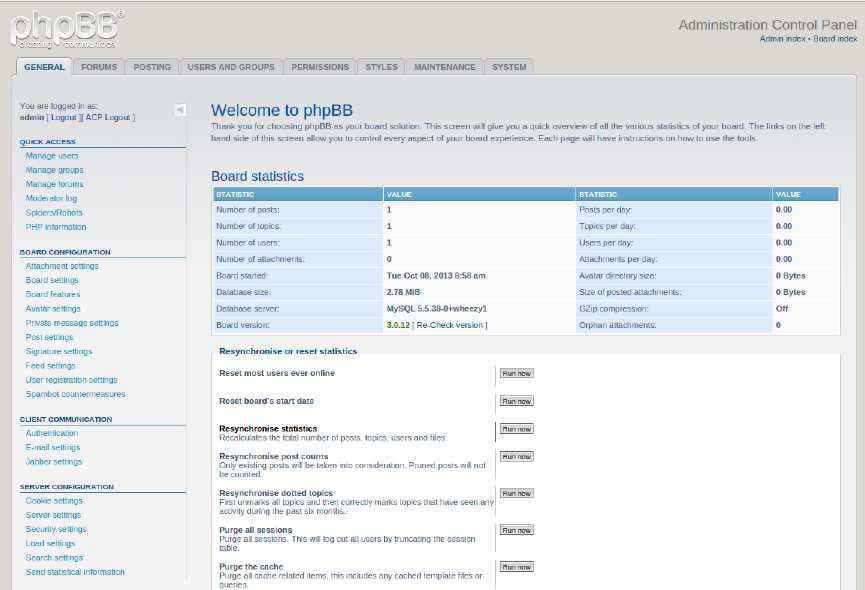
We can see that we are already in the index of our forum, now we must log in with the administrator user:
When we have started with the administrator user, the option will appear "Administration control panel" at the end of the index and we will click on it
HOW TO INSTALL DRUPAL AUTOMATICALLY ON PLESK PANEL
Steps to create a Drupal automatically from the Plesk administrative panel:
From the main page of "Websites and domains" we select the domain in which we want to install Drupal and click on "Install applications":
Now we write "Drupal" and click on "Search":
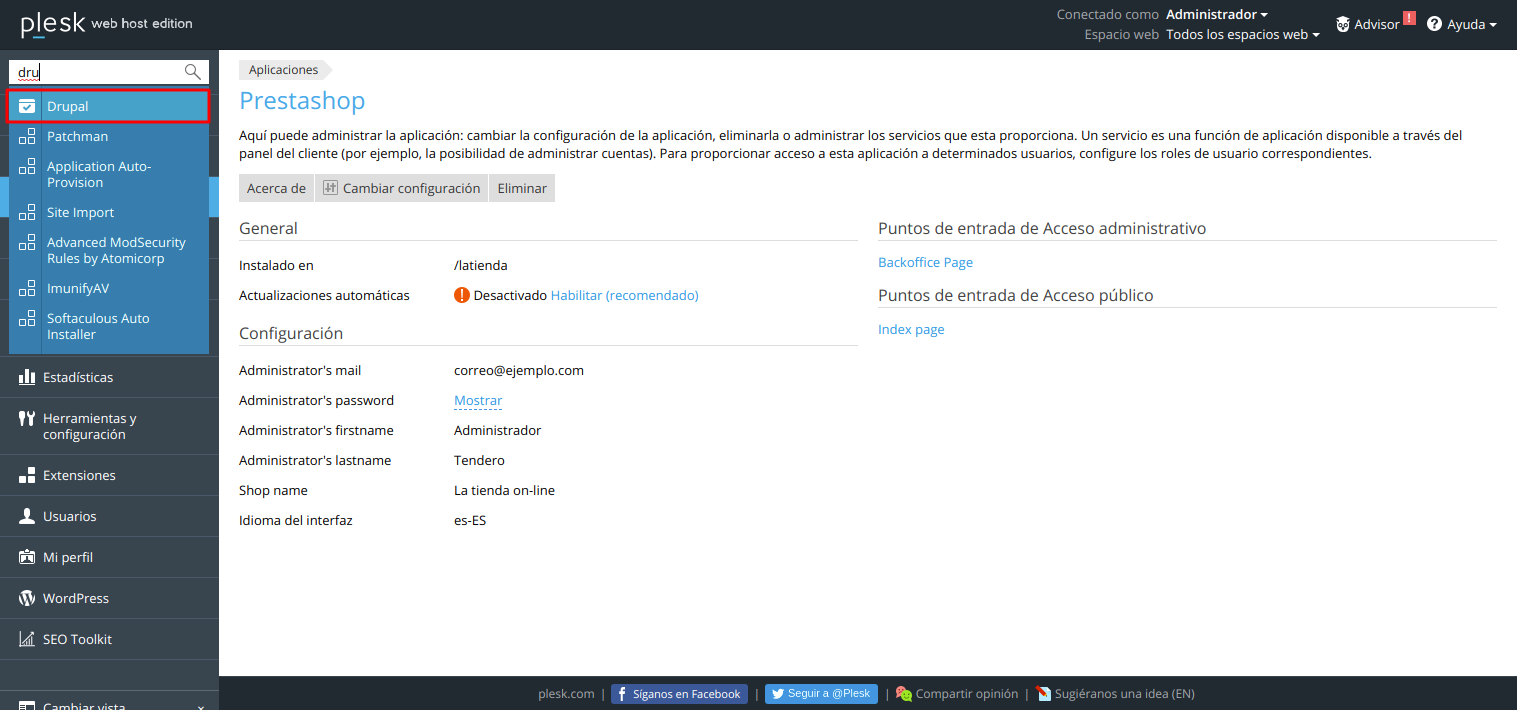
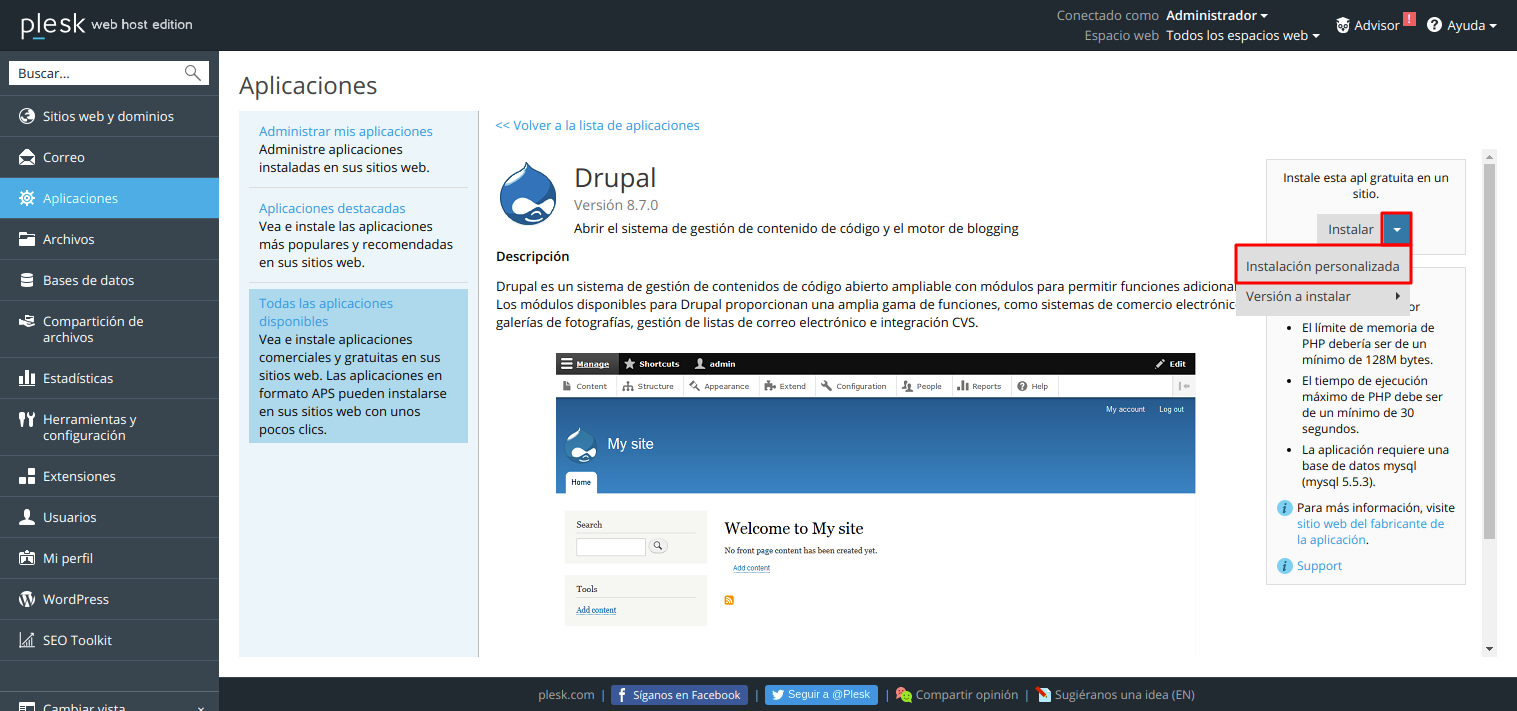
We select the Drupal application and click on "Install (Custom)":
We wait while Drupal downloads:
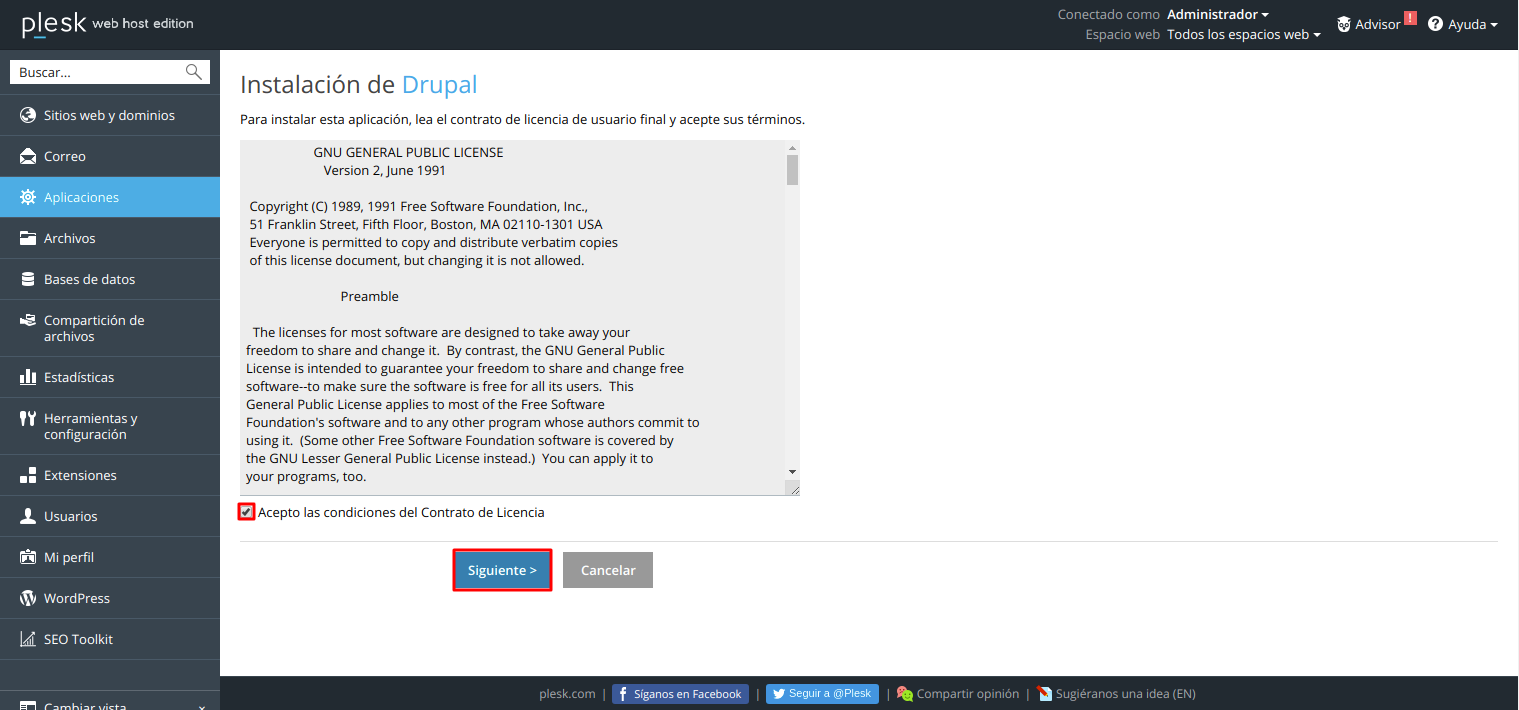
We accept the license terms and conditions of the Drupal installation and click on "Following":
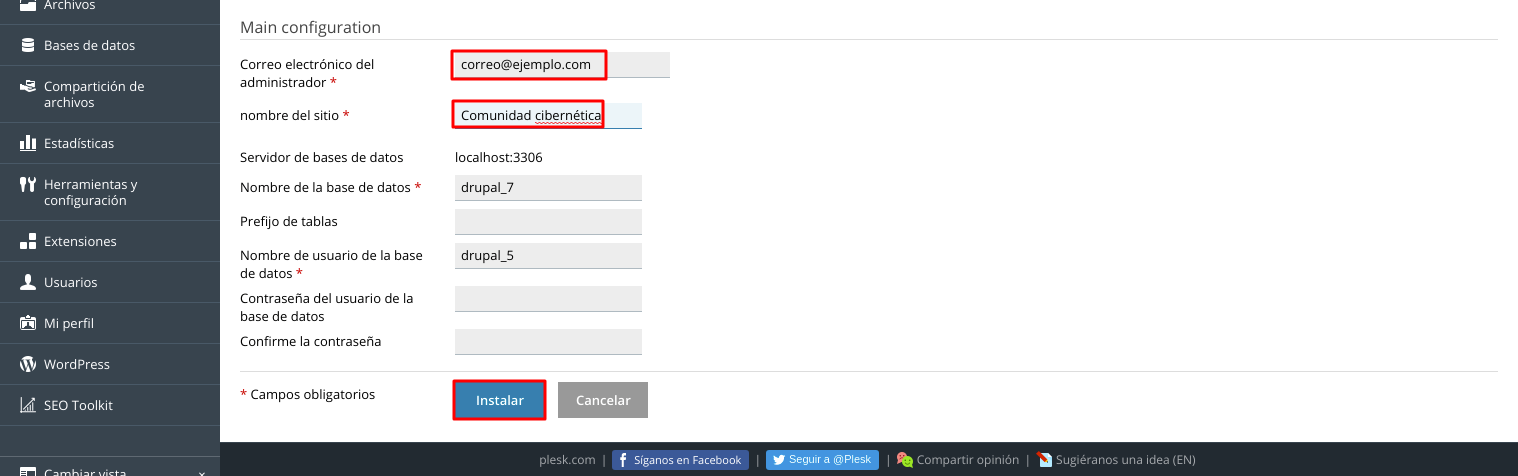
Then we will fill in the following fields to complete the installation:
Installation directory and domain Drupal (In this case we will install Drupal in the root directory of the domain creardrupal.es).
We mark the box Automatic Updates.
We make sure that the option "Use administrative credentials not connected to any particular user" is marked.
We will write a Username and password for the site administrator.

We will write an email of the administrator user of the site.
We will write the name of our site.
We will fill in the fields referring to the database of our site.
Now we will click on "Install":
We can see that Drupal has been installed correctly, then to access the administrative panel of the website we will click on Administrative Interface:
We authenticate with the administrator username and password specified above:
And we can now make changes to our website:
This is the default page of our Drupal website:
HOW TO INSTALL MOODLE AUTOMATICALLY IN PLESK PANEL
Steps to install Moodle automatically from the Plesk administrative panel:
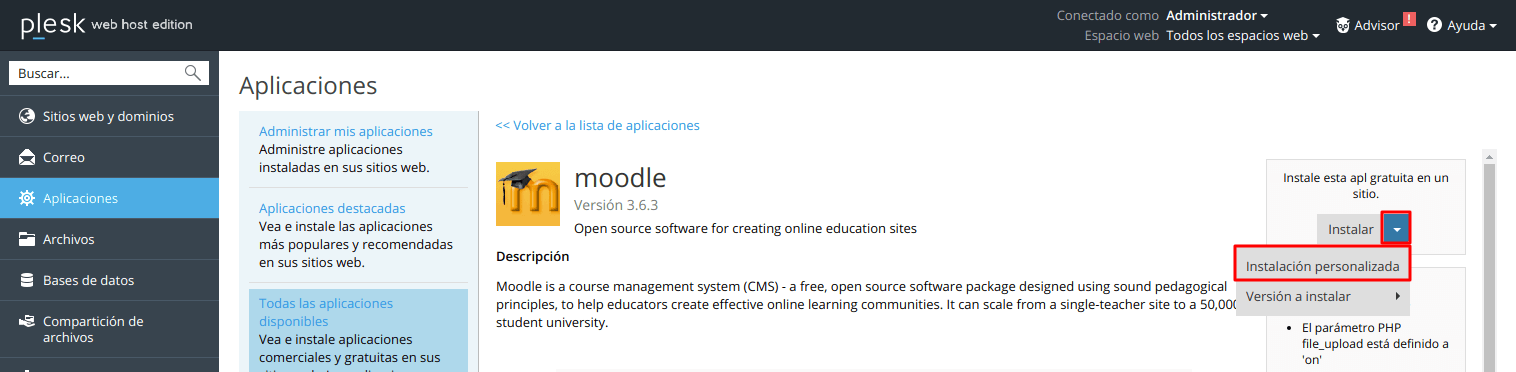
From the main page of the Plesk panel "Websites and domains" We select the domain in which we want to install the Moodle application and click on "Install applications":
Now we write the name of the application and click on "Search":

We select the application and click on "Install (Custom)":
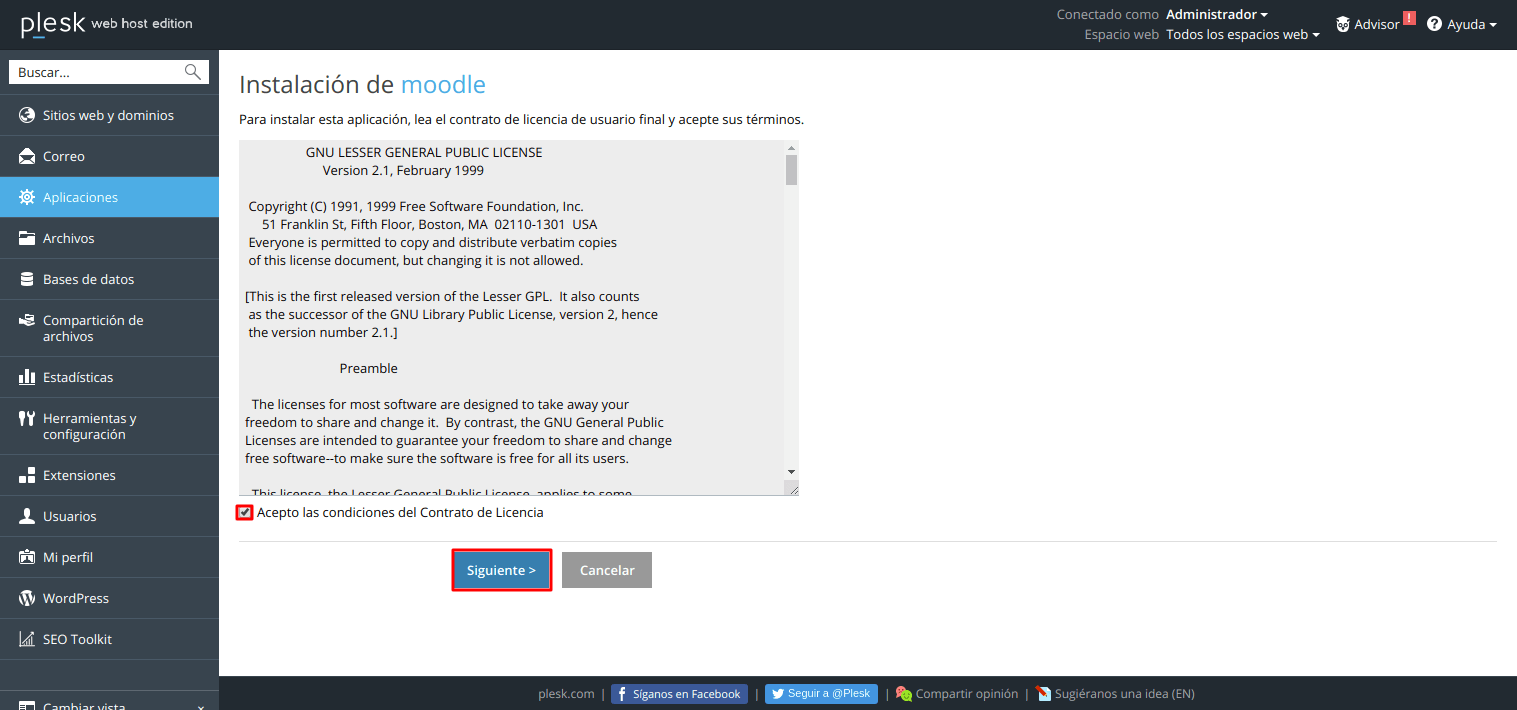
Next, we mark the Moodle installation license and conditions box and click «Next»:
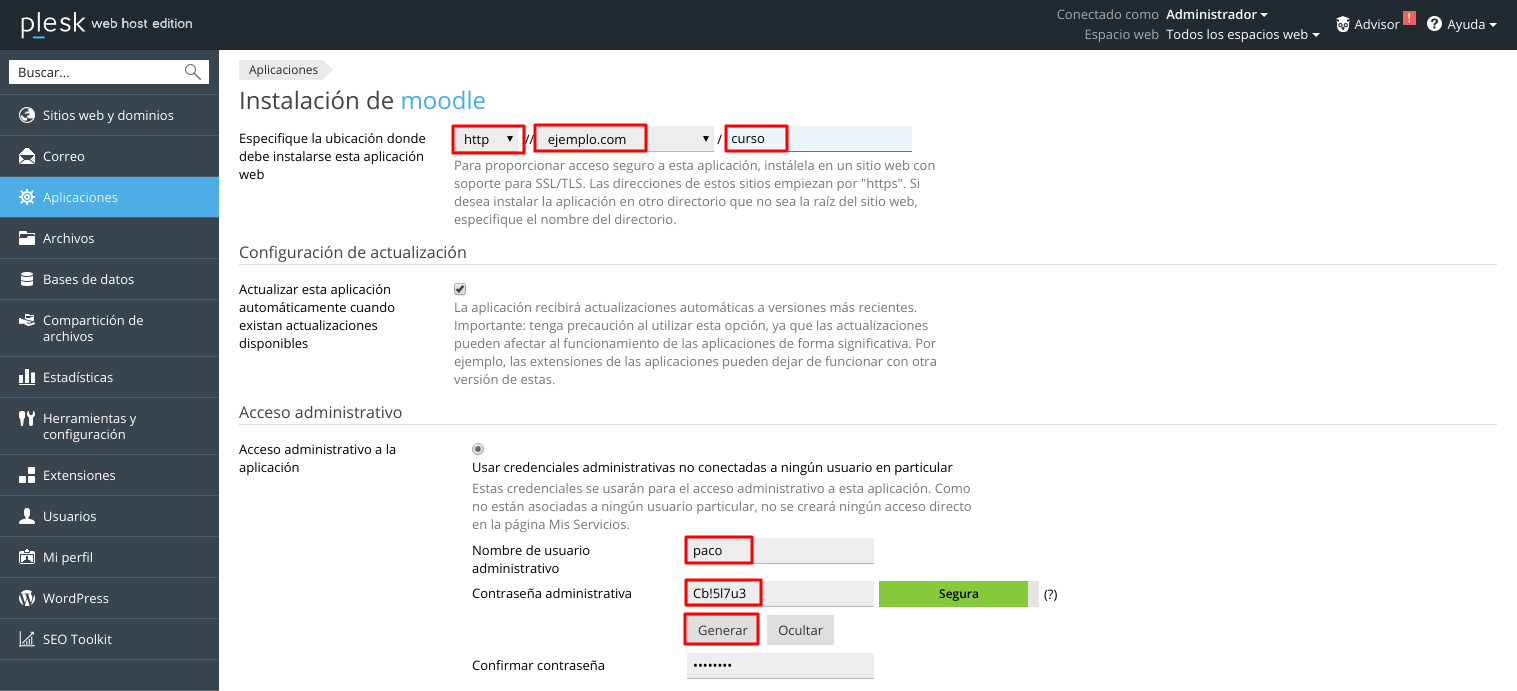
Now we are going to configure the following parameters to complete the installation:
Domain and directory in which we want to install Moodle (In this example we are going to install Moodle in the root directory of the domain creamoodle.es).
Update settings: We mark the box for automatic updates of the application.
We specify a username and password for the administrator user:
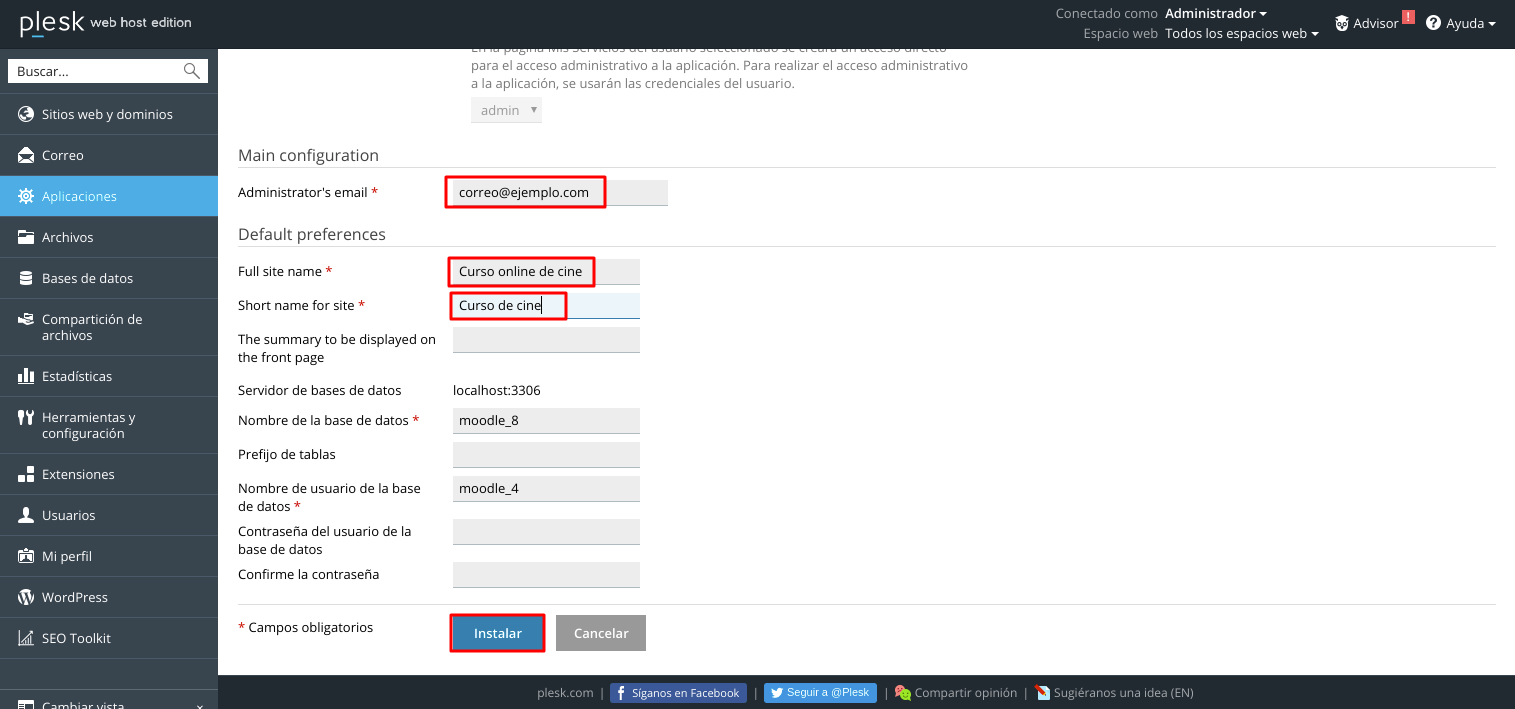
We specify a Email of the administrator.
We will write the name of our city.
From the drop-down list we will choose our country.
The full name and short name of our Moodle site.
We choose the language of the interface of our Moodle (By default it is in English and it cannot be changed from the installation process, can be changed later by installing language packs).
We click on "Install" to complete the installation:
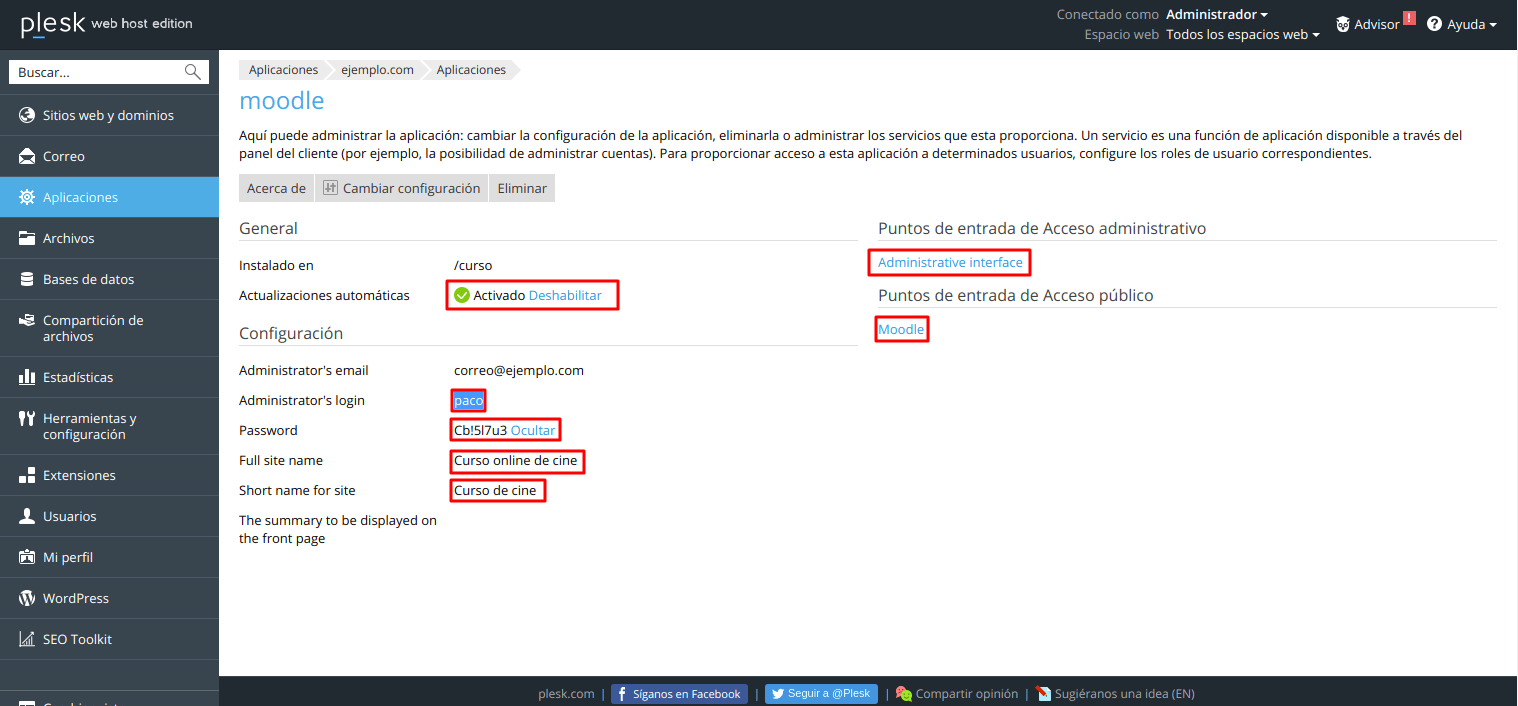
The installation of Moodle was successful, now we can access the administrative part of Moodle by clicking on Administrative Interface, or access our default Moodle by clicking on "Moodle":
This is our default Moodle:
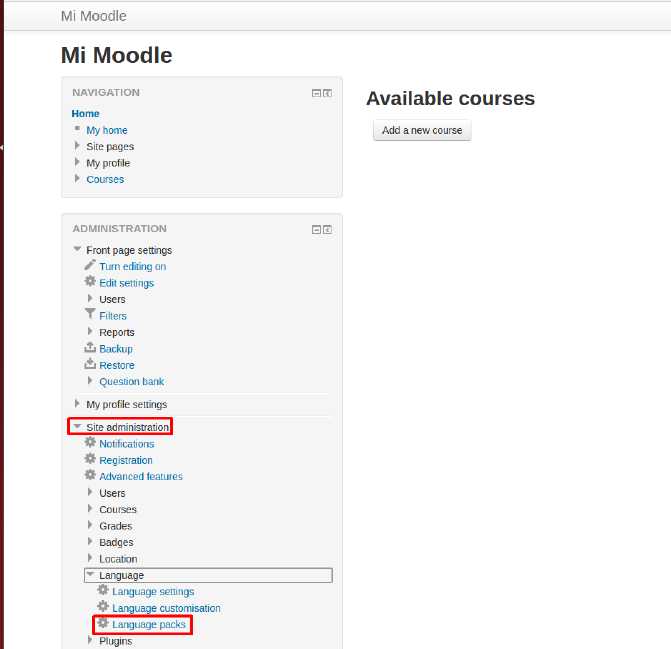
Change language to Moodle interface:
We go to the menu on the left we click on "Site administration" and in «Language packs»:
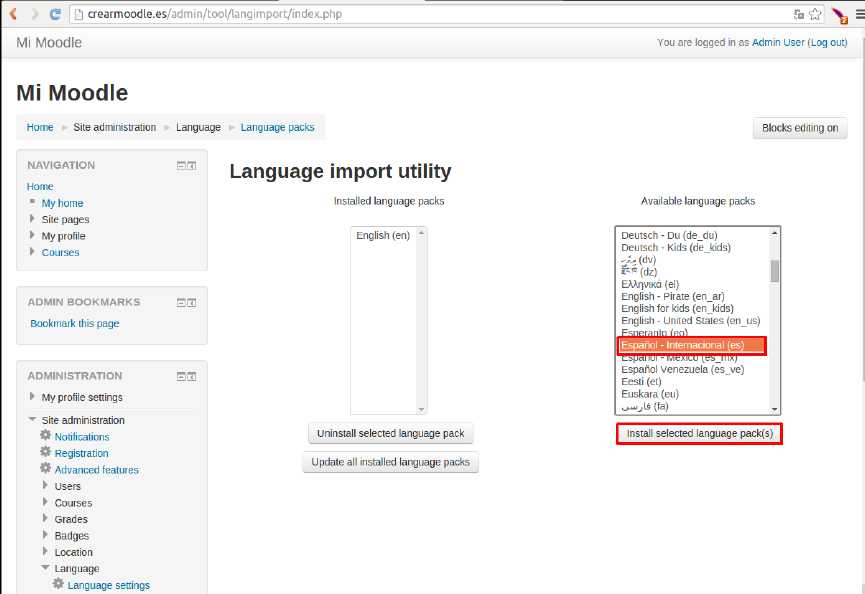
Next we look for the language «Spanish-International (es)» in the list of languages, select it and click on "Install selected language pack (s)":
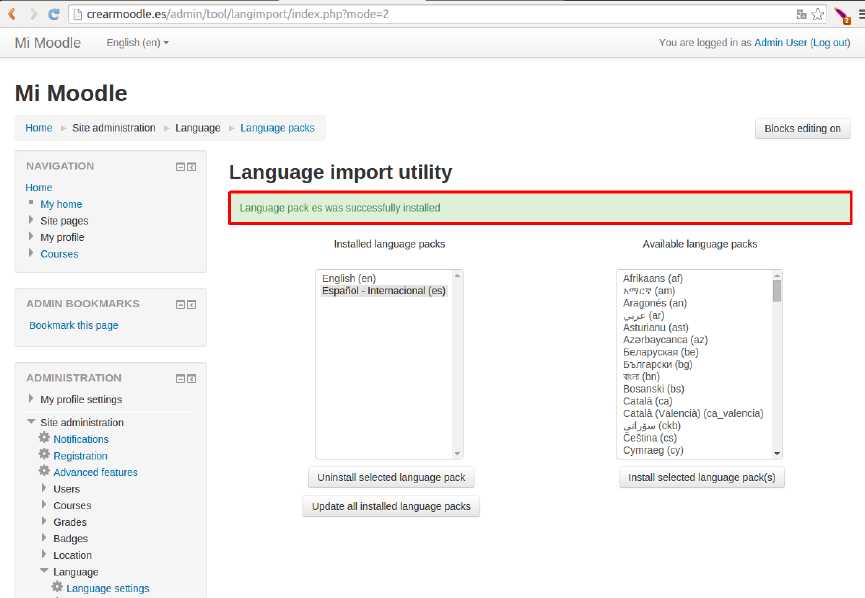
We can see that the language pack has been installed correctly:
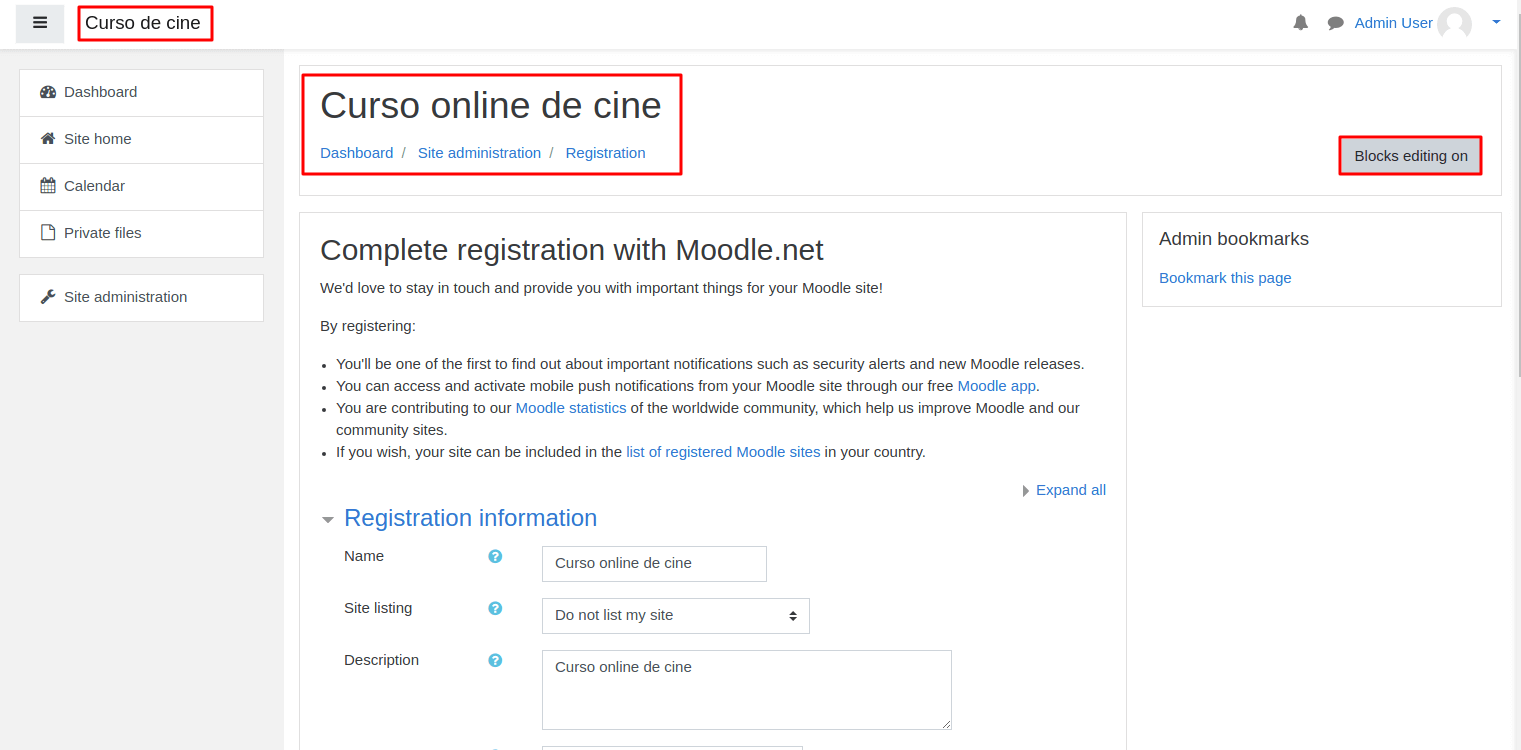
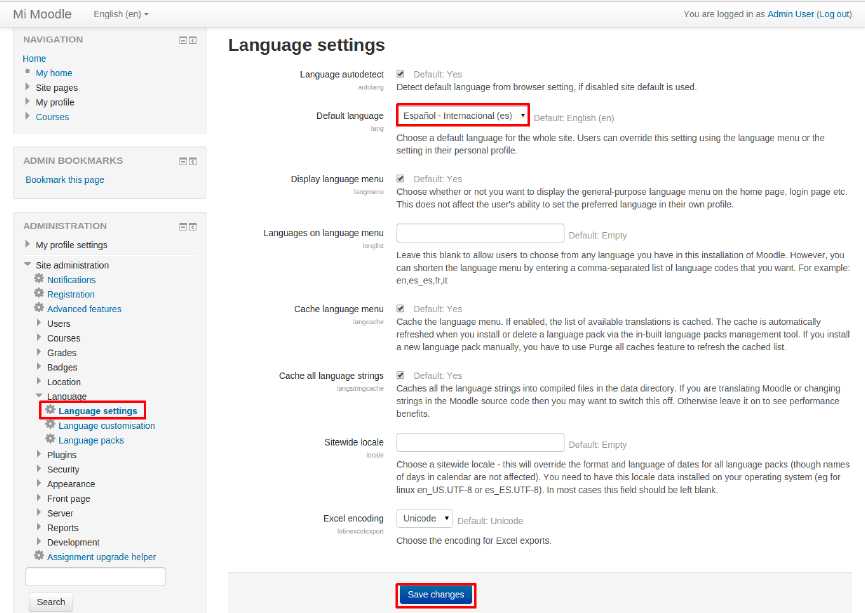
Now we are going to add that language pack to make it the default language: We are going to "Site administration" "Language Settings" and in the field of "Default language" we select the package installed in the previous step and click on "Save changes":
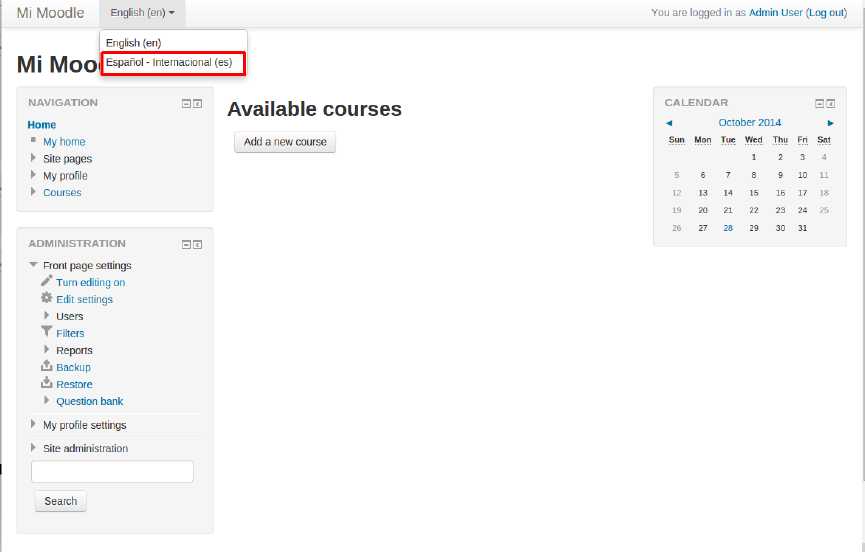
Now on the main page of our Moodle we can choose in which language the interface appears:
HOW TO AUTOMATICALLY INSTALL JOOMLA BLOG IN PLESK PANEL
Steps to install the Joomla application automatically from the Plesk administrative panel:
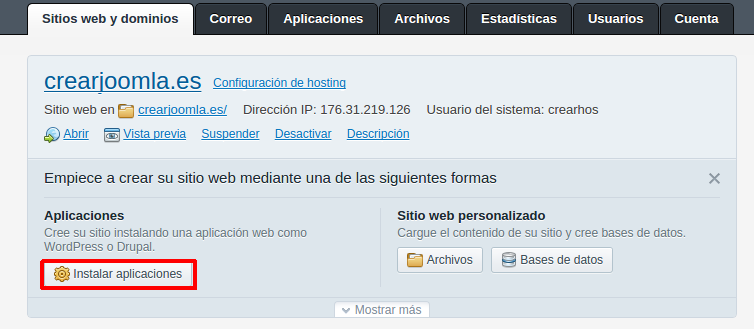
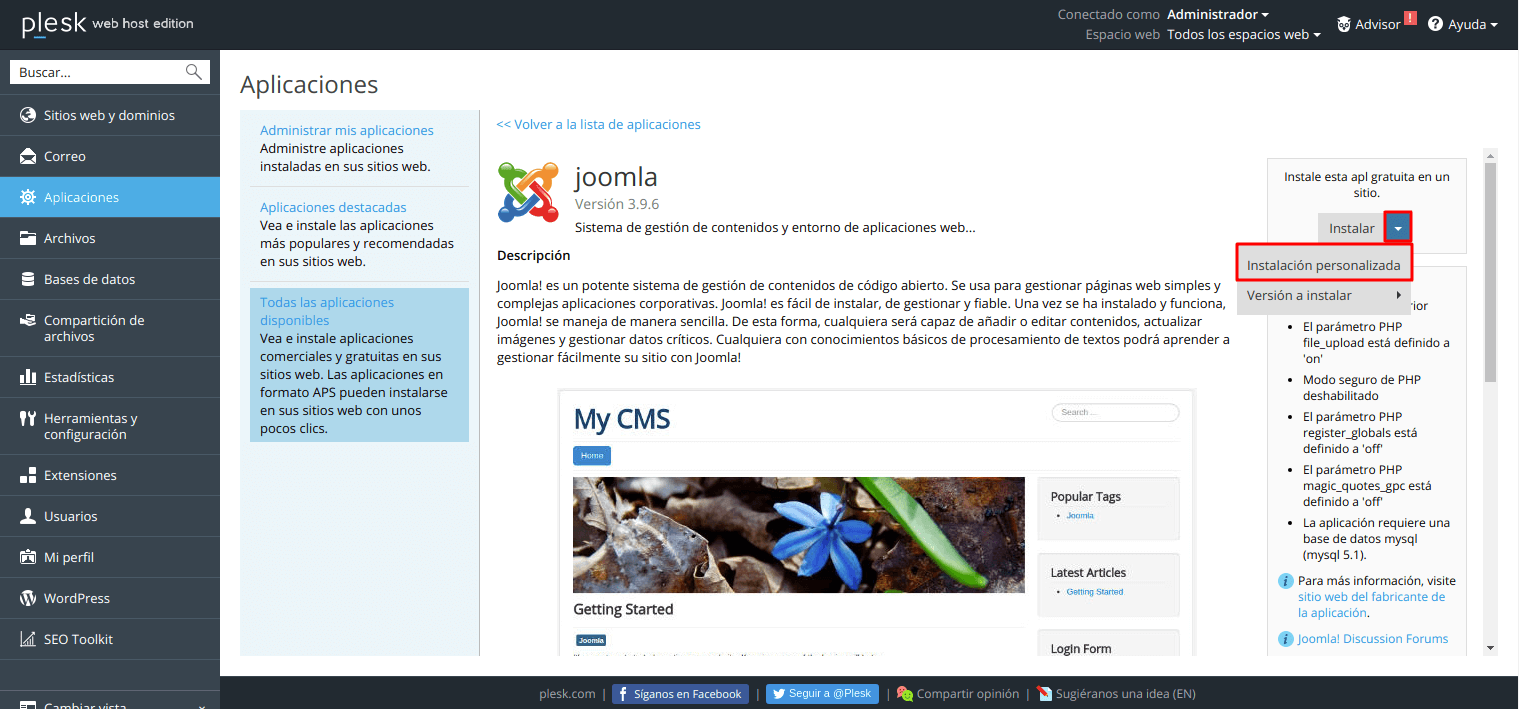
First, from the main Plesk panel "Websites and domains" we select the domain in which we want to install the Joomla application and click on "Install applications":
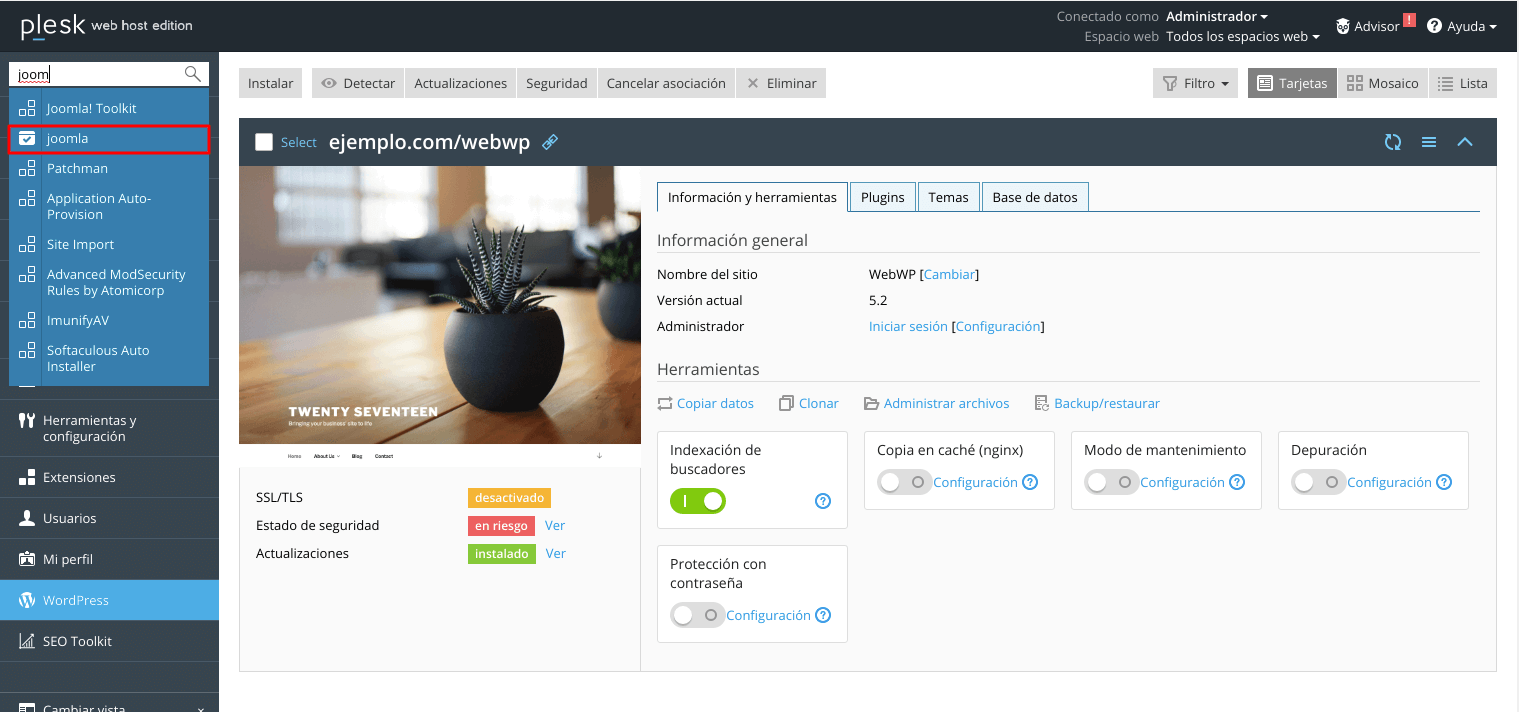
Now we make sure that we have selected the section of «All applications available» and in the field of "Applications" we wrote Joomla and we click on "Search":
When the search finishes we select the Joomla application and click on "Install (Custom)":
Then we accept the terms of the Joomla installation and click on "Following":

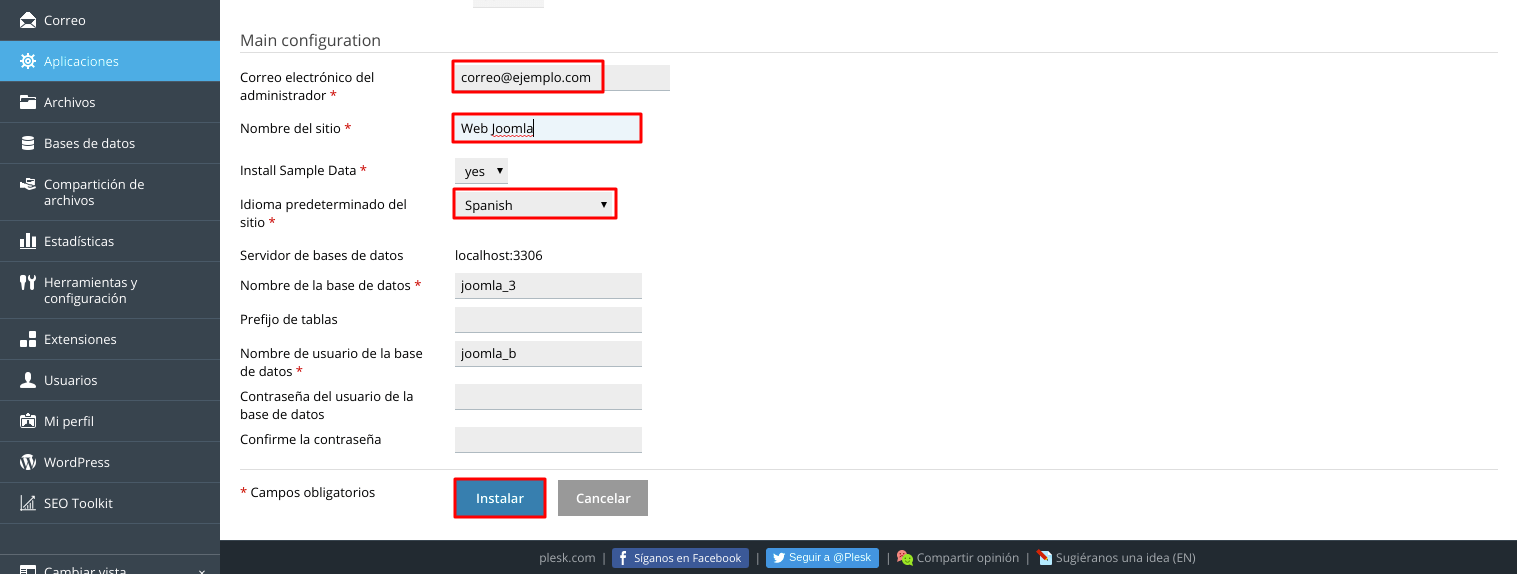
Now we are going to fill in the following fields to complete the Joomla installation:
- Domain and directory where the Joomla application files will be hosted (In our case we are going to host them in the root directory of the domain "createjoomla.es"):
- Update Settings: We mark the box if we want the application to update automatically if there are updates available.
- Administrative access: We mark the option: "Use administrative credentials not connected to any particular user"
- Administrative username and password: We write the username and password of the administrator user.

pulled apart «Main configuration»:
- Name of the site: We write the name of our website.
- Site default language: We select "English".
- Database name: We can leave it by default, or put a name of the database destined to install Joomla (previously created).
- Tables prefix: It is recommended to leave it as default.
- Database username: We can leave it by default, or specify a user of the database destined to install Joomla (previously created).
- Database user password and confirm password: If we leave these fields blank, a password will be generated automatically, if previously we have specified a database created prior to the installation process, we will have to enter the password of the database user.
We click on "Install" to finish the installation process:
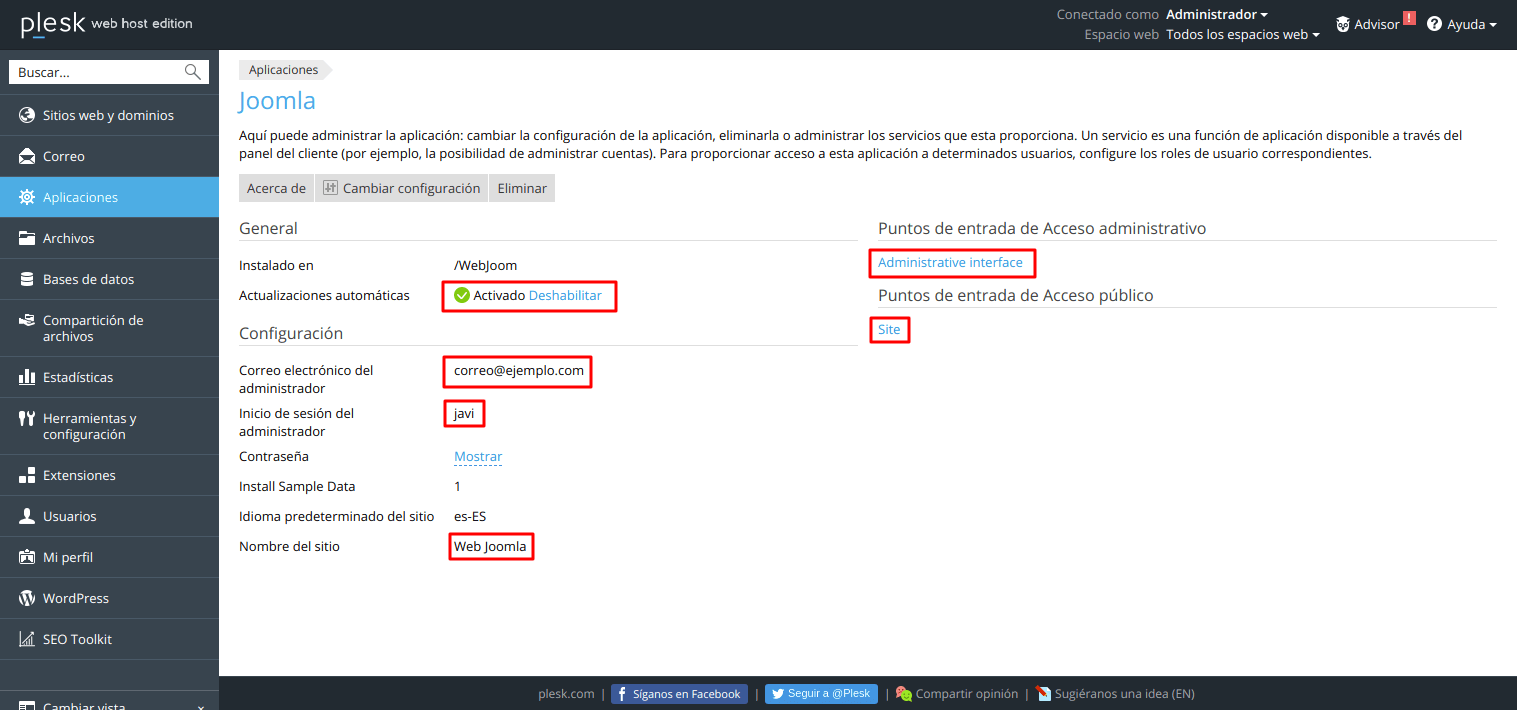
A message tells us that the application has been installed correctly:
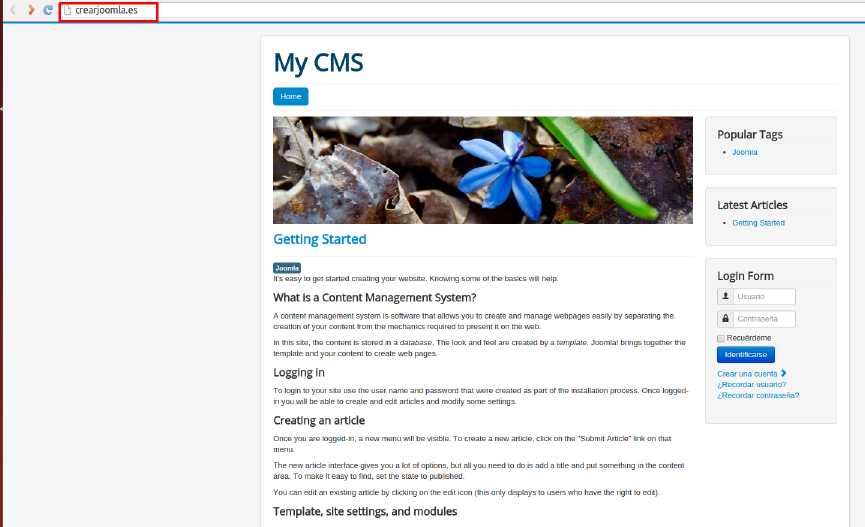
Next we go to the page of "Websites and domains", we select the domain in which we have installed the Joomla application, and click on "Open":
We can see how our Joomla page is by default:
To access the administrative panel, we write our domain in the browser followed by / administrator /
And we authenticate as administrator.
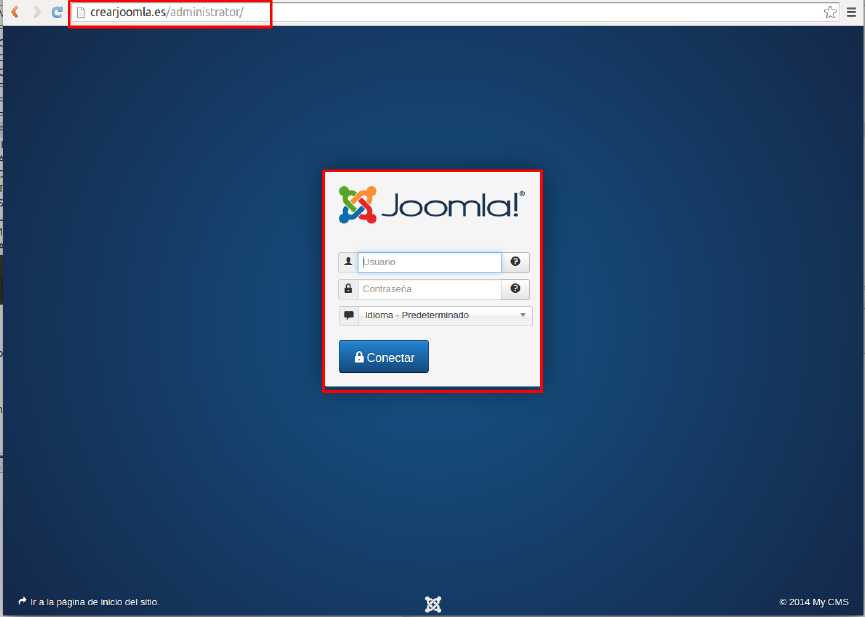
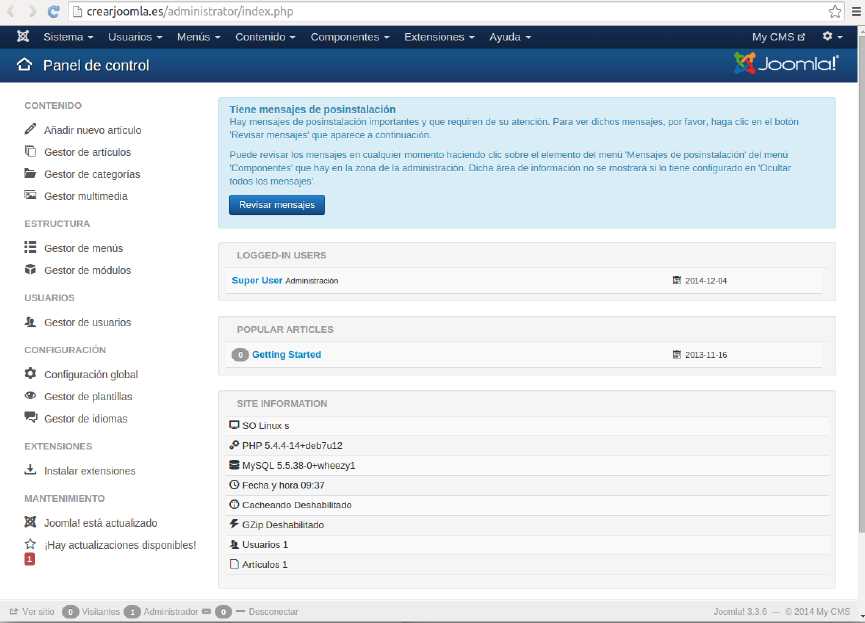
We can now access our Joomla administrative panel:
HOW TO MANAGE APPLICATIONS WITH PANEL PLESK
Installing Applications
Depending on your needs and level of experience, you can choose one of the following ways to install an application:
Fast: This is the easiest way to install an application. If you choose this path, Plesk will perform a typical installation of the latest version of the application for the selected application, Plesk will use the default values for the application settings. For example, your Plesk login credentials will be used as the application administrator credentials.
Note: Some applications require you to fill in certain settings, even if you select express installation. Personalized. This allows you to customize application installation settings, such as administrator credentials and location, installation path, and others. In particular, you should use custom installation if you want to disable automatic application updates.
To install an application:
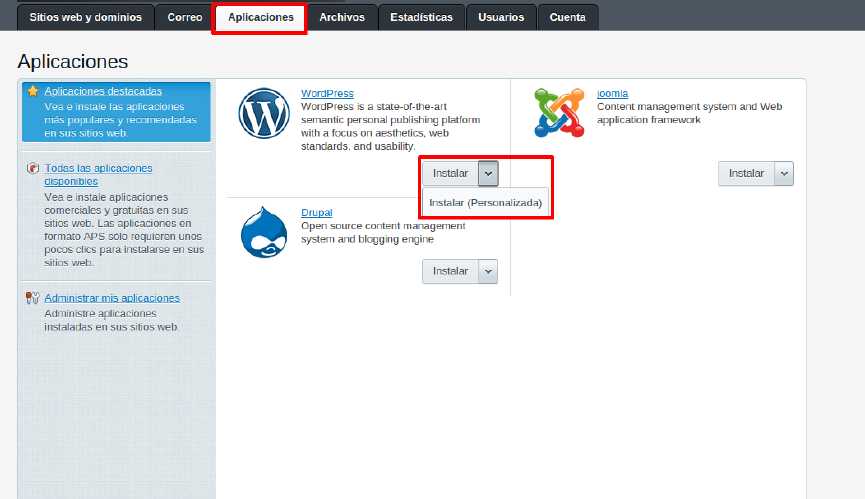
Select the tab "Applications" and find the application you need.
Click the "Install" button for quick installation or "Install (Custom)" for custom installation.
Example:
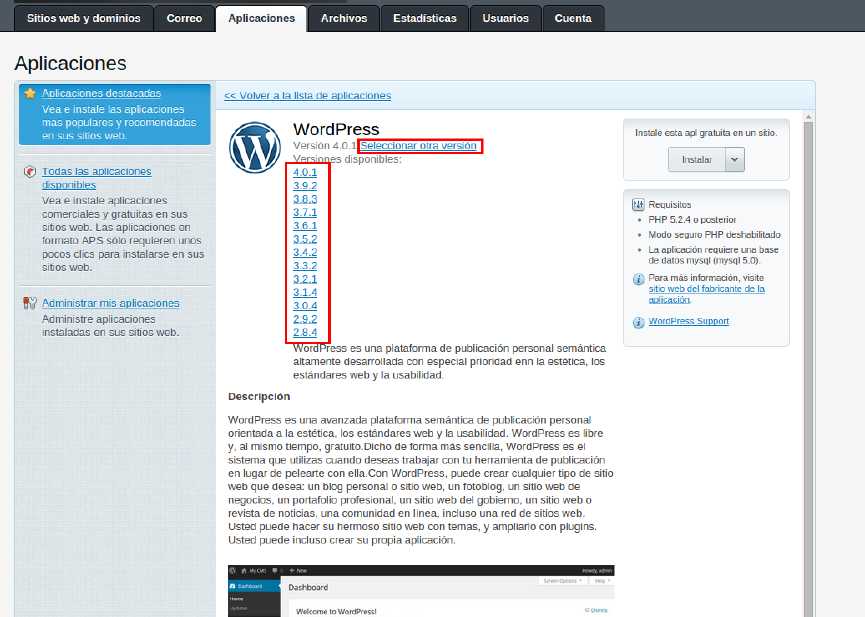
Sometimes you may have to install a specific version of an application. For example, if you want to use application extensions that are not compatible with the latest version of the application. In this case, click on the "Application name" Please select another version to select the version you need. Then install the application.
Example:
Note: For commercial applications, you need to obtain a license key, click on "Buy now" before starting the installation. For more information on using commercial applications, see the Commercial application license management section.
Application Management:
If an application provides a part of its Plesk functionality through services, you have the option to configure them. For example, the SugarCRM application allows the creation of user accounts and provides this capability as a service in the control panel. After selecting this service in the services provided, you can view all the application user accounts and create new ones. For some applications, you can associate the application accounts with the supporting user accounts. Learn more about account association in the Linking auxiliary user accounts and applications section.
Note: If WordPress Toolkit is installed on the server, users are advised to use it for centralized management of WordPress installations on the server.
Concession Auxiliary users of access to applications:
By default, after installing an application, only users with the owner role can access it. To allow other users of the subscription to access the application:
Grant the permission to access the application to a certain group of users in Users >> User roles. Make sure to add the users of your choice to the group.
Once you allow users to access the application, a link to the application appears on their websites and domains with the name of the corresponding web page. Note that you can only control application access for user groups, so you must either modify the permissions of an existing group or create a new one, and then assign users to it.
Auxiliary User Account Linking Applications:
Some applications allow you to create and manage user accounts without logging out of the application. If an application provides such an account type service, you can link users of a Plesk subscription with accounts in the application. To carry out this association:
Organize users into a specific group(Users >> User Roles).
Grant one of these group permissions:
Public access.
If granted, all users in the group will have access to the application through the link on the Websites and Domains page.
Personal access.
If granted, the application will automatically create the accounts of all users in the group. After that, users' websites and domains will contain an additional link that allows them to log into a personal account in the application. Please note that if personal access permission is denied, the app will automatically delete all accounts associated with this group.
Update apps
Automatic Updates
By default, Plesk installs the latest versions and updates of available applications once the new versions are available. However, updating an application can significantly change its functionality: For example, plug-ins or extensions developed for a particular version of the application may be incompatible with new versions. Therefore, you may want to disable automatic app updates.
To turn automatic updates on or off:
Go to Applications >> Manage My Applications and click on the application name.
Example:
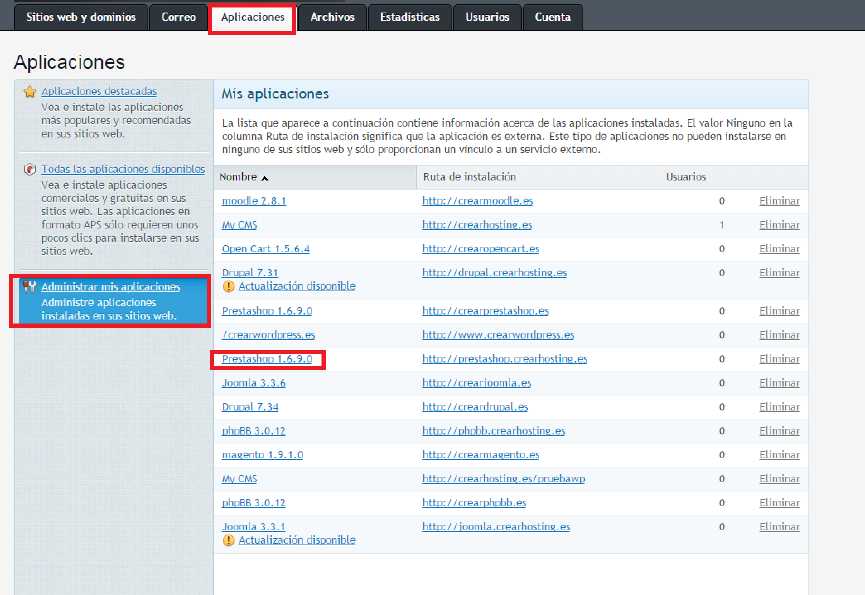
Click on setting:
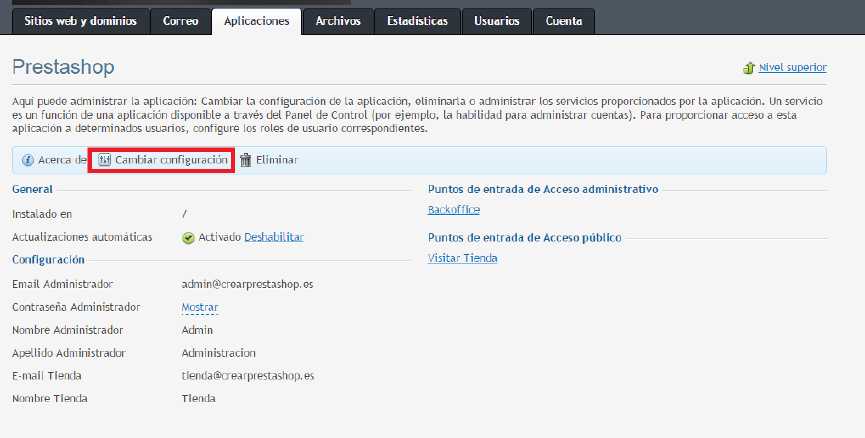
Select or deselect the option Automatically update this app when updates are available.

If you prohibit automatic updates for an app, Plesk will inform you about the availability of the latest versions by adding the update link available under the application name in Applications >> Manage My Applications.
HOW TO ACCESS DRUPAL ADMINISTRATION IN PANEL PLESK
To access the administration of our Drupal site we must follow the following steps:
There are two ways to access: From the Plesk panel or directly from the browser by writing the url of our domain in which our Drupal site is installed.
If we want to access from the Plesk panel:
Note: This option only appears if we have installed Drupal automatically from applications in the Plesk panel:
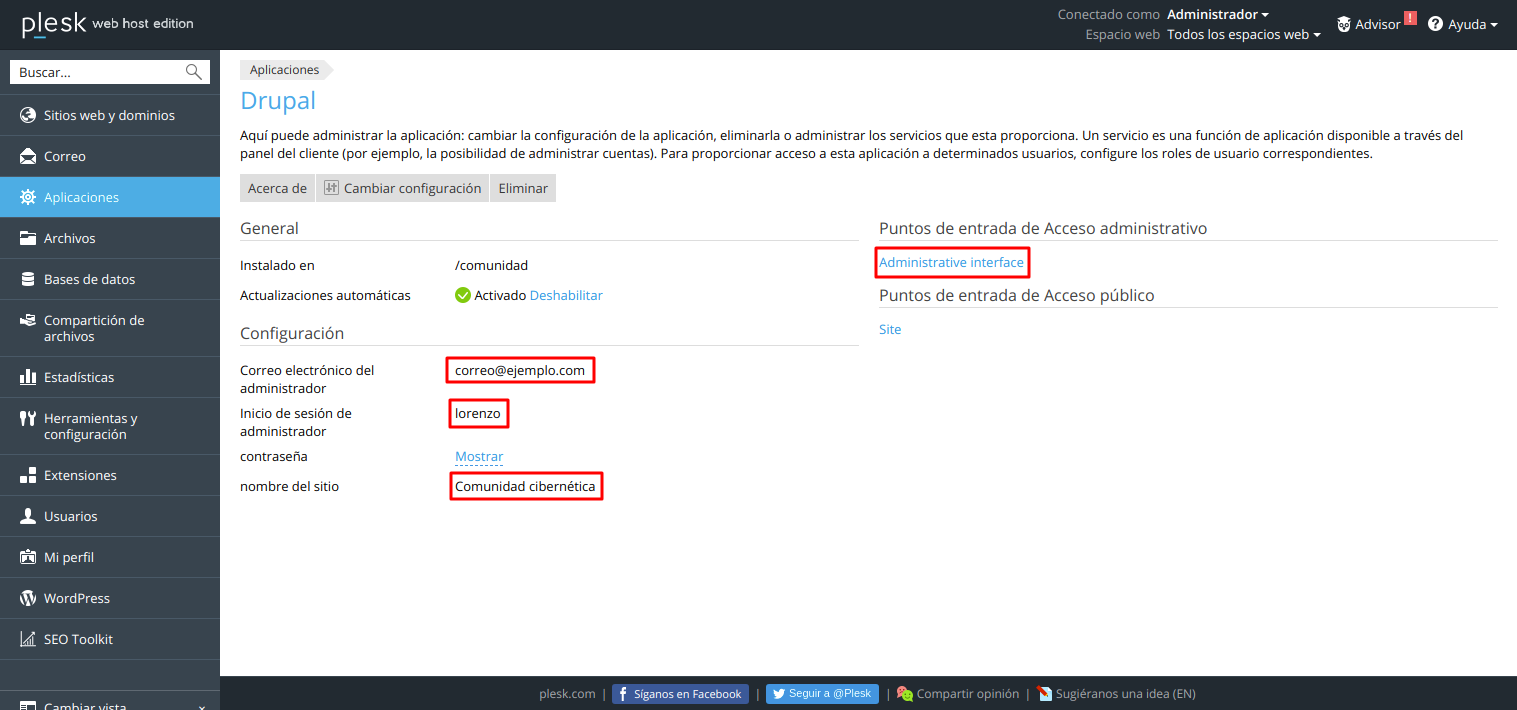
From the main tab of the Plesk panel "Websites domains" we will click on "Drupal" in the domain that contains our Drupal site:
Next we will click on Administrative Interface:

As the Plesk panel has the administrator user data saved, we can access the administration directly without authenticating.
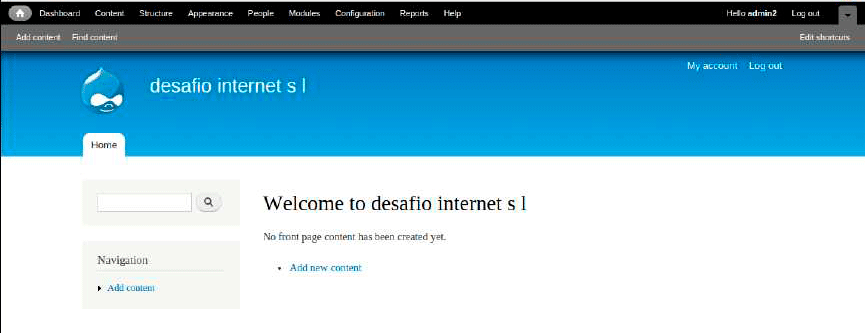
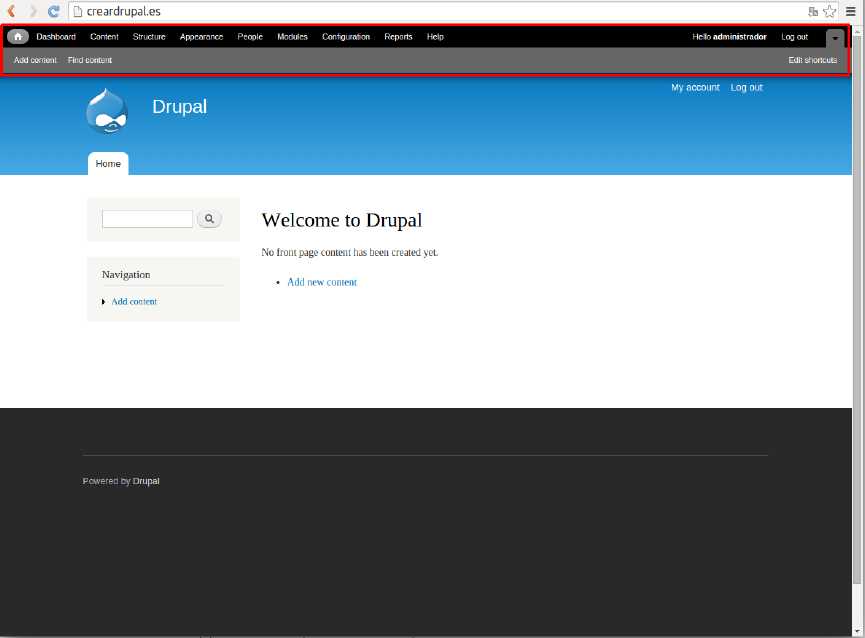
We can see that an administrative panel appears at the top of the page:
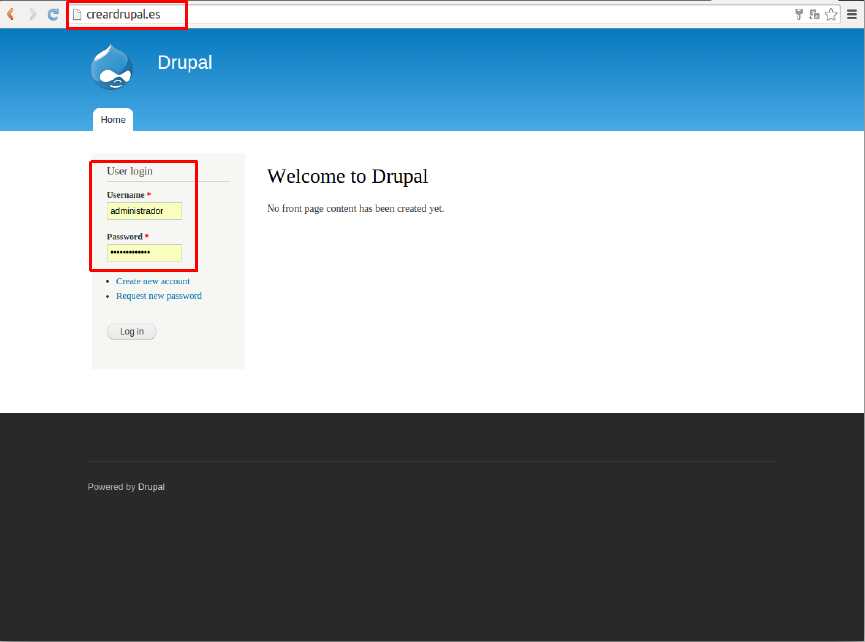
From the url of our domain:
We access our site in the normal way and then we must enter the name and password of the Drupal administrator user:
We already have access to the administration. We can see that the administrative panel appears at the top of the page:
HOW TO ACCESS JOOMLA ADMINISTRATION IN PANEL PLESK
To access the administrative panel of our Joomla we must follow the following steps:
There are two ways to access: From the Plesk panel or directly from the browser by writing the url of our domain in which joomla is installed.
If we want to access from the Plesk panel:
Note: This option only appears if we have installed Joomla automatically from the Plesk panel applications:
From the main tab of the Plesk panel "Websites domains" we will click on Joomla in the domain that contains our Joomla:
Next we will click on Administrative Interface:

Since the Plesk panel has the administrator user data saved, we can access the Joomla administration directly without the need to authenticate:
We now have access to the Joomla administrative panel:
-From the url of our domain:
We will write the following url in the internet browser:
yourdomain.com/administrator
(Instead of yourdomain.com you must put the name of your domain)
And then we are going to authenticate with the name and password of the Joomla administrator user:
We can see that we have already accessed the Joomla administrative panel:
HOW TO ACCESS MOODLE ADMINISTRATION IN PANEL PLESK
To access the administrative panel of our Moodle we must follow the following steps:
There are two ways to access: From the Plesk panel or directly in the browser by writing the url of our domain in which Moodle is installed.
If we want to access from the Plesk panel:
Note: This option only appears if we have installed Moodle automatically from the Plesk panel applications:
From the main tab of the Plesk panel "Websites domains" we will click on "Moodle" in the domain that contains our Moodle:
Then we will click Administrative interface:
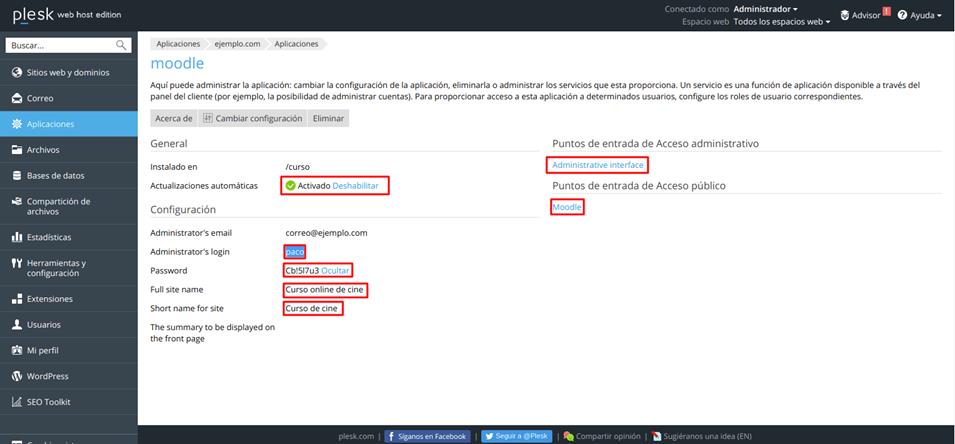
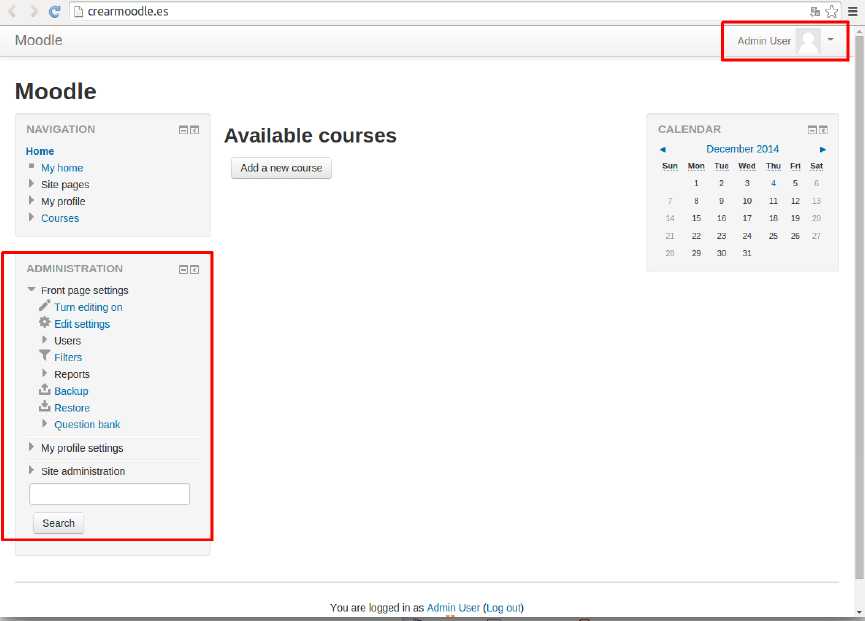
As the Plesk panel has the administrator user data saved, we can access the Moodle administration directly without needing to authenticate:
We can see the administration menu on the left:
-Directly from the url of our domain:
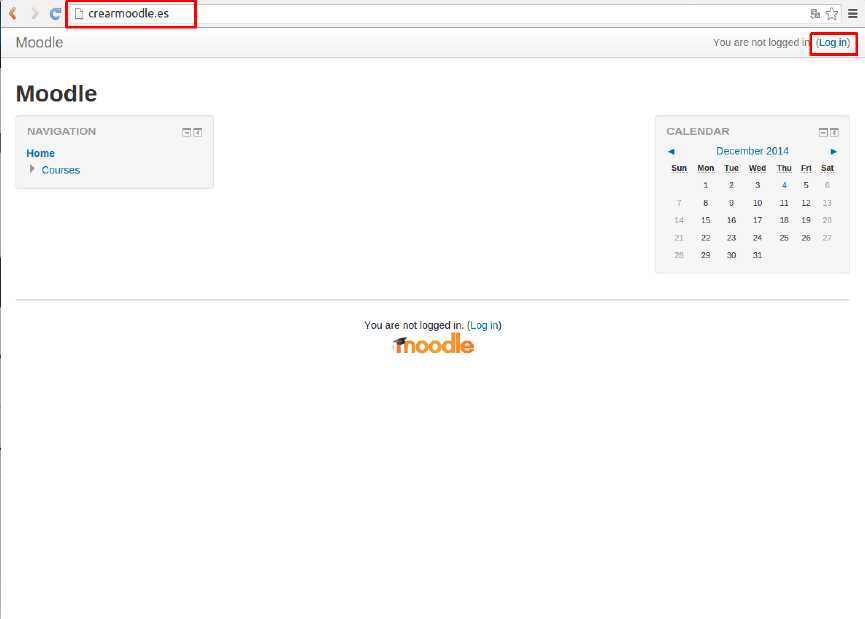
We access the main page of our domain
And then we will click on the option "Log in":
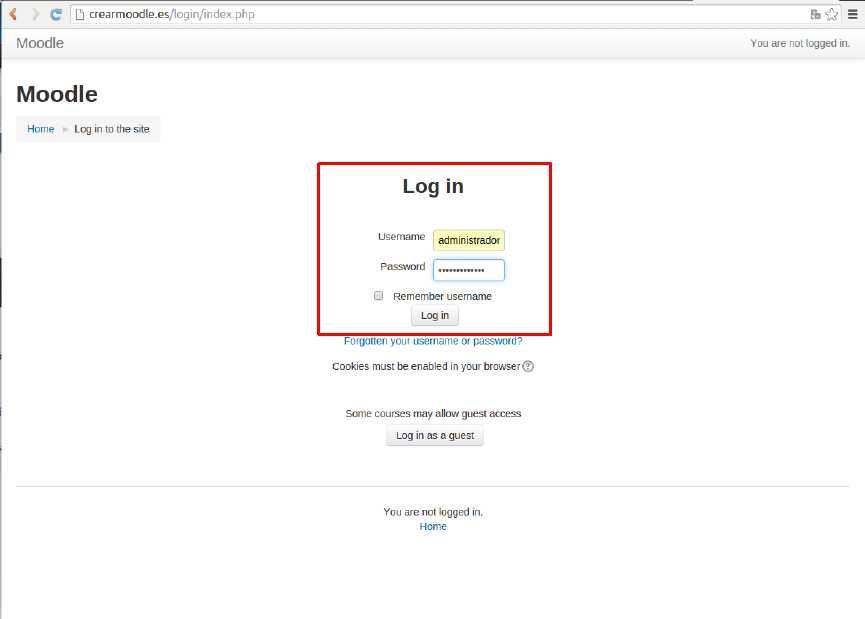
Now we will authenticate with the username and password of the moodle administrator:
We can see that we have started as administrator, and the moodle administration menu appears on the left: